Product Introduction
This improved USRP B210 is upgraded based on the classic Ettus USRP B210 reference design, targeting RF teaching, wireless algorithm prototyping, amateur radio, spectrum monitoring, software-defined radio research and communication system verification. It retains the classic USRP hardware architecture while optimizing the FPGA chip, interface and power supply layout, fully compatible with official UHD driver and GNU Radio ecosystem, and supports independent Vivado FPGA secondary development.
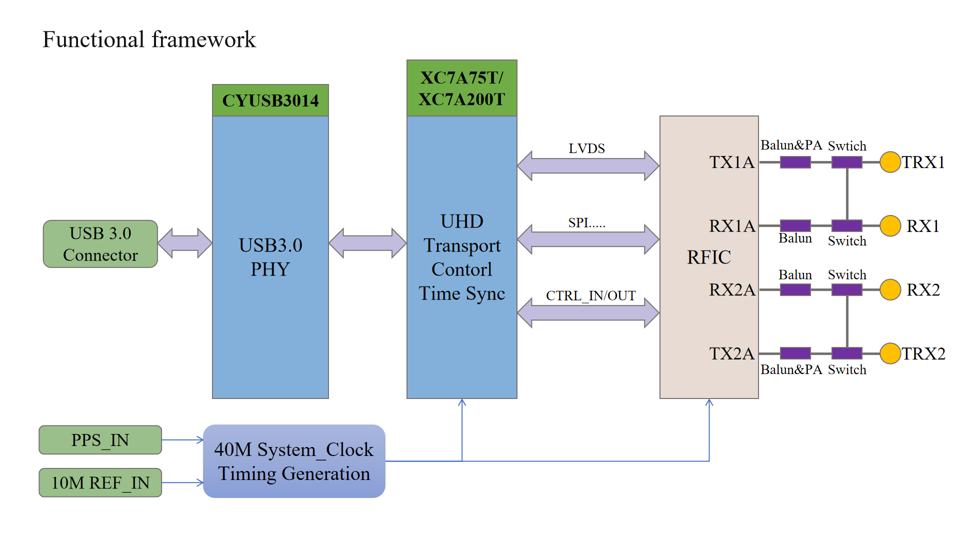
Centered on the high-performance AD9361 wideband agile RF transceiver paired with Xilinx XC7A75T-2FBG484I Artix-7 FPGA or Xilinx XC7A200T-2FBG484I Artix-7 FPGA (please note the XC7A75T or XC7A200T bundle), the upgraded USRP B210 features 2 independent receive channels and 2 independent transmit channels supporting full-duplex and half-duplex operation. It generates and captures RF analog signals covering 70 MHz to 6 GHz, with a maximum real-time instantaneous bandwidth of 56 MHz and flexible adjustable channel bandwidth from 200 kHz to 56 MHz. High-speed USB 3.0 Type-C bus serves as the data transmission and power supply interface, delivering stable 56 MHz real-time streaming bandwidth verified under native Linux systems, and compatible with Windows and Linux operating systems.
The board reserves MMCX external clock interfaces for 10 MHz reference clock and PPS synchronization signals, supporting external GPSDO clock input for high-precision time-frequency synchronization. Multiple SMA RF ports are equipped for TRX1, TRX2, RX1 and RX2, and an MX1.25 expansion connector is reserved for multi-channel GPIO extension and external hardware linkage. Multiple status indicator LEDs are integrated on board, including power supply, firmware loading, PPS lock, reference clock lock, and separate TX/RX status indicators for each RF channel to facilitate real-time working state observation. Compared with the original version, the new design removes the onboard GPSDO slot to reduce overall dimensions to 70*97 mm for better portability.
Integrated RF-Baseband Full-Spectrum Performance Matrix for USRP B210 (XC7A75T/XC7A200T)
Functional Specification Table of Peripheral Interfaces & Indicator LEDs
Core Advantages & Features
Native full-duplex 2TX+2RX independent channel, simultaneous transmit & receive support
Equipped with upgraded XC7A200T FPGA, fully compatible with Vivado for customized RF digital signal processing
High-speed USB3.0 Type-C port, up to 56MHz real-time bandwidth under native Linux; lossless large-volume IQ data transmission, durable plug-and-play
MMCX 10MHz reference clock and PPS pulse input, compatible with GPSDO for multi-SDR synchronous acquisition
Cross-platform support for Windows & Linux with UHD driver; nativ
Functional framework
Windows System Usage Tutorial
This chapter mainly introduces the construction of the software-defined radio environment and basic practical operation procedures for the Artix-7-based USRP B210 on the Windows 11 64-bit platform. It covers the deployment of low-level UHD drivers, environment configuration, troubleshooting of common faults, hardware verification, as well as the installation of multiple mainstream SDR tools and practical signal demodulation operations. A standardized device debugging and radio frequency signal testing solution for Windows is established.
UHD Driver Installation & Image Configuration
This section covers UHD library installation, environment variable configuration, fixes for missing dependencies and fx3 state 5 errors, and customized B210 FPGA image replacement to resolve device recognition failures.
Download & Install official UHD USB driver
UHD is the core library that allows all SDR software to communicate with the USRP B210. We will install the official Windows release driver.
Step1: Get installation package
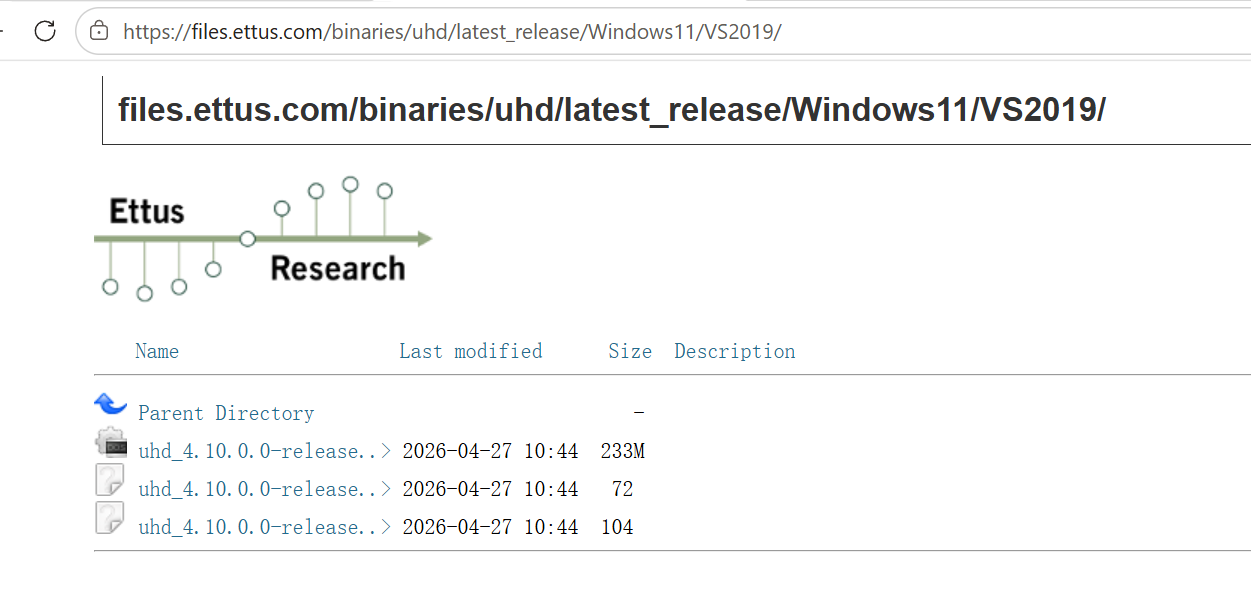
Open your browser and visit the URL: https://files.ettus.com/binaries/uhd/latest_release. This machine runs the 64-bit Windows 11 operating system. On the page, open the Windows 11 directory and download the first compatible driver installer uhd_4.6.0.0-release_Win64_VS2019.exe located within it. Alternatively, you may use the identical installer pre-included in the supporting resource package.
Step2: Run installer with administrator privilege
Run the installer as administrator. If a Windows SmartScreen warning pops up, click "More info" followed by "Run anyway". Follow the installation wizard: click "Next", accept the license agreement, then click "Install". The entire installation process takes approximately 30 seconds.
Step3: Hardware connection & device check
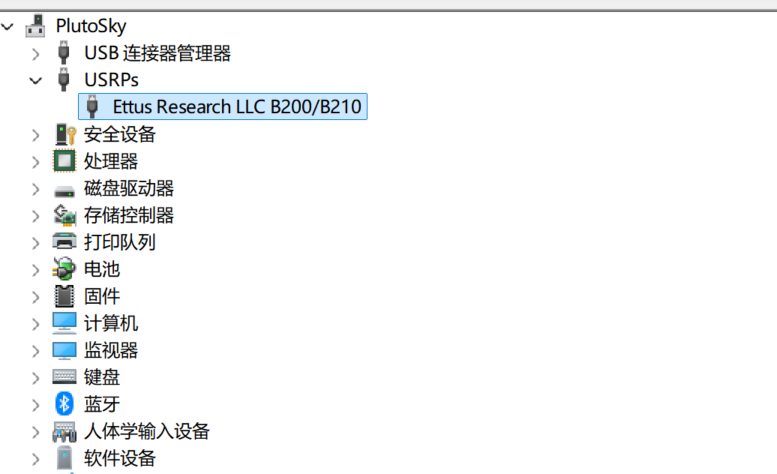
After installation, connect the Artix-7 USRP B210 to your computer via a USB cable. Open Device Manager; under normal circumstances, you will see Ettus Research LLC B200/B210 listed under the USRPs category.
Step4: Manual driver update for unrecognized device
If the device fails to enumerate automatically, right-click the unknown device and select "Update driver". Manually specify the driver folder located in the UHD installation directory, then unplug and replug the USB device afterward.
Environment variable configuration for UHD
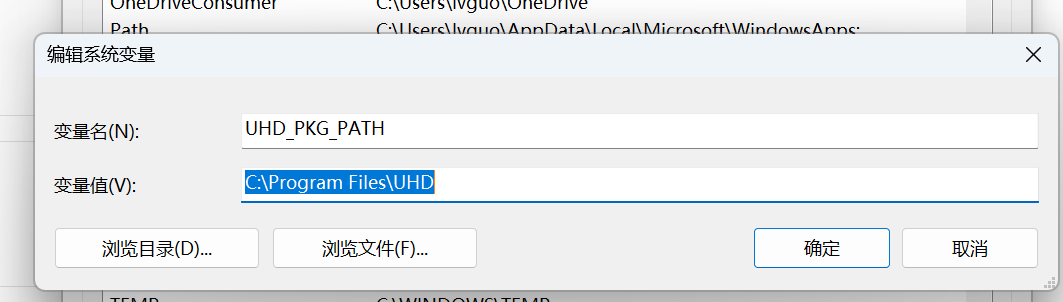
Press the Win + R shortcut keys to open the Run window, enter sysdm.cpl and click OK. Switch to the Advanced tab at the top of the popped-up System Properties window, then click the Environment Variables button. Create two new system environment variables named UHD_PKG_PATH and UHD_IMAGES_DIR, with their respective values set to C:\Program Files\UHD and C:\Program Files\UHD\bin.
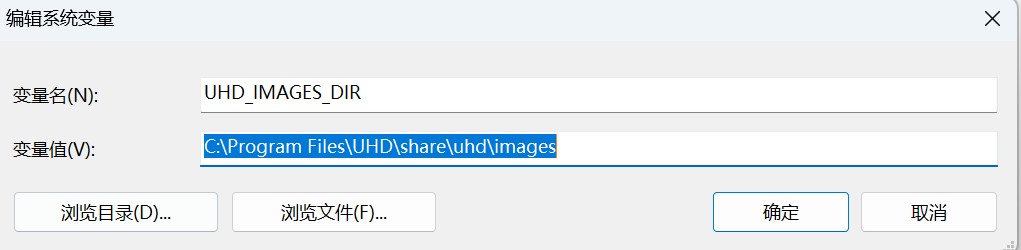
Save the configuration and reopen the Command Prompt window for the settings to take effect.
Troubleshooting the Missing libusb-1.0.dll Error
Connect the device with a USB cable, navigate to the bin folder under the UHD installation directory, type cmd in the address bar and press Enter to open Command Prompt, then run uhd_usrp_probe.exe. The system will pop up a prompt indicating that libusb-1.0.dll cannot be found.
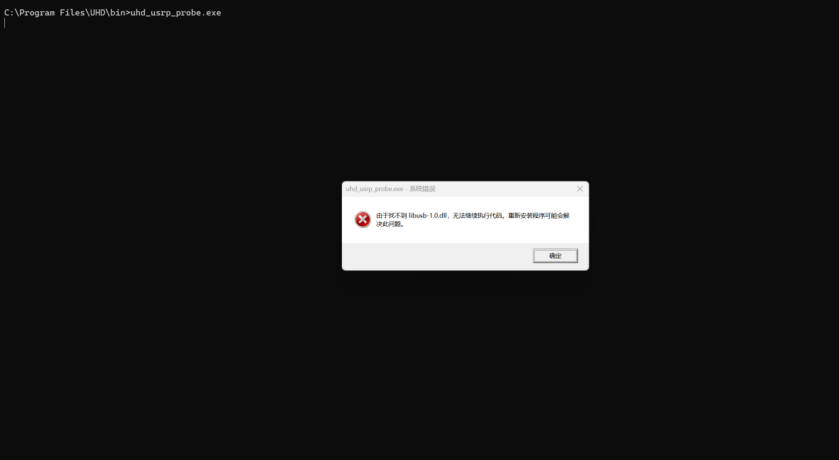
Solution: Copy the corresponding DLL file from the supporting resource package to the bin directory of UHD, then re-run the command.
Custom FPGA firmware replacement to fix fx3 state 5 error
Running uhd_usrp_probe triggers the error RuntimeError: fx3 is in state 5. This issue arises from mismatched FPGA image files. Follow the steps below to fix it:

Step 1: Locate the default storage path of the FPGA binary file
The terminal displays the loading path:
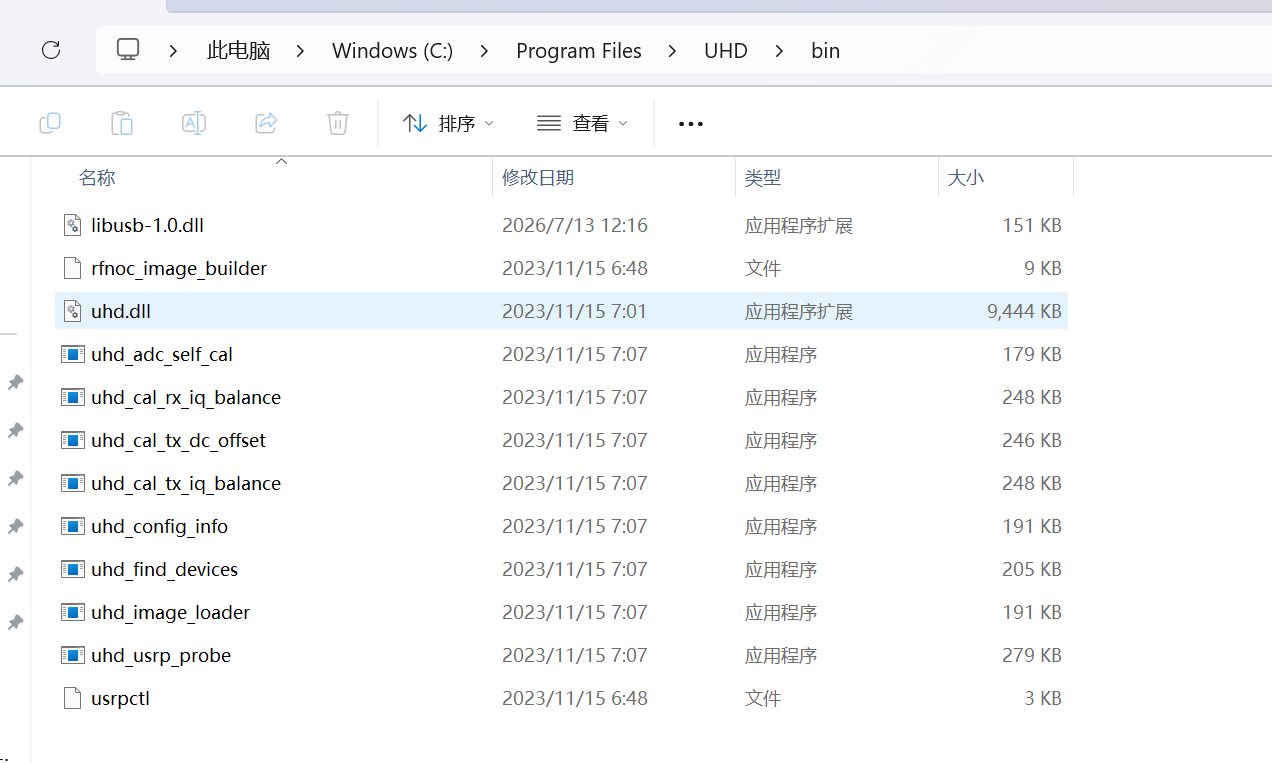
C:\Program Files\UHD\share\uhd\images\usrp_b210_fpga.bin

Step 2: Overwrite the original file
Copy the customized usrp_b210_fpga.bin file provided in the supporting resource package to the above image directory to replace the original file.
Step 3: Re-detect the hardware
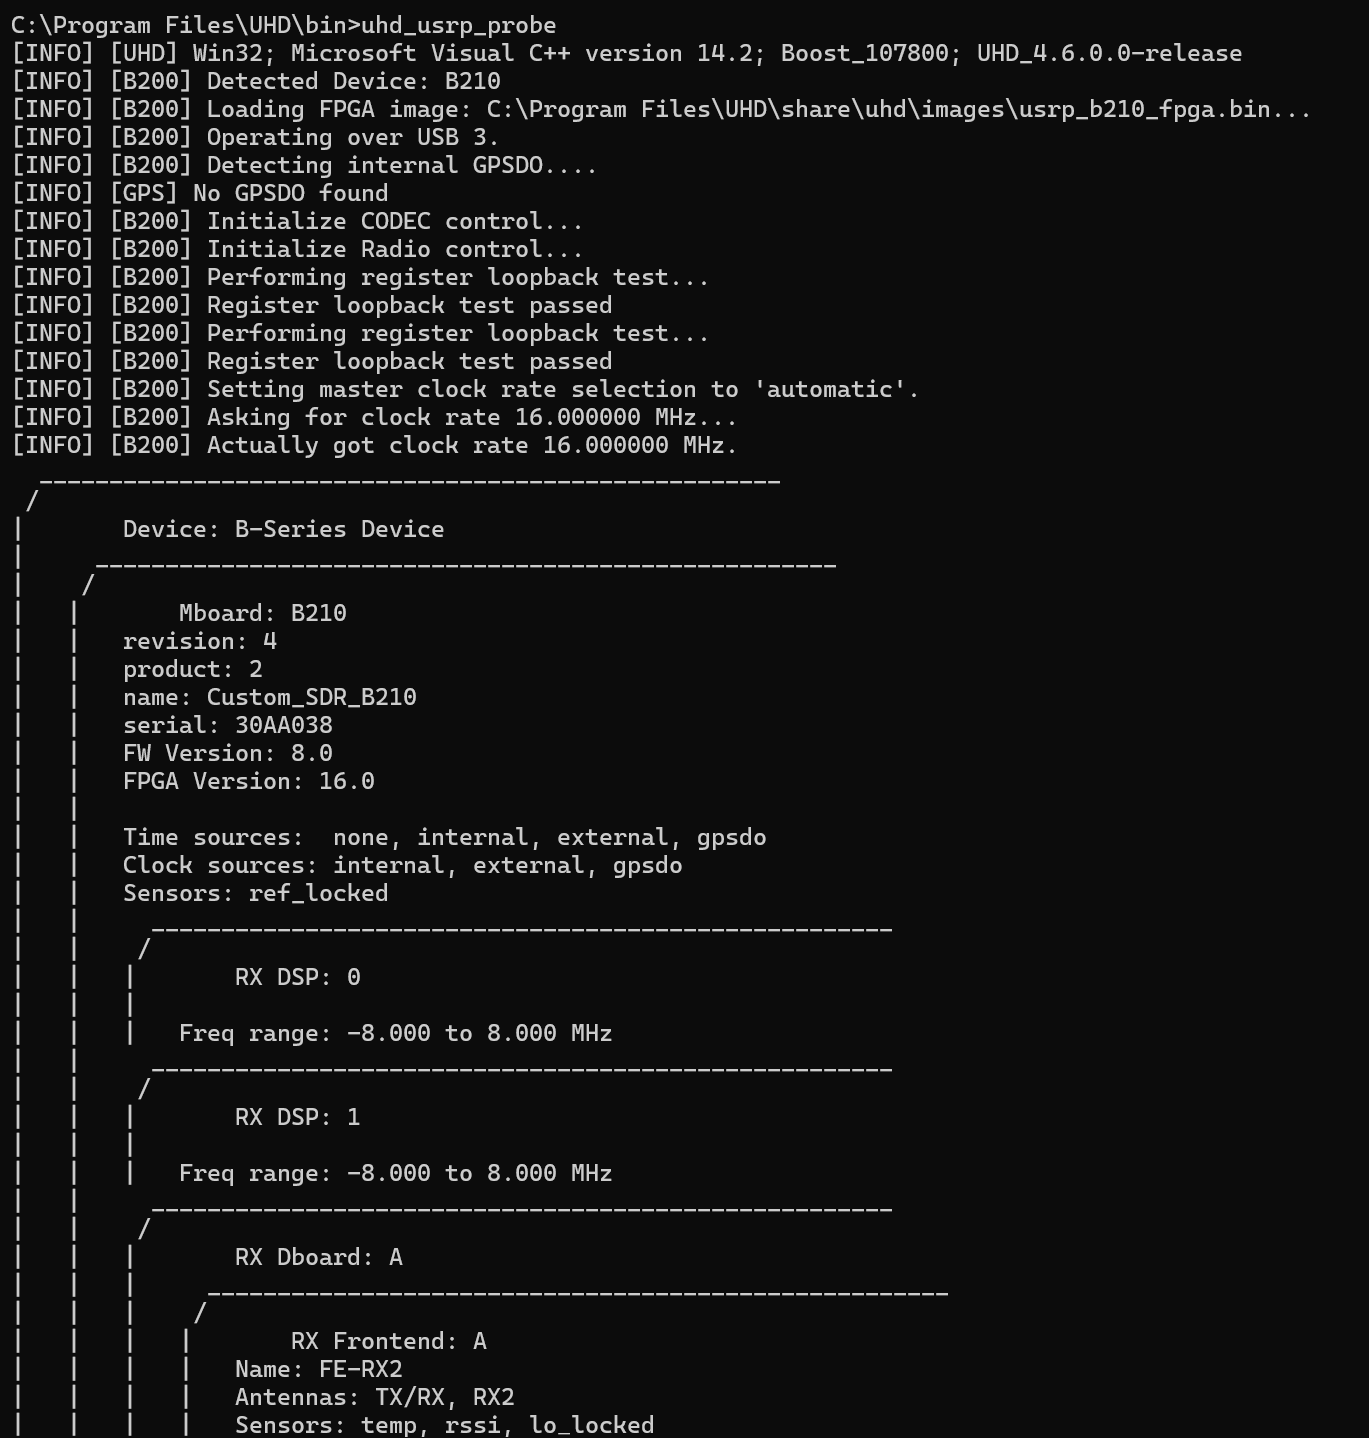
Rerun uhd_usrp_probe.exe. If the terminal fully outputs hardware parameters of the B210, including clock configuration, RF channels, FPGA version and other information, it indicates the driver and firmware are correctly matched.
Device Connection & Hardware Verification
This section introduces standard hardware wiring specifications and two official UHD detection commands for verifying that the communication link, firmware and driver between the host computer and the USRP device are all functioning properly.
Hardware wiring specification
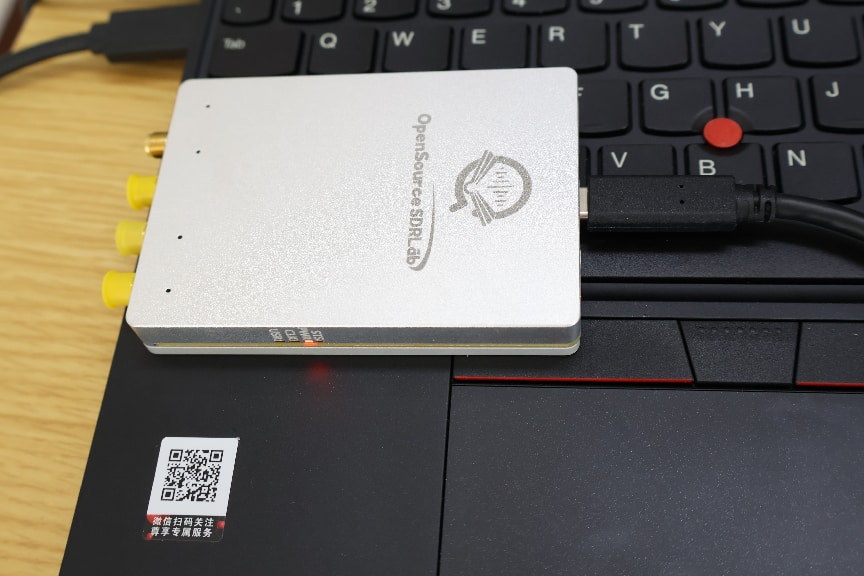
Connect the USRP B210 to your computer via a blue USB 3.0 port. USB 2.0 ports lack sufficient bandwidth, which will cause issues such as data disconnection, IQ sample packet loss and FPGA loading failures.
Two official UHD detection commands
Quick scan connected USRP devices: Navigate to the UHD bin directory and run the corresponding command in Command Prompt.
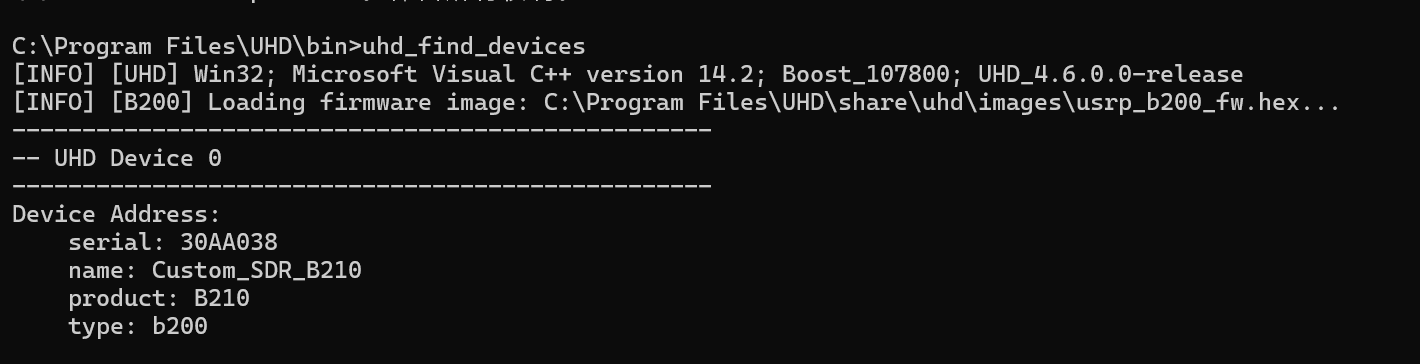
uhd_find_devices
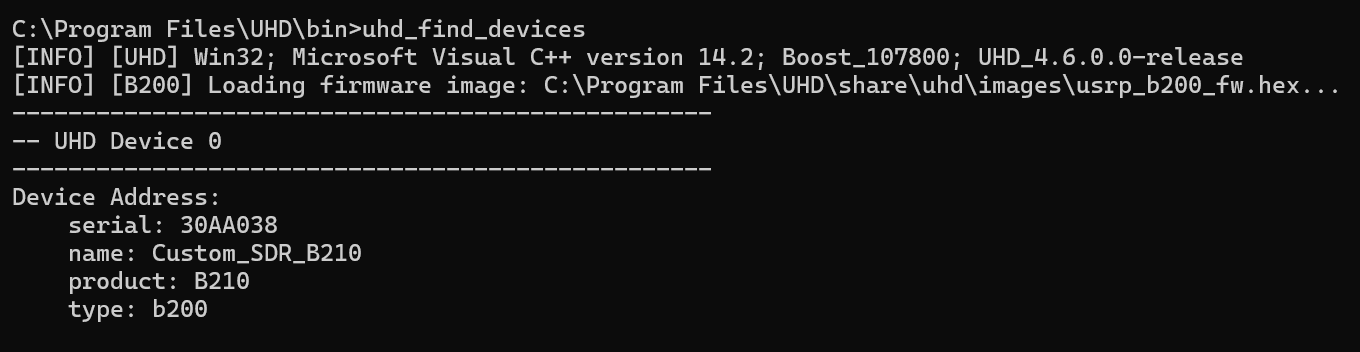
Normal output including device serial number, device name and product model B210 indicates that the hardware has been recognized by the system.
Full Hardware Probe for Complete Device Information via Command Prompt
uhd_usrp_probe
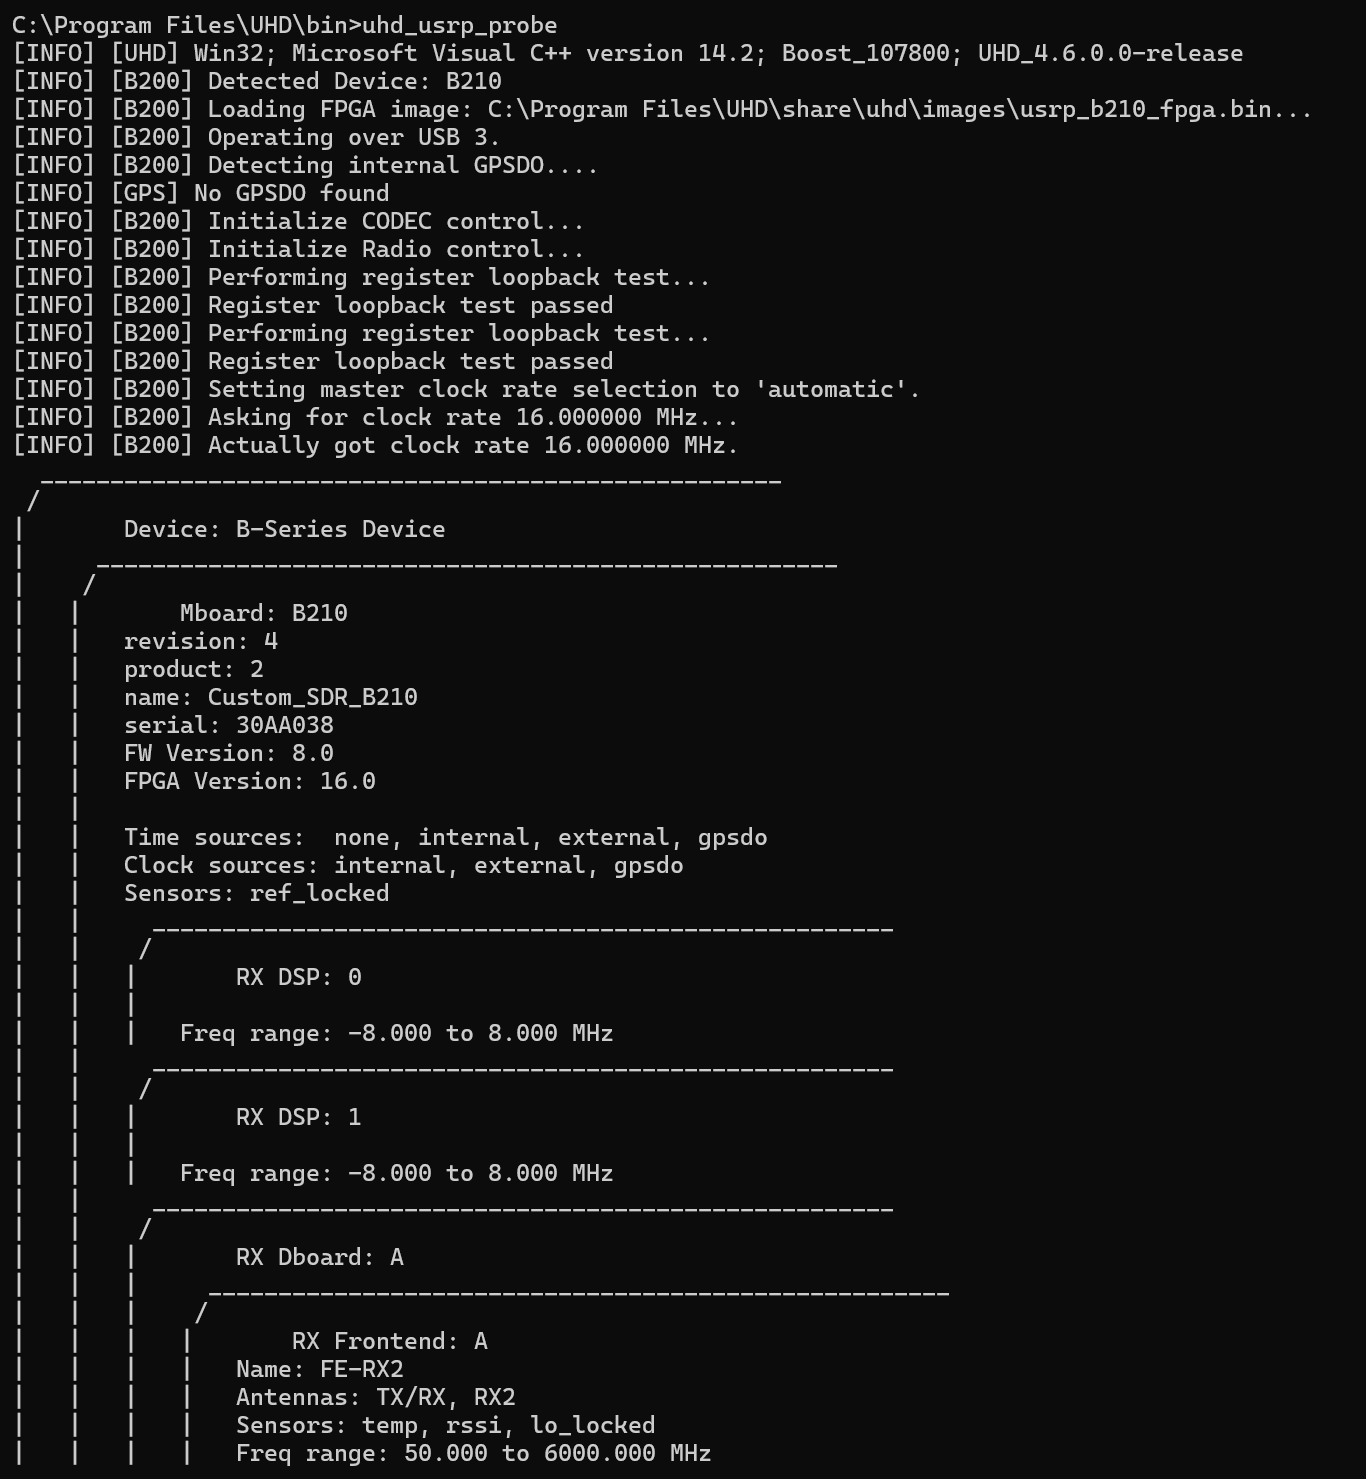
The terminal will fully display details including FPGA version, firmware version, RF transmit/receive channels, frequency range, gain range, clock source and loop self-test results. A passed loop test means the device can normally transmit and receive RF signals.
SDRangel Installation and Usage
This section covers installing SDRangel, an SDR visualization software, and demonstrates FM reception & demodulation using the USRP B210.
Download & install SDRangel software
Step1: Download installation package
https://github.com/f4exb/sdrangel/releases
Download the latest Windows EXE installer.
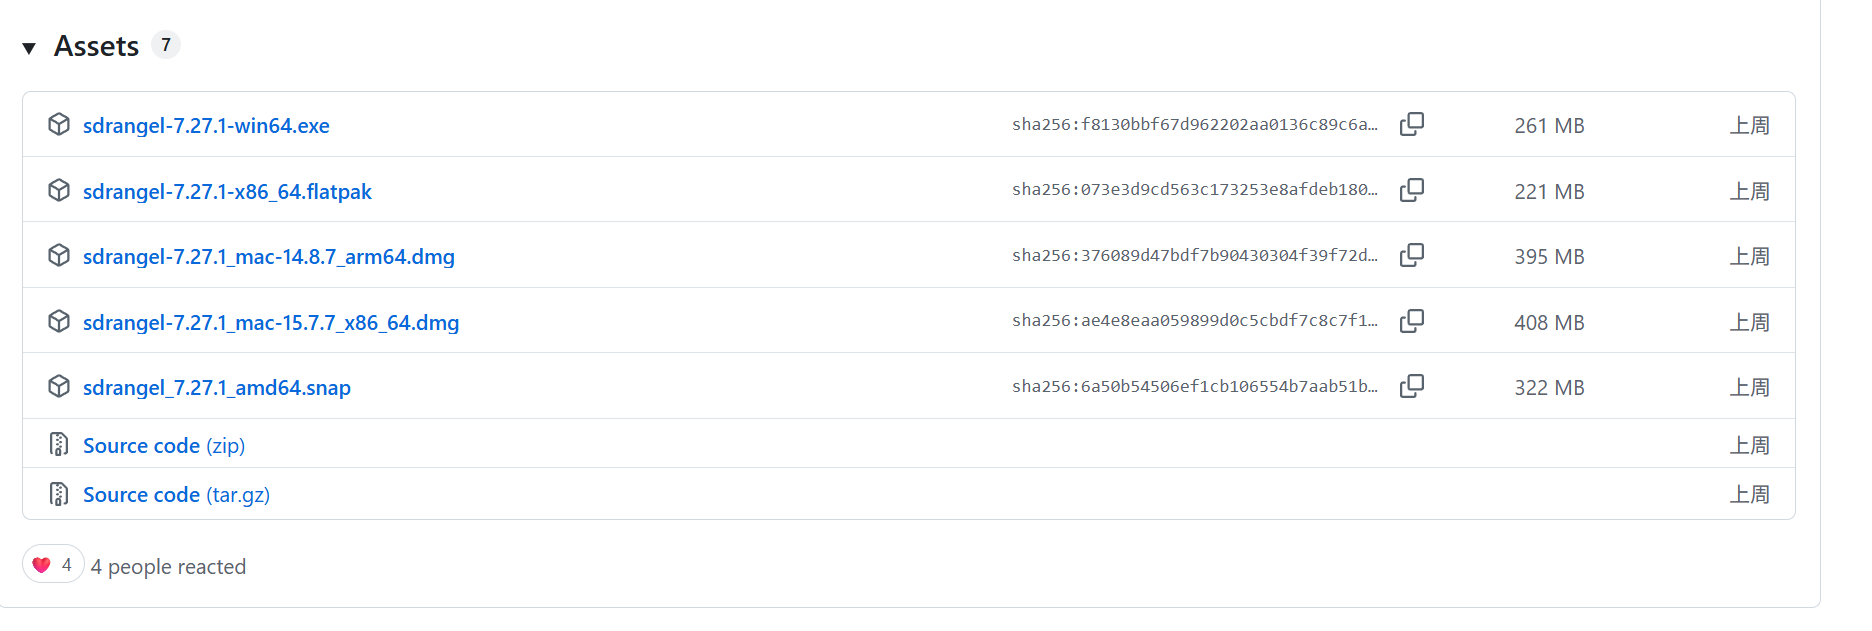
Step2: Install with administrator privilege
Right-click the installation package and select Run as administrator.
Click Yes in the Windows User Account Control pop-up window, then follow the wizard and click Next to finish the installation.
FM Broadcast Demodulation with USRP Device
Connect the USRP B210 via USB, and run uhd_find_devices in advance to confirm the device can be detected.
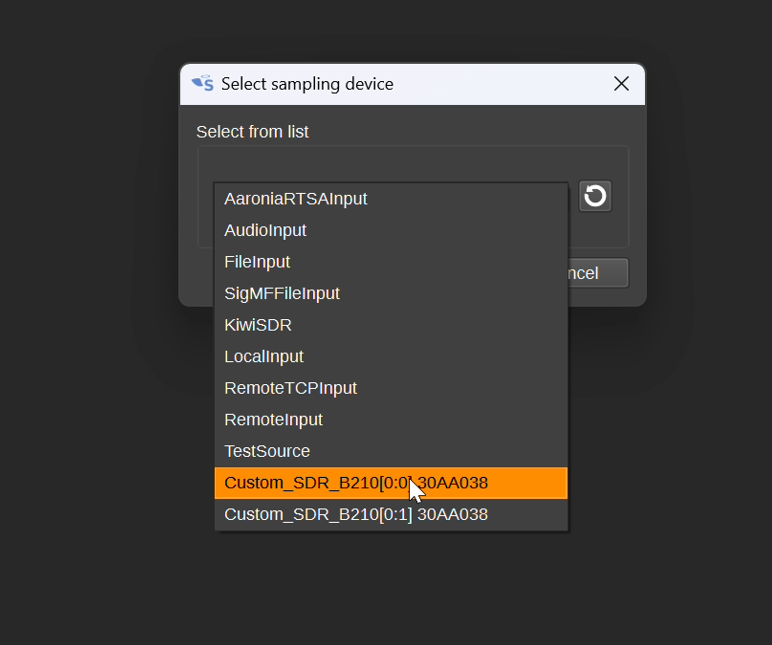
Launch SDRangel, click Add Receiver on the blank workspace, and select USRP from the hardware list.
Configure device parameters on the panel: fill in the local FM frequency as the center frequency (example: 103.9 MHz) and set the sample rate to 2.5 Msps
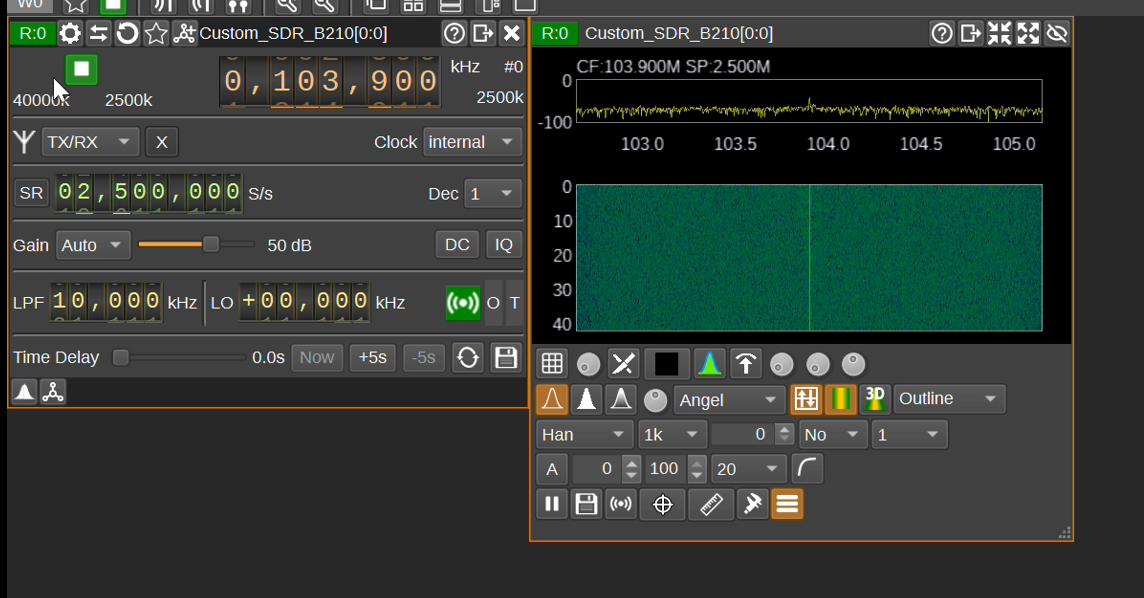
Center Frequency
Sample Rate
Click the purple play button to start RF reception; the spectrum and waterfall diagram will be displayed in real time on the interface.
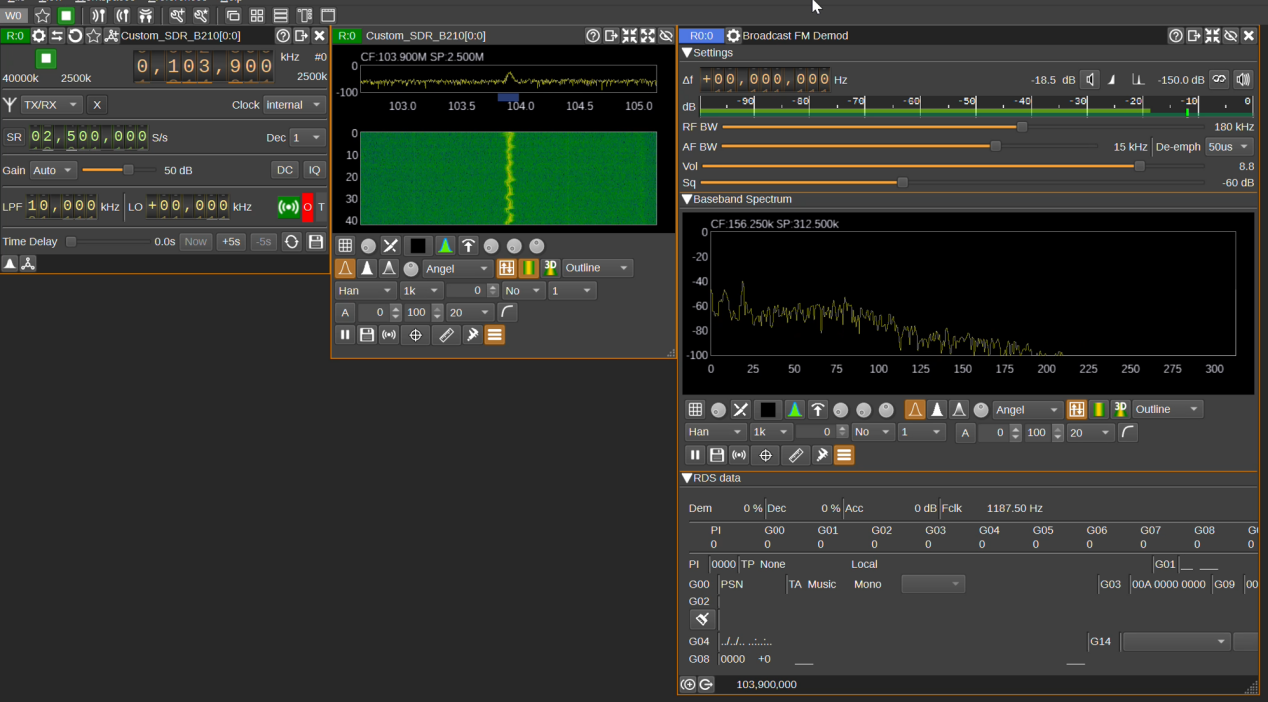
Click Add Channel, select Broadcast FM Demodulator as the demodulator type, fine-tune channel parameters, and broadcast audio will be output through computer speakers.
Universal Radio Hacker (URH) Installation and Usage
This section covers URH (wireless signal reverse engineering and IQ analysis tool), demonstrating raw RF IQ data capture with USRP B210 for offline analysis.
Download & install URH signal analysis tool
Step1: Download Installer
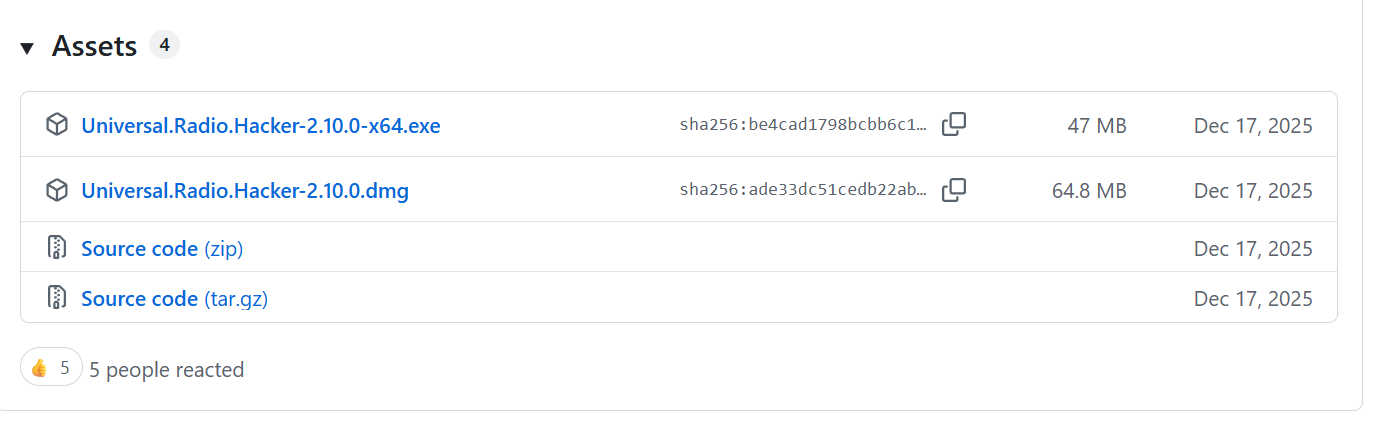
Open the URH release page at https://github.com/jopohl/urh/releases and download the Windows 64-bit installer Universal.Radio.Hacker-2.10.0-x64.exe.
Step2: Complete Installation
Right-click the installer and run it as administrator, then follow the setup wizard and click Next to finish the installation.
USRP Device Scanning and IQ Raw Data Recording in URH
After launching the software, open the File menu and click the red Record button. In the recording window, select USRP as the hardware device and tap the green refresh icon to detect connected equipment.
Set the center frequency to your target signal frequency (e.g. 103.9 MHz), bandwidth to 2.1 MHz and sample rate to 2.1 MSPS. Adjust RF gain as required, with 25 dB as the initial value. Click Start to begin recording, then hit Stop after 10 to 30 seconds.
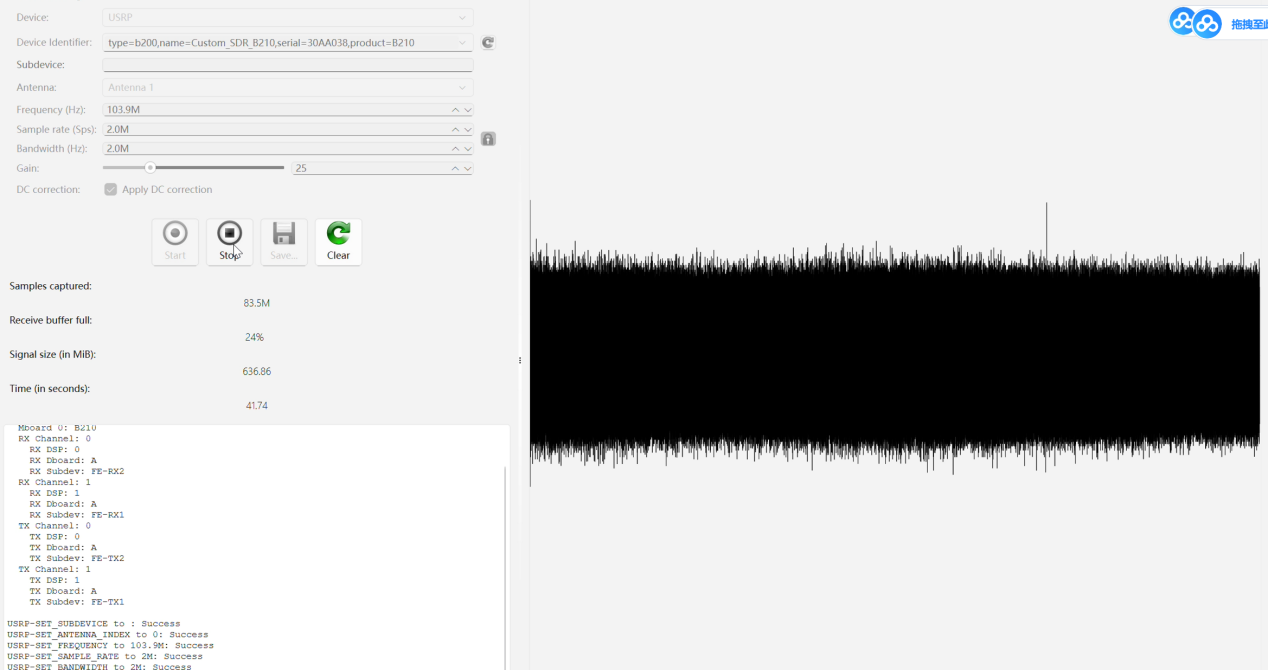
You can now save the recorded IQ data to a file for later analysis or replay.
GNURadio Installation and Usage
This section covers Windows deployment of GNU Radio, a graphical SDR framework, and walks through building an FM demodulation reception flowgraph.
Install GNU Radio via Radioconda
Step 1: Download the Installation Package
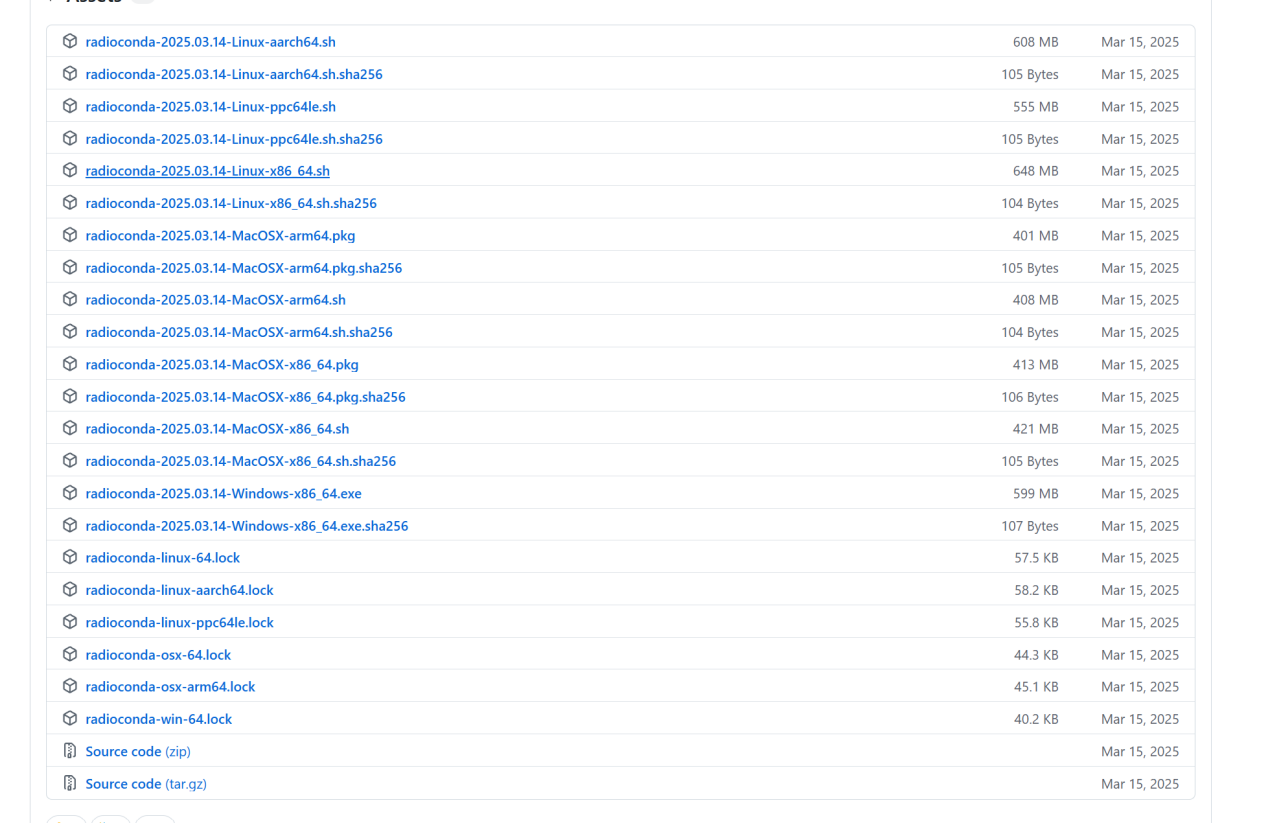
Visit https://github.com/radioconda/radioconda-installer/releases and download the Windows x86_64 EXE installer.
Step 2: Finish Installation via the Setup Wizard
Run the installer and complete the installation by following the on-screen setup wizard prompts.
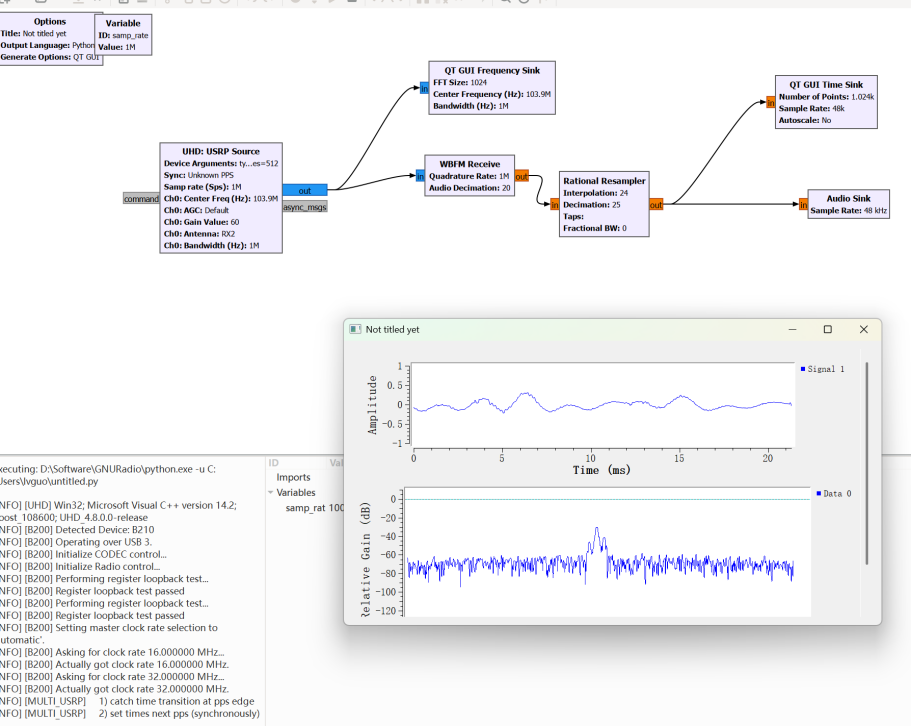
Build USRP-Based FM Broadcast Receiver Flowgraph
1.Connect the antenna to the RX1 port of the USRP device, then launch GNU Radio Companion from the Start Menu.
2.Drag and drop the following modules onto the canvas: UHD: USRP Source, WBFM Receive, QT GUI Frequency Sink, Rational Resampler, QT GUI Time Sink, and Audio Sink.
3.Parameter configuration:
UHD: USRP Source: Center frequency set to 103.9 MHz, sampling rate 1.0 MHz, receive gain 60 dB, and bandwidth consistent with the device sampling rate.
WBFM Receive: Quadrature rate matched to the device sampling rate, audio decimation factor of 20.
Rational Resampler: Interpolation factor 24, decimation factor 25.
Audio Sink: Audio sample rate set to 48 kHz.
Port of UHD: USRP Source → Input port of WBFM Receive; Output port of WBFM Receive → Input port of Rational Resampler; Output port of Rational Resampler → Input port of Audio Sink.
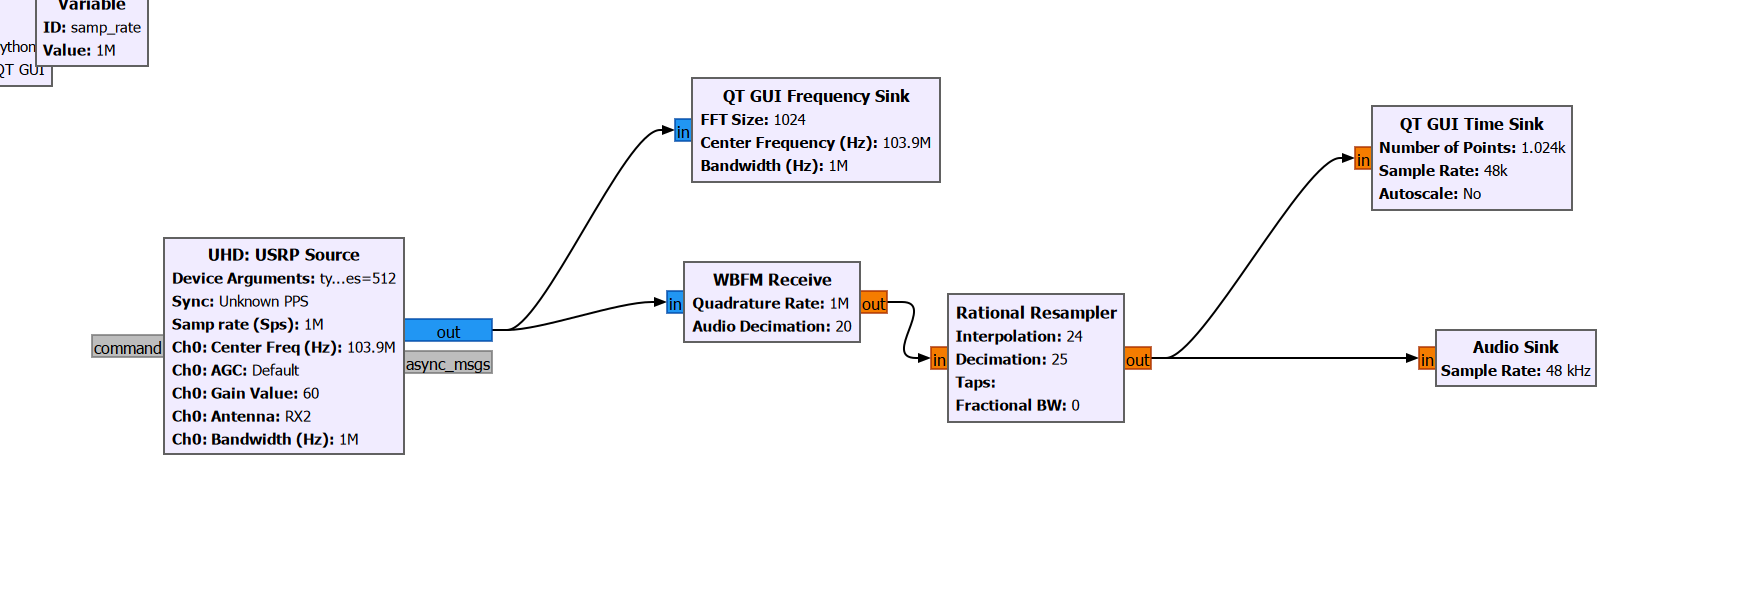
5.Save the flowgraph and click the execute button. After compilation finishes, you may listen to the FM broadcast.
SDRSharp Installation and Usage
This section covers SDRSharp deployment and firmware replacement. Connect the Artix-7 USRP B210 using the USRP ExtIO driver and configure parameters to receive 103.9 MHz FM broadcasts.
Install SDRSharp
First, locate the SDRSharp.zip file in the software package we provided, extract and install it. Next, double-click SDRSharp.exe to launch the program, which is ready for immediate use.
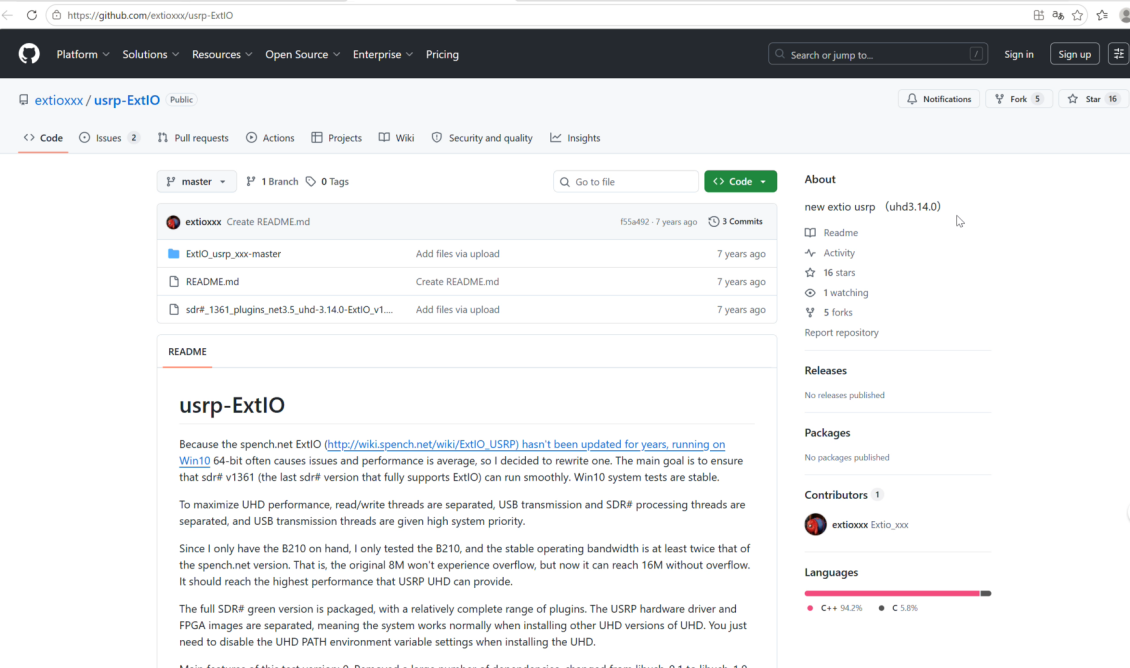
Alternatively, go to the GitHub repo: GitHub - extioxxx/usrp-ExtIO: new extio usrp(uhd3.14.0) to download the SDR# package preintegrated with the USRP plugin. Unzip the archive and extract its internal subpackage sdr#_1361_plugins_net3.5_uhd-3.14.0-ExtIO_v1.0.xxx-win32. Copy the custom firmware usrp_b210_fpga.bin from the resource pack into this folder to overwrite the original file, then double-click SDRSharp to launch the software.
Use SDRSharp to receive FM radio broadcasts
On the top left corner, open the "Source" drop-down menu and select "USRP - ExtIO_usrp.dll".
Note: If the software fails to detect the Artix-7 USRP B210, it is mostly caused by missing replacement of the custom firmware usrp_b210_fpga.bin. Re-overwrite this file to fix the issue.
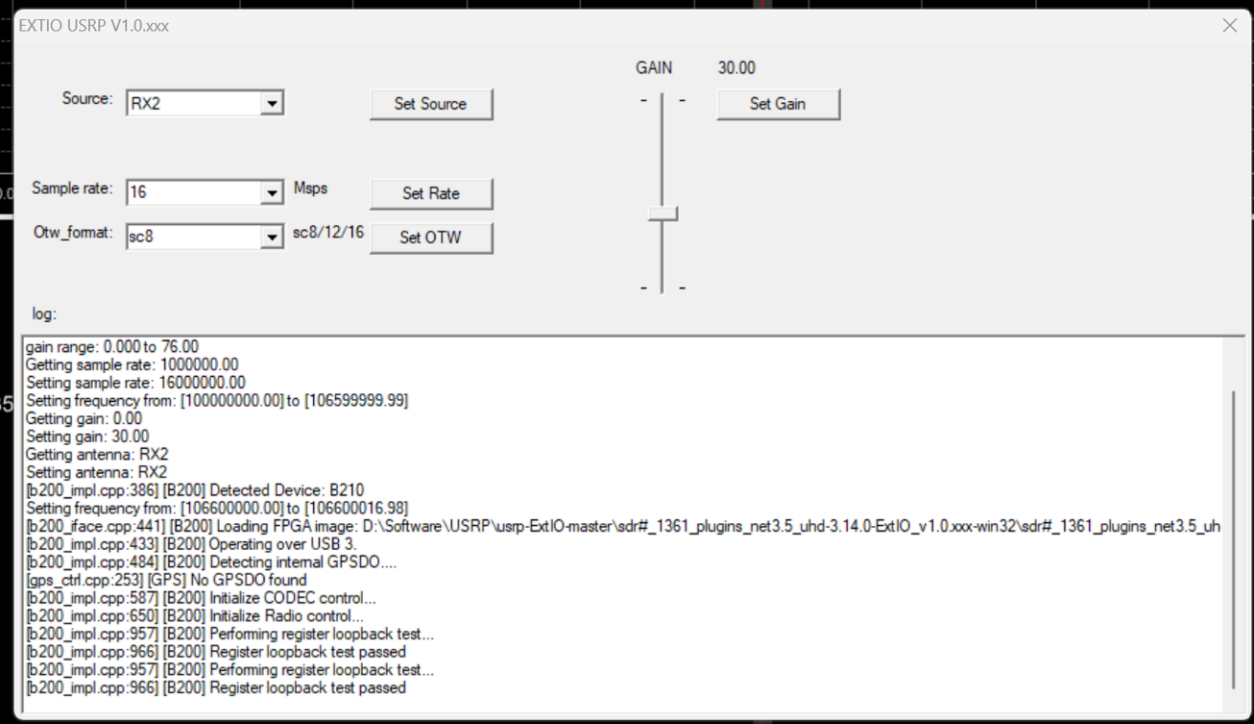
Next, click the adjacent Configure button. In the pop-up configuration window, device parameters will be automatically detected and filled, and full initialization logs will be displayed in the log panel, indicating successful hardware connection.
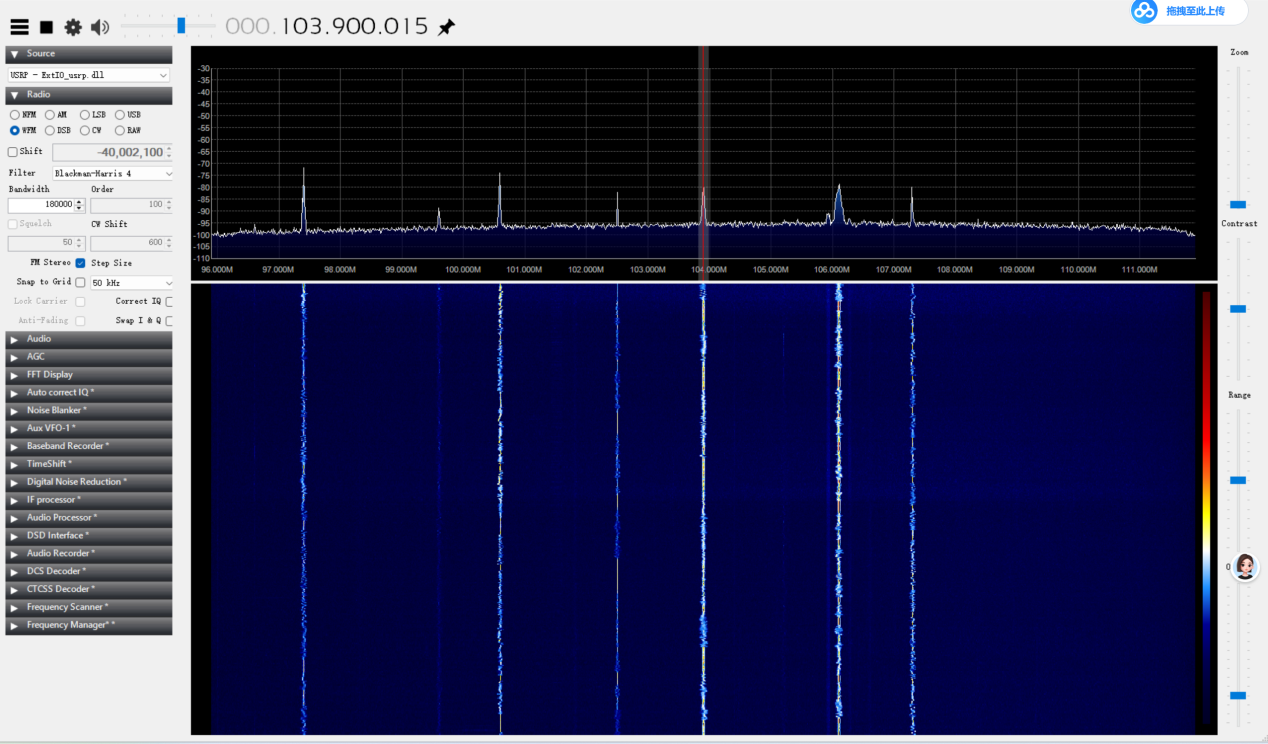
Now tune the parameters for receiving the 103.9 MHz FM broadcast: enter the center frequency of 103.9M, select WFM from the radio mode dropdown on the right, and set the bandwidth to 180000.
Click the play button to listen to the radio.
Ubuntu System Usage Tutorial
This chapter presents the complete setup and practical experiment workflow of the Artix-7 upgraded USRP B210 on Ubuntu. Contents include UHD deployment, FPGA firmware replacement, hardware validation, installation of mainstream SDR applications, command-line transceiver tests and advanced RF experiments. A unified standard debugging workflow is built for SDR development based on USRP B210.
UHD Driver Installation & Image Configuration
This section covers the core UHD communication library installation and customized B210 FPGA mirror replacement, solving fx3 is in state 5 device recognition failure error.
Update system source & install core UHD library
UHD is the core library that allows all SDR software to communicate with the USRP B210. We will install it from the official Ubuntu repository.
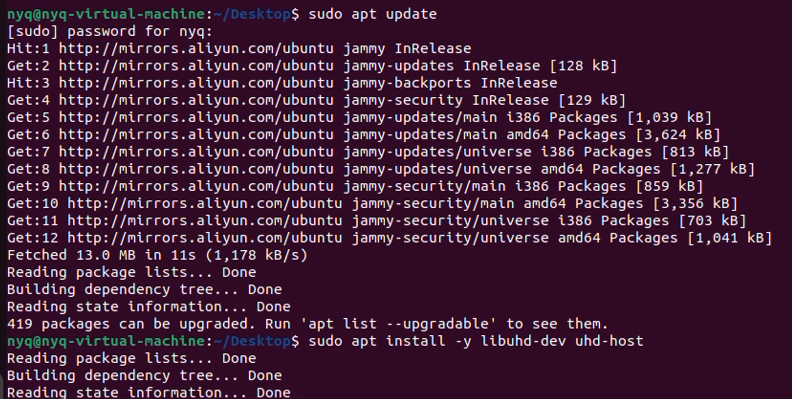
First, open the terminal and update the package list:
sudo apt update
Install the UHD driver and development files:
sudo apt install -y libuhd-dev uhd-host
Create FPGA image directory and configure environment variables
Create a directory to store FPGA images and set proper permissions:
sudo mkdir -p ~/B210/B210_images
sudo chmod 666 ~/B210/B210_images
Locate the download script path:
find /usr -name "uhd_images_downloader.py" 2>/dev/null
Note: The path varies for different users, please use your own path to download firmware.
Set the environment variable for UHD to find the images:
export UHD_IMAGES_DIR=~/B210/B210_images/

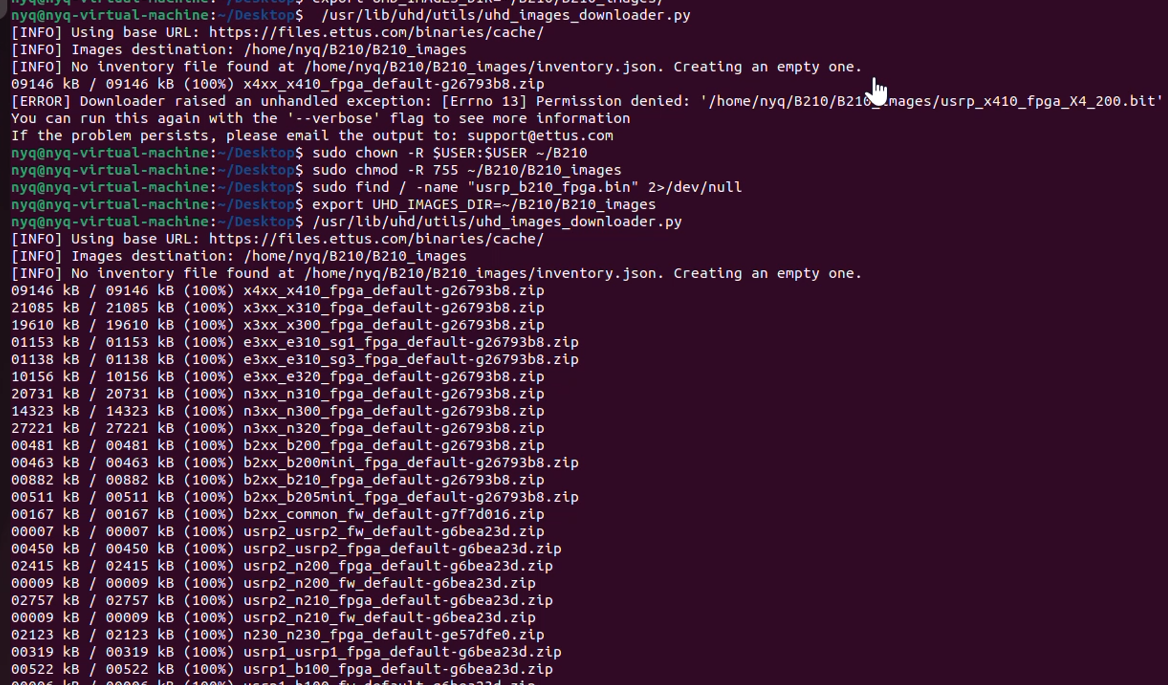
Official firmware download & permission error troubleshooting
Download the official firmware and FPGA images:
/usr/lib/uhd/utils/uhd_images_downloader.py
Note: You may encounter a [Errno 13] Permission denied error. To resolve this, change the directory’s owner to your current user account, which will grant you full control over it.
sudo chown -R $USER:$USER ~/B210
Add full recursive permissions to the directory:
sudo chmod -R 755 ~/B210/B210_images
Reset the environment variable and re-run the downloader:
export UHD_IMAGES_DIR=~/B210/B210_images /usr/lib/uhd/utils/uhd_images_downloader.py
Custom FPGA firmware replacement operation
Copy the custom usrp_b210_fpga.bin file we provided into the image directory to replace the original file. Without replacement, the system cannot detect the device and throw RuntimeError: fx3 is in state 5.
Step1: Locate the original firmware file
sudo find / -name "usrp_b210_fpga.bin" 2>/dev/null
The default storage path example:
/home/nyq/B210/B210_images/usrp_b210_fpga.bin

Step2: Delete the original firmware
cd /home/nyq/B210/B210_images
sudo rm usrp_b210_fpga.bin

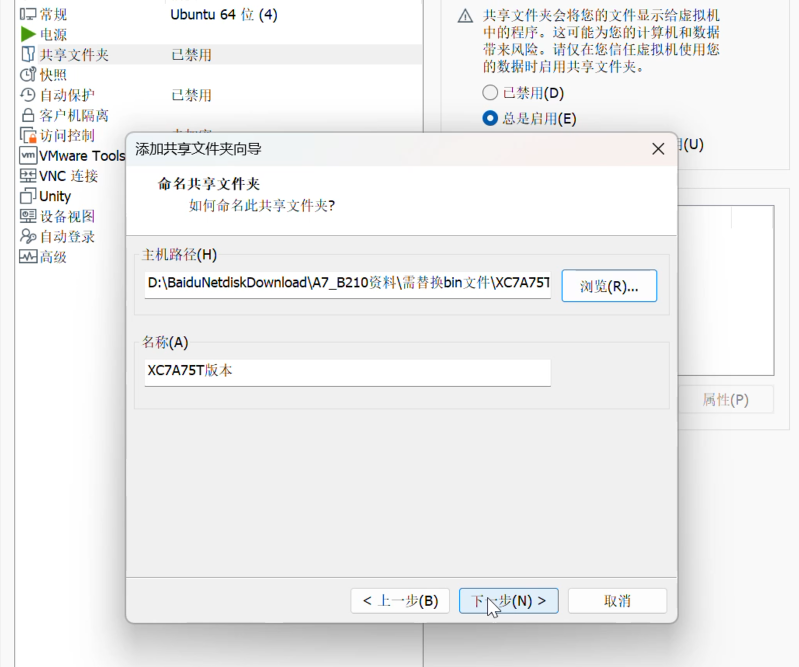
Step3: Enable VMware shared folder to import customized firmware
Open VM menu → Settings → Options → Shared Folders, check Always enabled, click Add and select the local folder storing replacement firmware.
Step4: Move customized firmware to target directory
Select the matching firmware for replacement according to the product version. The example shown uses the XC7A75T version.
cd /mnt/hgfs/XC7A75T版本
sudo mv usrp_b210_fpga.bin /home/nyq/B210/B210_images
Firmware replacement completed.

Device Connection & Hardware Verification
This section covers standard hardware connection methods, USB permission configuration to support non-root operation, and two official UHD detection commands to confirm normal communication between host and hardware.
Hardware wiring specification
Connect the USRP B210 to your computer using a blue USB 3.0 port. USB 2.0 will lead to insufficient bandwidth and random disconnection.
Write exclusive udev rules for USRP USB devices
1.Create and write USRP udev rule file
sudo tee /etc/udev/rules.d/10-usrp.rules >/dev/null << 'EOF'
SUBSYSTEM=="usb", ATTRS{idVendor}=="2500", ATTRS{idProduct}=="0020", MODE="0666"
SUBSYSTEM=="usb", ATTRS{idVendor}=="2500", ATTRS{idProduct}=="0021", MODE="0666"
SUBSYSTEM=="usb", ATTRS{idVendor}=="2500", ATTRS{idProduct}=="0022", MODE="0666"
EOF

2.Reload the udev rules to take effect immediately
sudo udevadm control --reload-rules
sudo udevadm trigger

Reload rules and set persistent environment variable
New terminal windows will lose environment variables, reconfigure manually:
export UHD_IMAGES_DIR=/home/nyq/B210/B210_images
Verify variable:
echo $UHD_IMAGES_DIR

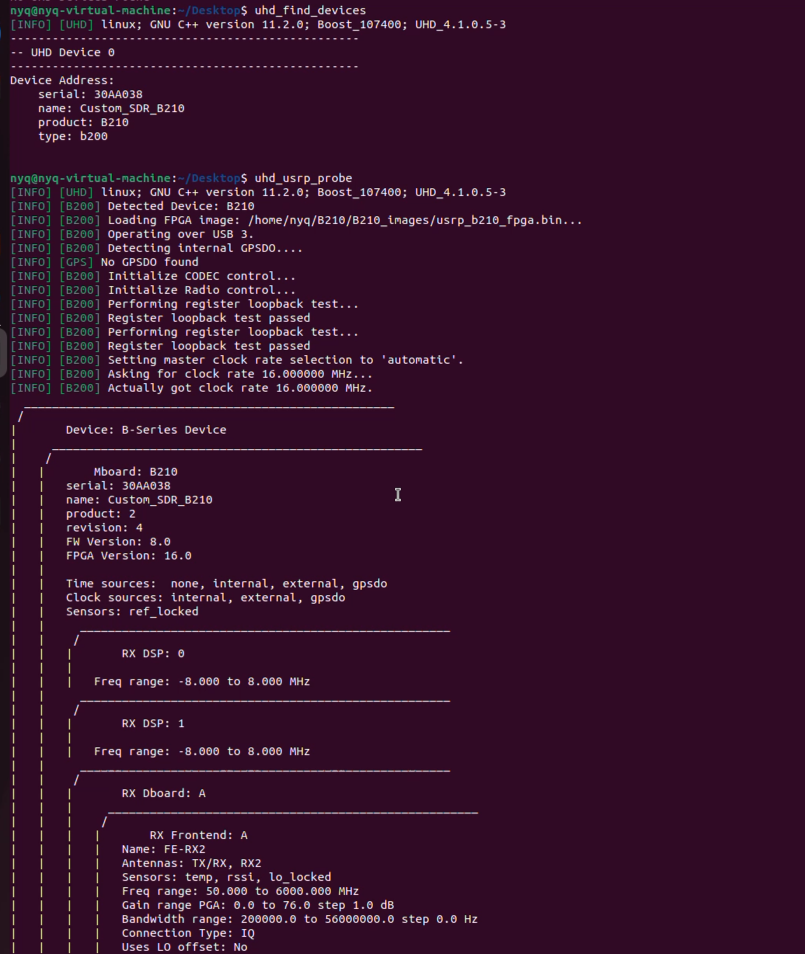
Dual hardware detection
Quick scan connected USRP devices
uhd_find_devices
Full hardware probe to read AD9361, FPGA version, serial number
uhd_usrp_probe
Complete AD9361 hardware information output indicates driver, firmware and physical connection work normally.
Universal Radio Hacker (URH) Installation and Usage
This section covers the full installation process of signal recording, analysis and decoding tool URH, and practical IQ raw signal capture operation with USRP B210.
Build independent Python virtual environment & install URH
cd ~
sudo apt install python3.10-venv
python3 -m venv urh-env
source urh-env/bin/activate
pip install --upgrade pip -i https://pypi.tuna.tsinghua.edu.cn/simple
pip install PyQt5 numpy scipy psutil pyzmq -i https://pypi.tuna.tsinghua.edu.cn/simple
pip install urh -i https://pypi.tuna.tsinghua.edu.cn/simple
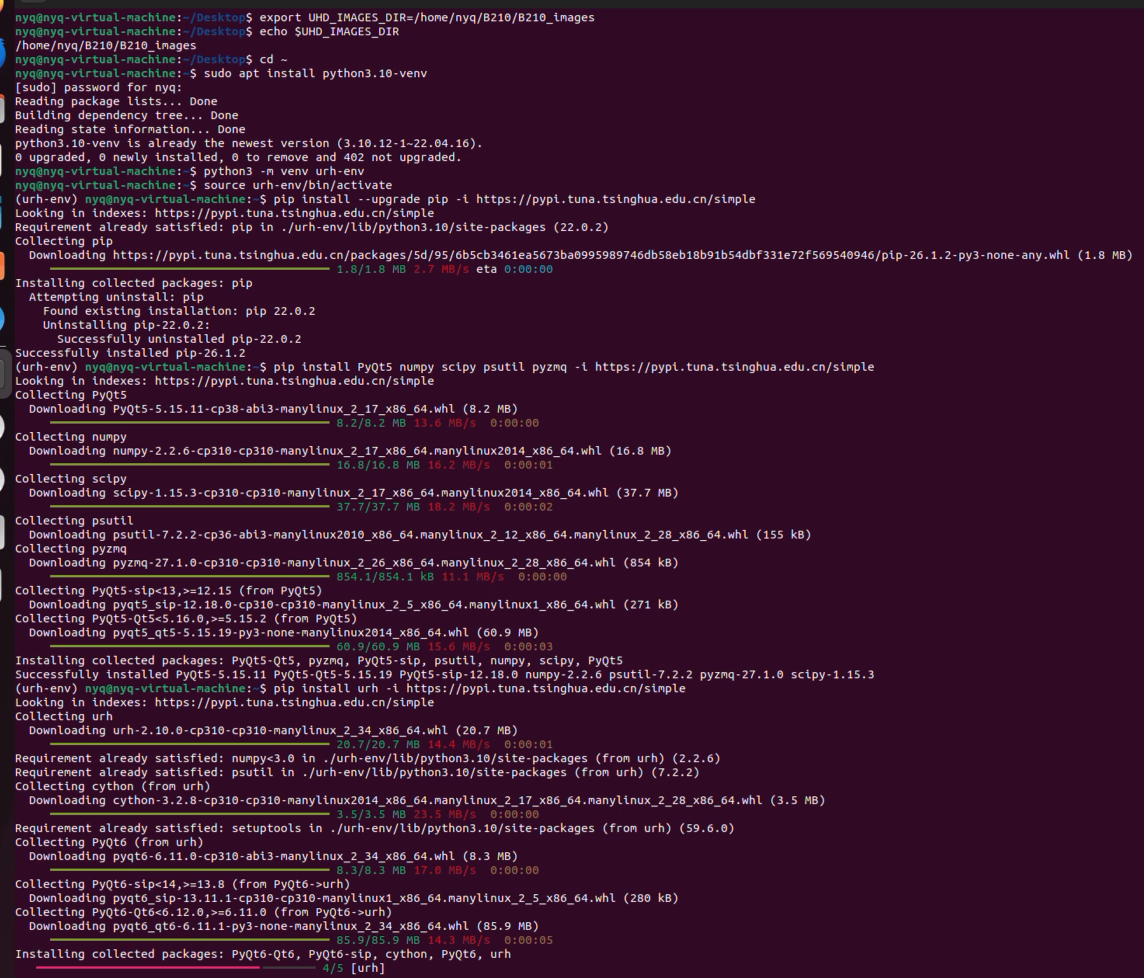
After installation, input urh in terminal to launch software.
URH startup method
Remember to activate the virtual environment every time before opening URH:
source ~/urh-env/bin/activate urh

IQ signal recording operation
After launching URH, click File → red Record button, select USRP in device list, click green refresh icon to scan hardware.
Set signal parameters: center frequency 103.9 MHz, bandwidth 2 MHz, sampling rate 2 MSPS, initial gain 25 dB. Click Start to record 10~30 seconds, then Stop, save IQ data file for later analysis and playback.
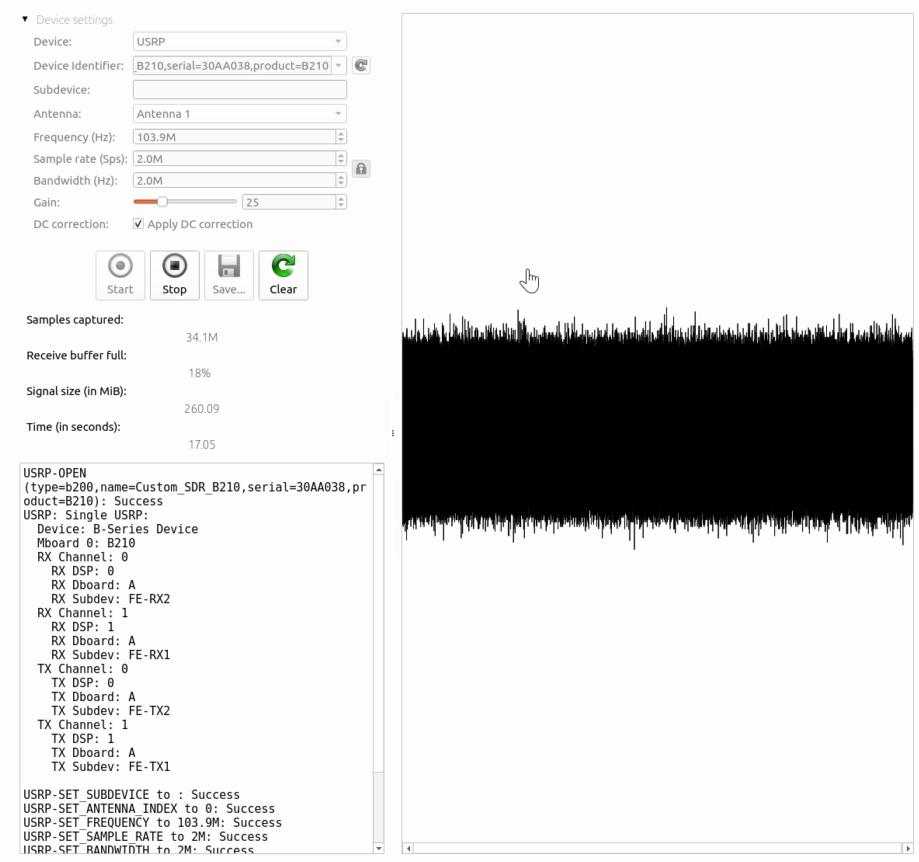
GNURadio Installation and Usage
This section covers mainstream graphical SDR development platform GNU Radio deployment, hands-on building of FM demodulation receiving flowgraph for broadcast radio.
Install GNU Radio full components
sudo apt install -y gnuradio gnuradio-dev cmake git libboost-all-dev libcppunit-dev liblog4cpp5-dev python3-pygccxml pybind11-dev liborc-0.4-dev python3-pip clang-format gr-osmosdr
sudo apt install -y vim zsh wget net-tools
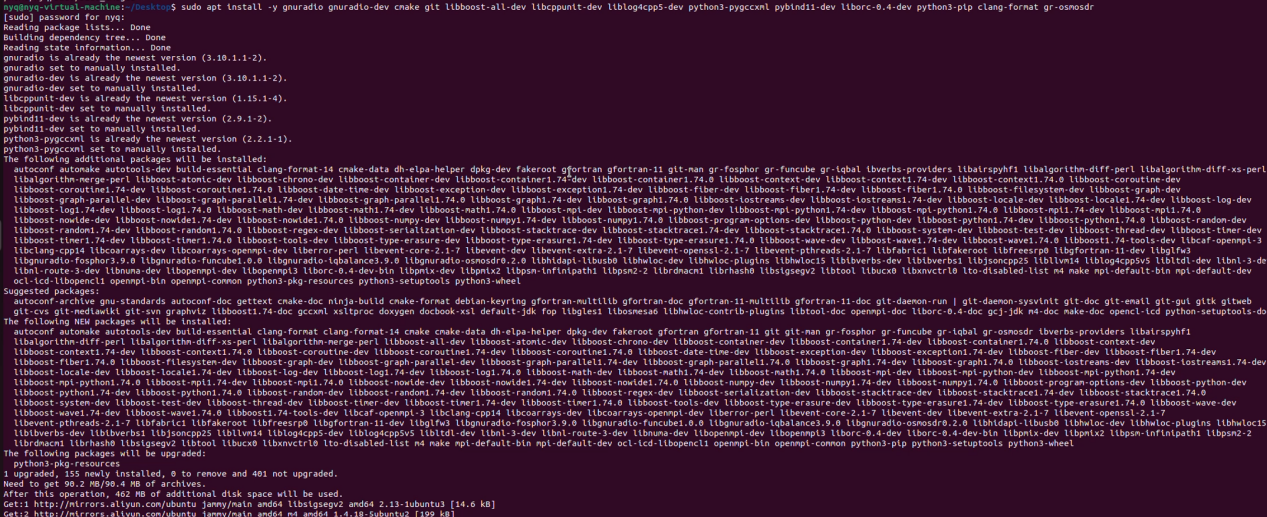
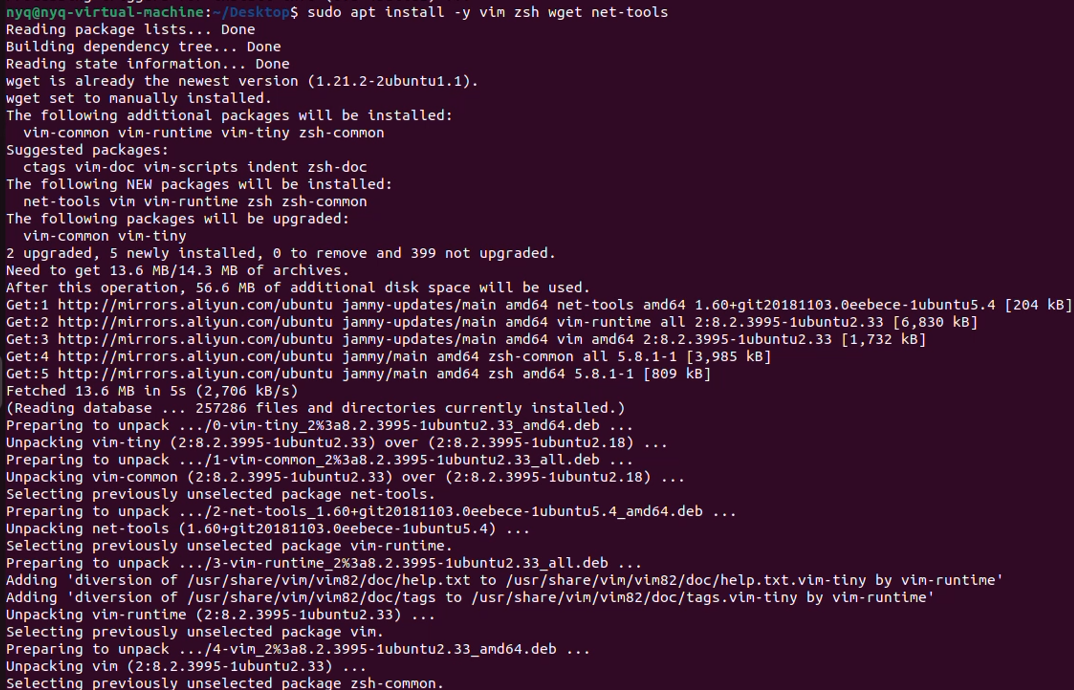
Installation verification
Check GNU Radio version:
gnuradio-config-info –version
Connect USRP B210, verify device recognition:
uhd_find_devices
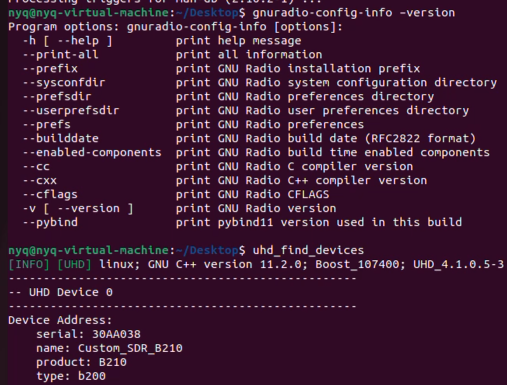
For convenient subsequent use, we can set the UHD image file path as a permanent environment variable.
echo 'export UHD_IMAGES_DIR=/home/nyq/B210/B210_images' >> ~/.bashrc
Reload the environment configuration immediately
source ~/.bashrc
Verify the environment variable configuration
echo $UHD_IMAGES_DIR
If the configuration succeeds, the terminal should output:
/home/nyq/B210/B210_images
This indicates that the UHD image path has been configured correctly.

Build FM broadcast receiver flowgraph
Launch GNU Radio Companion via Terminal
gnuradio-companion
Drag 3 core modules to canvas: USRP Source, WBFM Receive, Audio Sink.
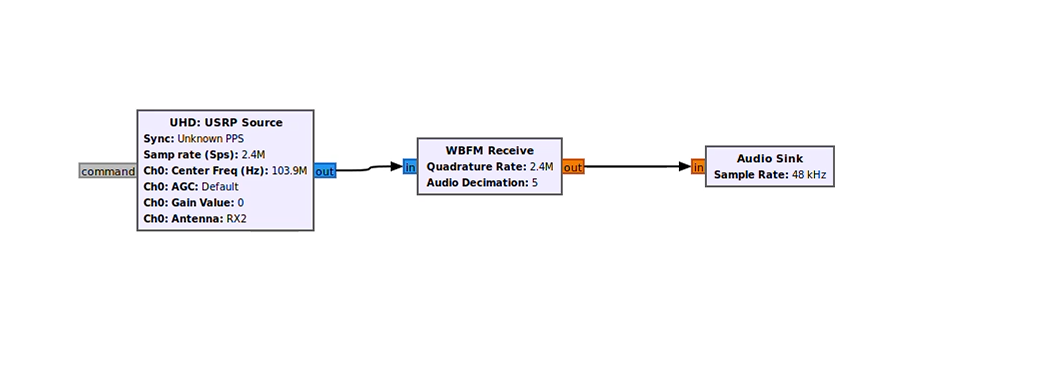
USRP Source parameter configuration: antenna RX2, sample rate 2.4 MHz, center frequency local FM station 103.9MHz.
WBFM Receive setting: Audio Decimation=10, Quadrature Rate consistent with sampling rate.
Audio Sink sample rate set to 48 kHz.
Signal wiring: USRP Source output → WBFM Receive input → WBFM output → Audio Sink input.
Save flowgraph file, click Execute button. After automatic compilation, computer speakers output FM radio audio, proving GNU Radio and USRP work cooperatively.
Gqrx Installation and Usage
This section covers lightweight spectrum visualization tool Gqrx installation, simple spectrum observation and FM broadcast receiving operation with USRP B210.
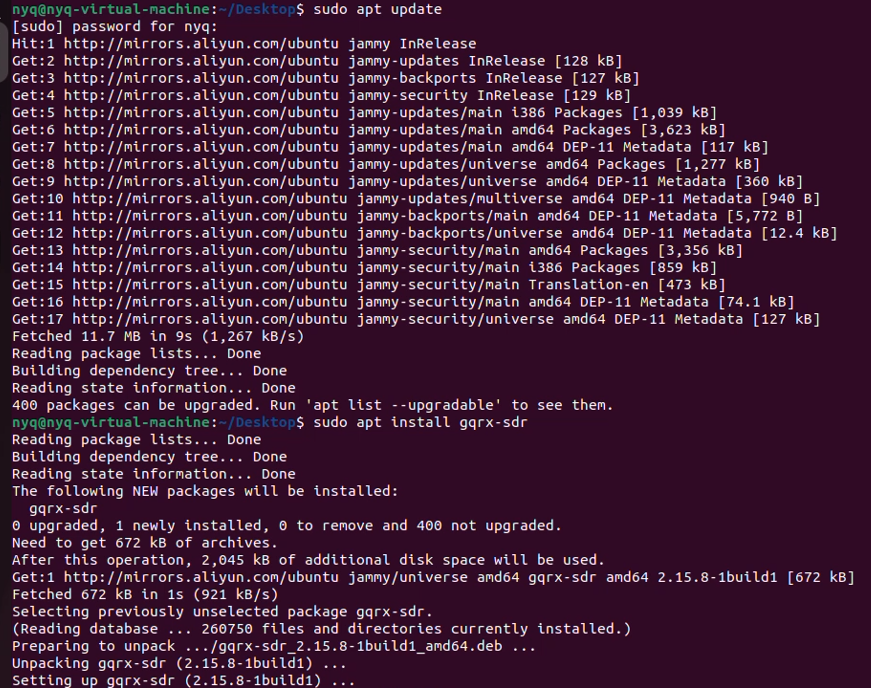
Install Gqrx
sudo apt update
sudo apt install gqrx-sdr
No error prompts mean installation succeeds.
Input gqrx in terminal to launch software, or open it from application menu.
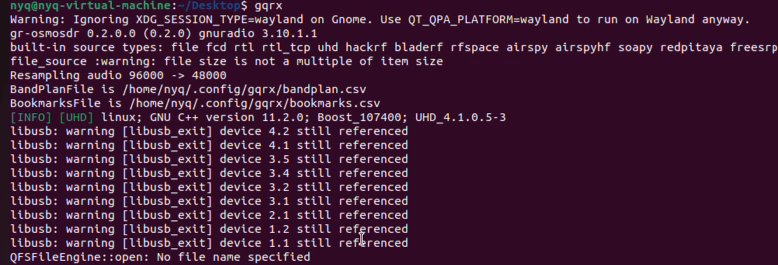
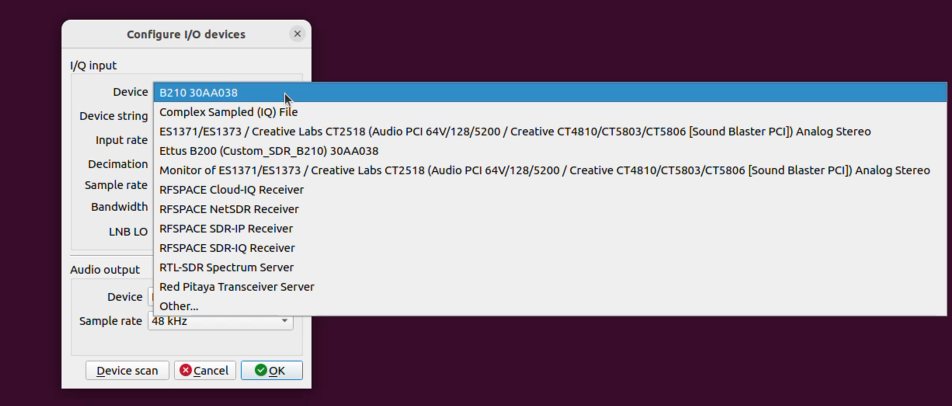
First run pops up Device Configuration window, select B210/UHD device in dropdown list, click OK to initialize hardware.
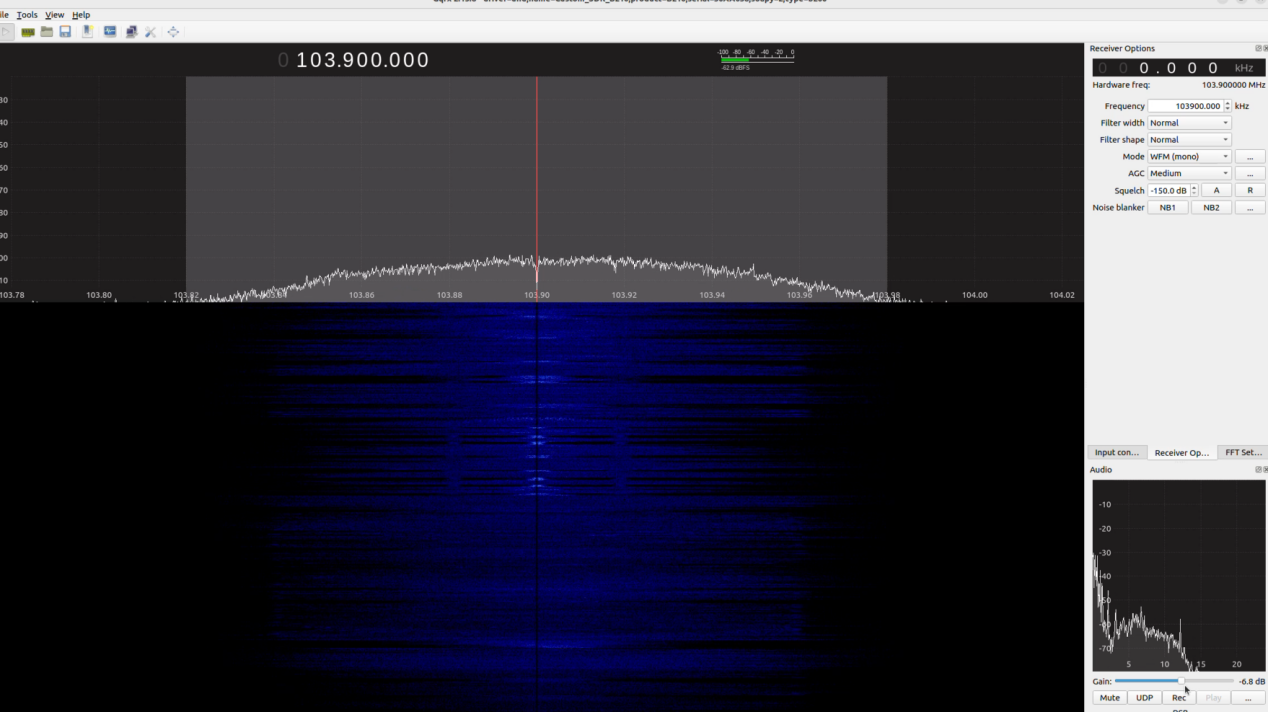
FM broadcast receiving parameter configuration
Fill local FM frequency such as 103.9 MHz in frequency input box, select WFM (mono/stereo) demodulation mode in Mode dropdown.
Adjust Volume slider and LNA Gain slider until obvious signal peak appears on spectrum and audio output is clear without noise.
Basic RX/TX Test with Command Line Tools
This section introduces built-in UHD command-line tools without graphical interface, supporting fast spectrum receiving and single frequency signal transmission verification.
Real-time spectrum receiving test
Command format: uhd_fft -f target_frequency
Example: uhd_fft -f 100e6
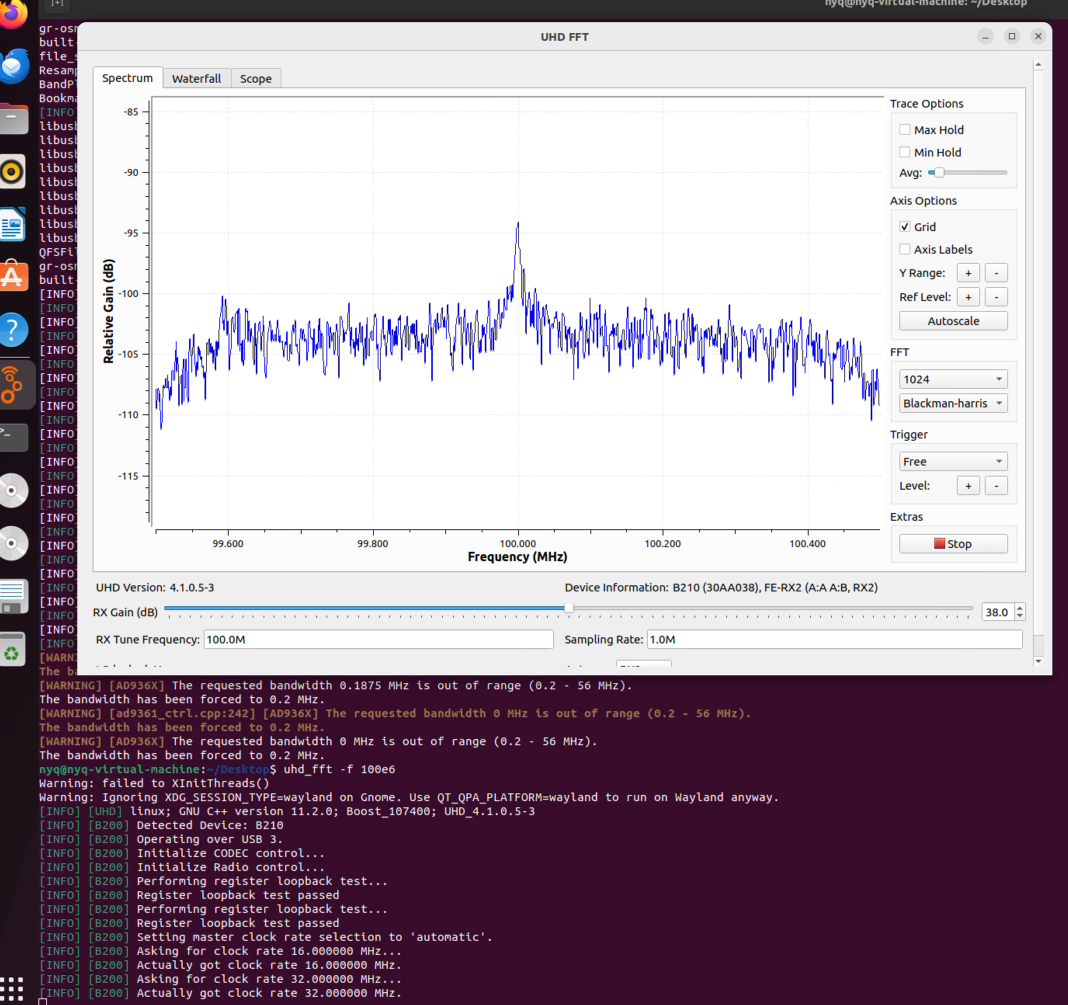
A real-time FFT spectrum window pops up after running, tunable frequency range: 70 MHz ~ 6 GHz via -f parameter.
Single-tone carrier transmission test
Command format: uhd_siggen --freq frequency --const --amplitude power_coefficient
Example: uhd_siggen --freq 100e6 --const --amplitude 0.3
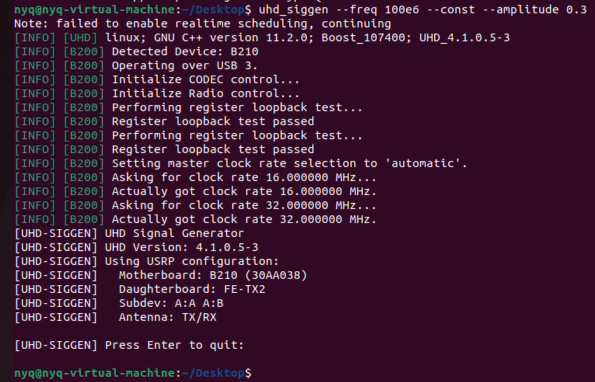
Parameter explanation: --const generates unmodulated carrier wave; amplitude ranges from 0.0 to 1.0 to control transmit power; press Ctrl+C to stop transmission.
Advanced SDR Applications and Experiments with USRP B210
This section covers multiple advanced practical SDR experiments based on USRP B210, including spectrum monitoring, graphical spectrum analyzer development, interference-suppressed FM receiver, and multi-industry research application scenarios.
Antenna matching & wireless spectrum monitoring
2.4GHz WiFi spectrum observation
Connect broadband antenna to USRP, execute command:
uhd_fft --freq 2.45e9 --gain 40 --samp-rate 20e6
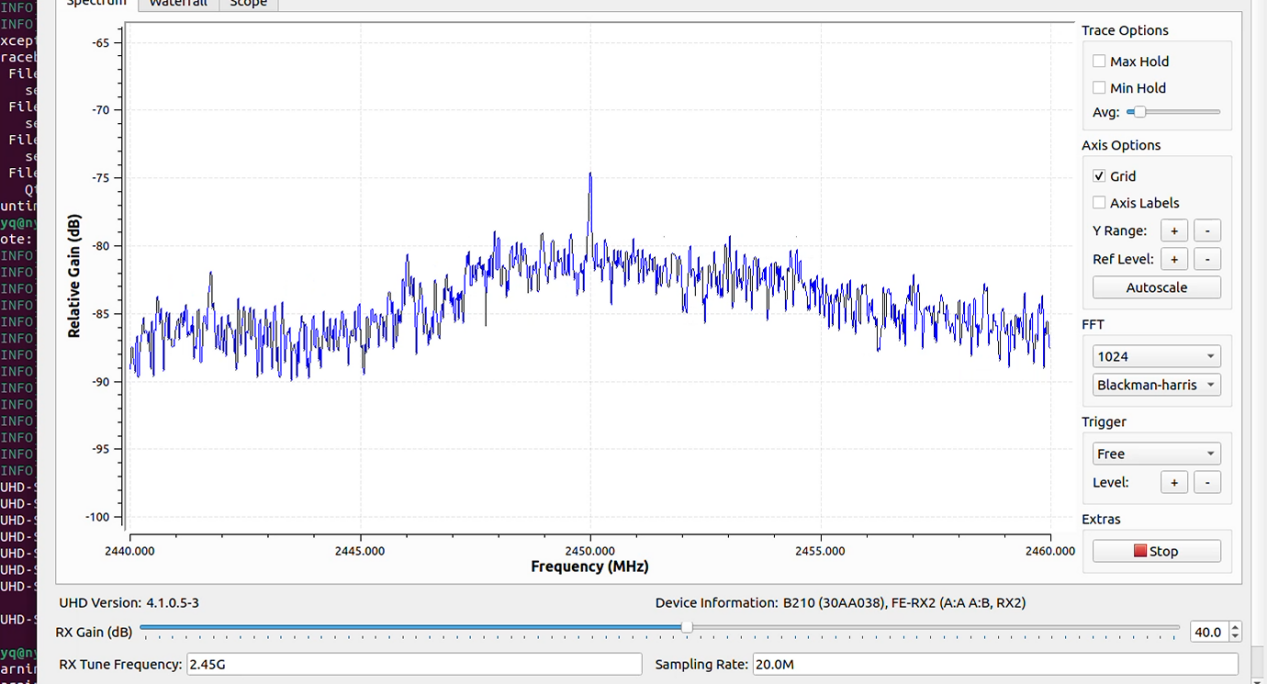
Turn on mobile phone WiFi hotspot, an obvious signal peak will appear on the spectrum window.
FM broadcast spectrum observation
Replace FM dedicated antenna, execute command:
uhd_fft --freq 93M --samp-rate 2M --gain 30
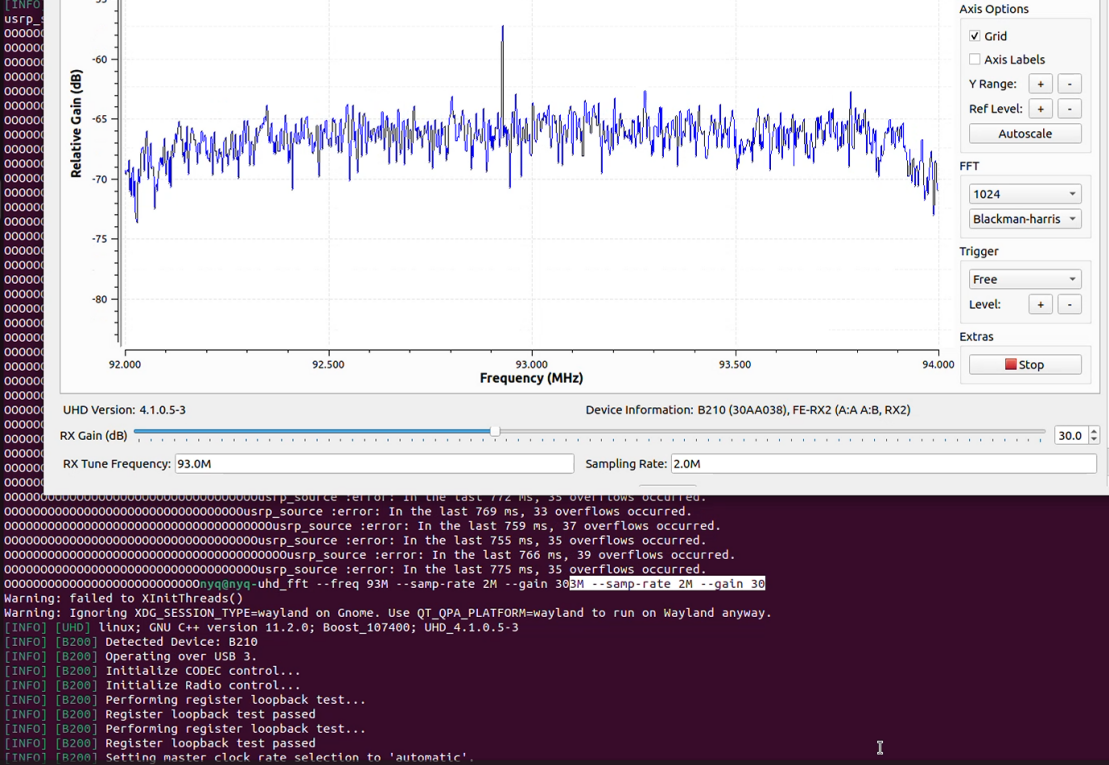
A narrow high amplitude peak corresponds to local FM radio station signal.
GNU Radio self-developed real-time spectrum analyzer
Launch GNU Radio Companion via Terminal
gnuradio-companion
Step1: Drag UHD USRP Source module to canvas
Step2: Module parameter configuration
Ch0 Center Freq: 93M
Ch0 Sample Rate: 2M
Ch0 Gain Value: 40
Antenna: RX2
Step3: Drag QT GUI Frequency Sink spectrum display module
Step4: Connect USRP Source output to QT GUI Frequency Sink input
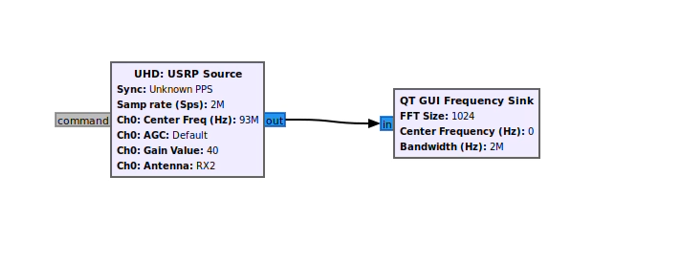
Step5: Click Run button to launch real-time spectrum window
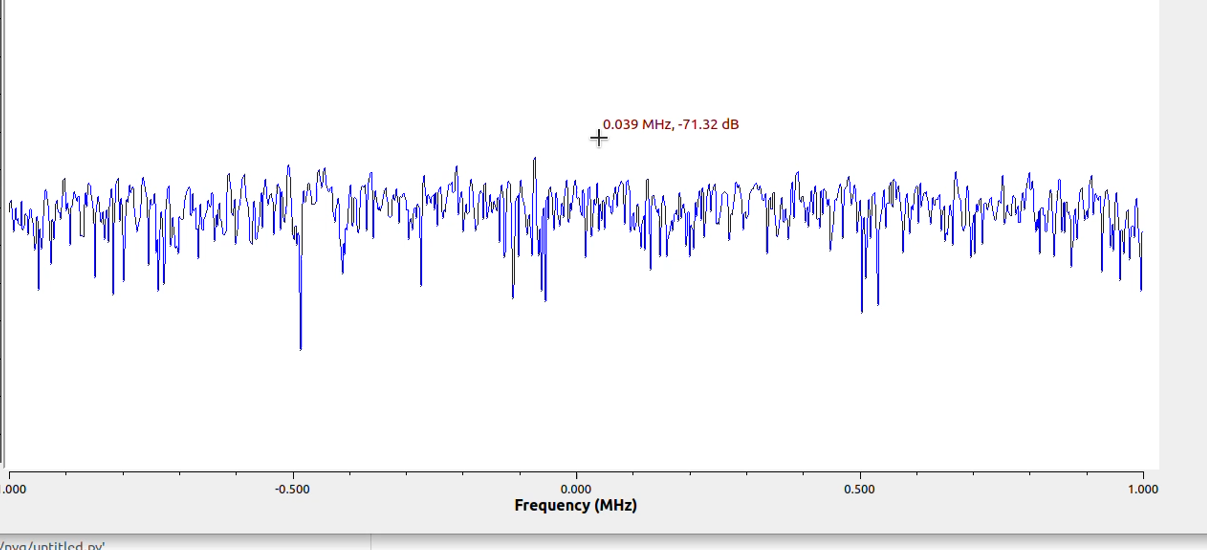
Compared with command-line uhd_fft, graphical flowgraph supports richer real-time parameter adjustment.
Filter-enhanced high-quality FM demodulation receiver
System audio authority configuration
ls -la /dev/snd
sudo usermod -aG audio $USER
newgrp audio
Groups
aplay -l
sudo apt install alsa-utils sox
play -n synth 2 sin 440
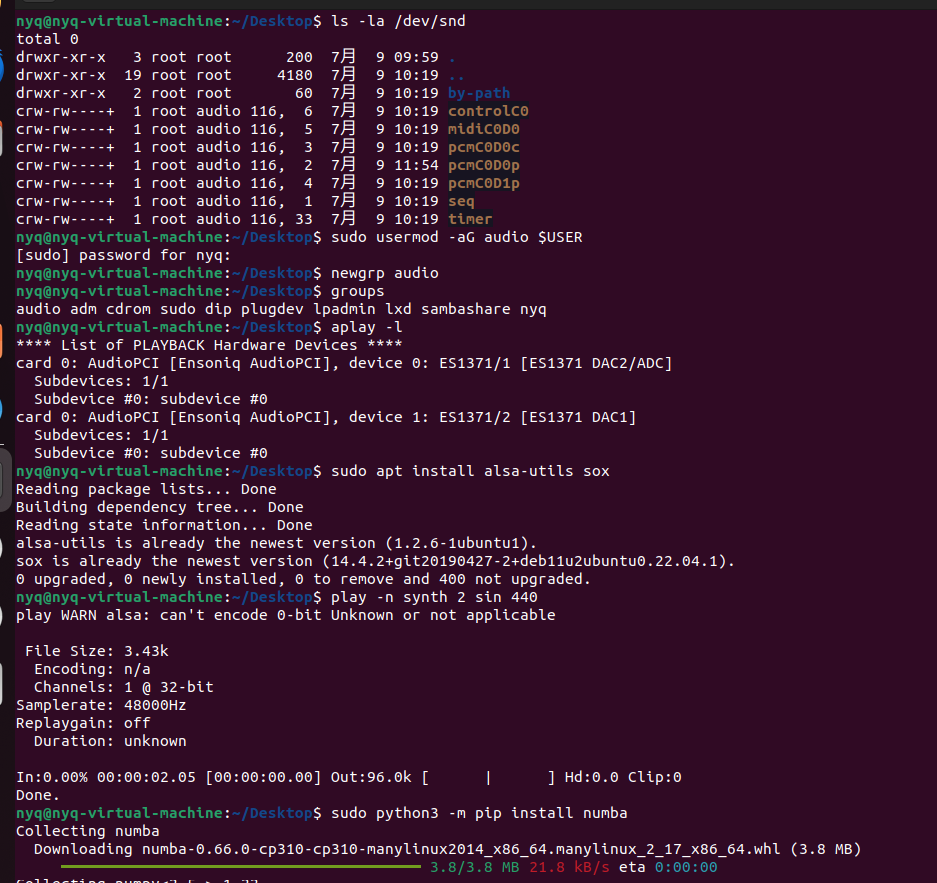
If ALSA fails to detect sound card 0, manually specify audio card:
export ALSA_CARD=1
Note: ALSA is Linux bottom audio interface, PulseAudio is upper audio service, the above configuration is compatible with both.
Install numba for filter operation acceleration
sudo python3 -m pip install numba
Pure Python filter operation runs slowly; numba compiles code to C language to improve processing speed.
Complete FM demodulation signal processing logic
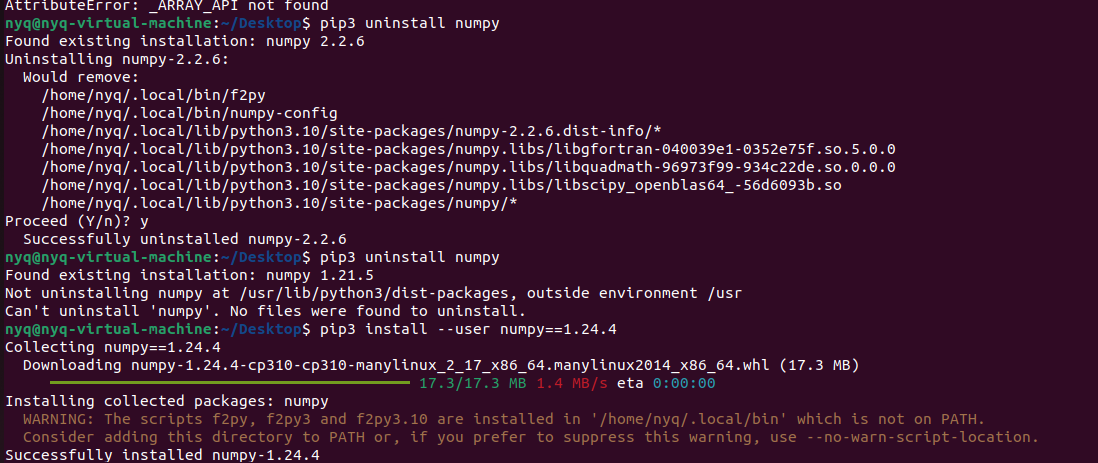
The Gaussian Filter module in this experiment relies on Numba, which requires NumPy 1.22 or newer. Execute python3 -c "import numpy; print(numpy.__version__)" to verify the installed NumPy version. The check result shows the current system version is 1.21.5, meaning an upgrade is mandatory.
Given GNU Radio suffers compatibility conflicts with NumPy 2.x, we avoid the latest release and remove the existing NumPy installation first:
pip3 uninstall numpy
Repeat the above command repeatedly if multiple NumPy versions coexist on the system, until pip outputs that no matching packages are left to uninstall.
Install the compatible fixed version with the following command:
pip3 install --user numpy==1.24.4
Recheck the NumPy version after installation to confirm success.
Launch GNU Radio Companion via Terminal
gnuradio-companion
Signal flow: UHD USRP Source → Rational Resampler (4x decimation) → 100kHz Low-Pass Filter → WBFM Receive → Secondary Rational Resampler (convert 50kHz audio to standard 48kHz) → Audio Sink.
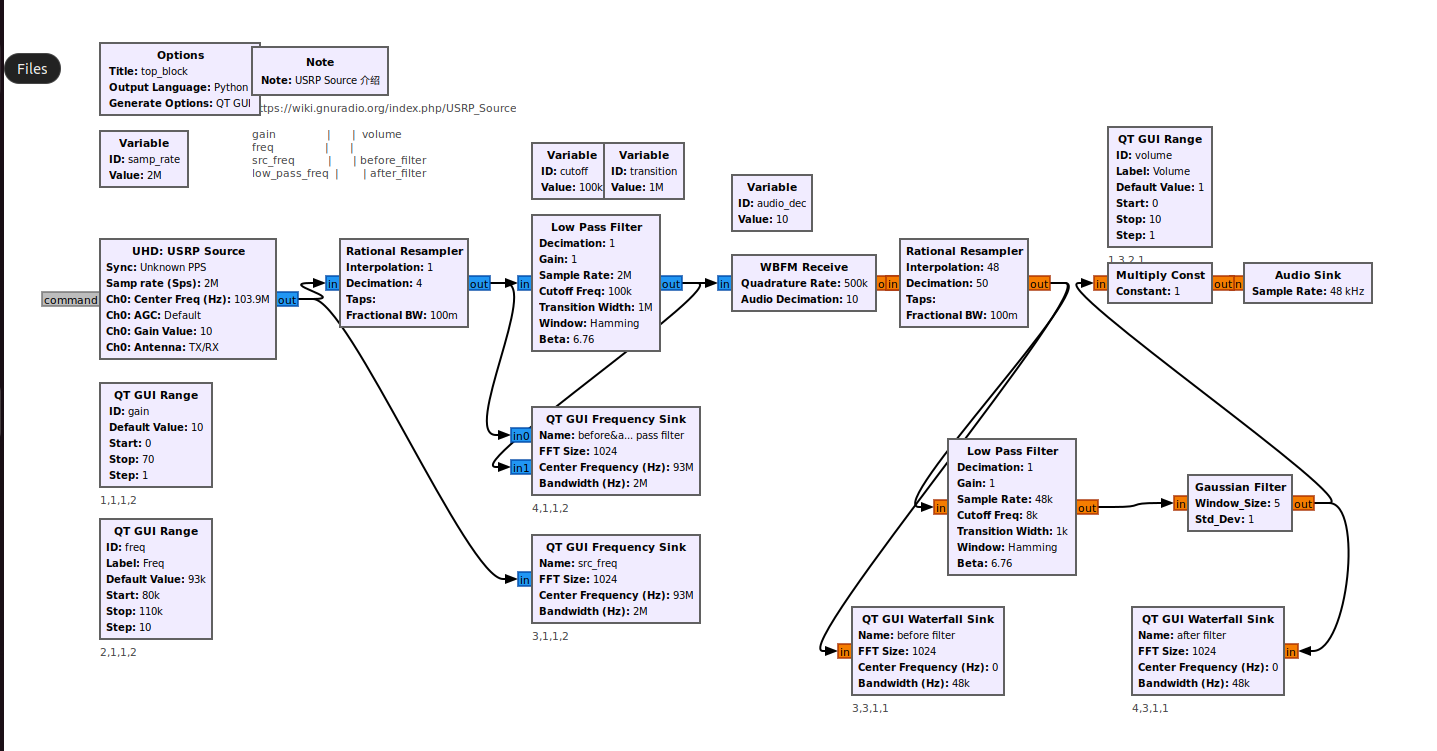
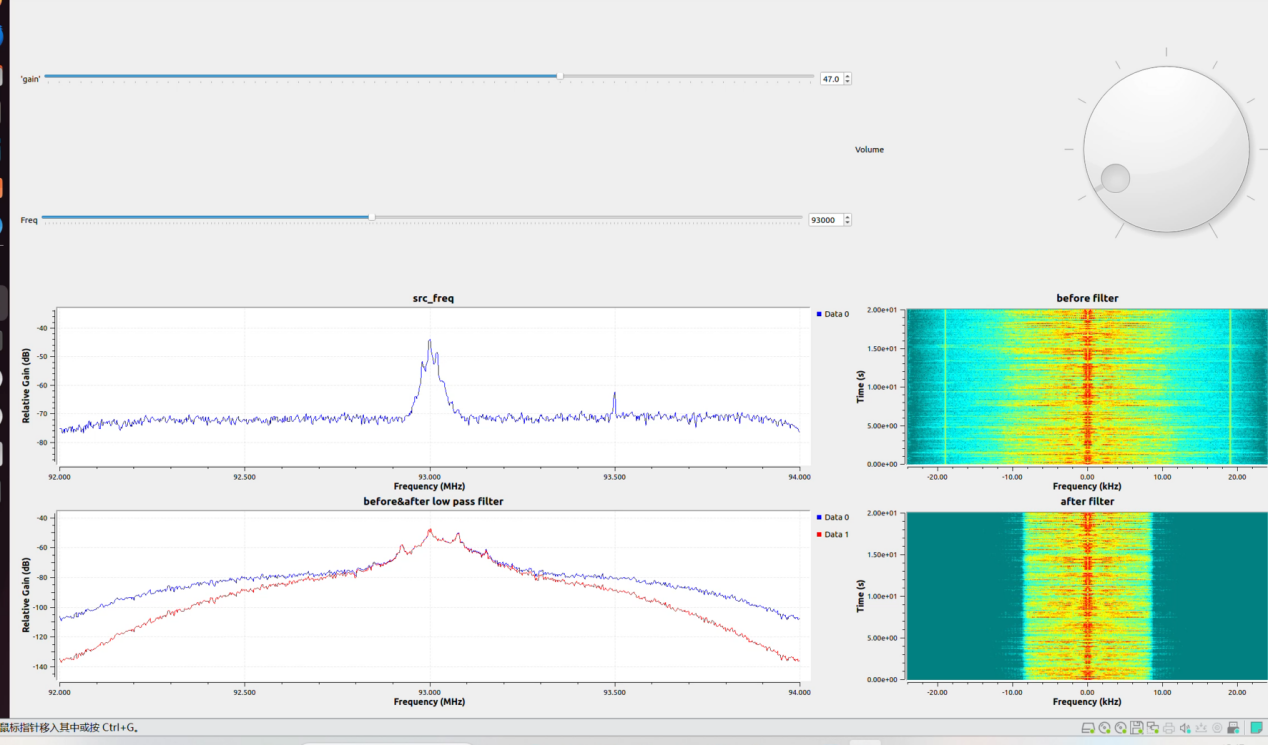
Add QT GUI Frequency Sink to display spectrum before and after filtering; filter cutoff frequency and transition width can be adjusted via real-time slider to suppress out-of-band interference and improve audio clarity.
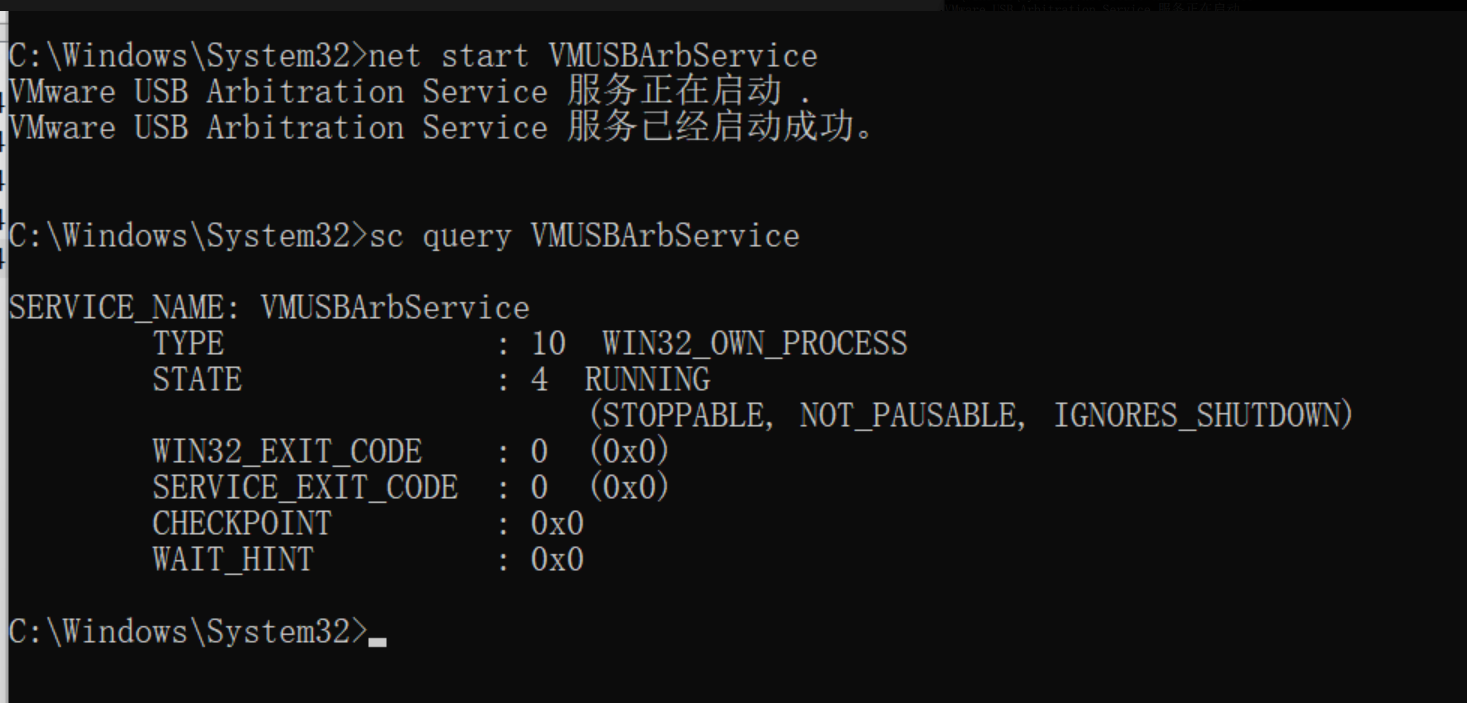
If the USRP device still cannot be detected at this point, and the UHD driver has been confirmed to be installed correctly, completely close VMware Workstation, then run Command Prompt (CMD) with administrator privileges and restart the VMware USB Arbitration Service to restore USB device passthrough functionality.
net start VMUSBArbService
sc query VMUSBArbService
Multi-scenario extended application introduction
USRP B210 supports multi-modulation research (BPSK/QPSK/16QAM/64QAM/GMSK/OFDM), ISM band equipment protocol reverse engineering, GSM/LTE cellular signal analysis based on srsRAN & OpenBTS, GPS signal simulation for receiver testing, FMCW & passive radar prototype development, amateur radio digital modes (FT8/WSPR/satellite communication), long-term spectrum monitoring with IQ data recording, and rapid prototyping of custom wireless communication protocols.
Reference
https://files.ettus.com/binaries/uhd/latest_release
https://github.com/extioxxx/usrp-ExtIO
https://wiki.analog.com/resources/tools-software/linux-software/gnuradio