
Pluto+ SDR User Manual
User manual for Pluto+, a Zynq-7010 + AD9363 2T2R SDR with Gigabit Ethernet and SD boot: Windows and Ubuntu setup, the AD9361 unlock and DFU recovery.


Product Introduction
PLUTO+ is a high‑performance software‑defined radio transceiver platform. Drawing on the hardware architecture of ADI’s classic ADALM‑PLUTO, it delivers multiple upgrades and improvements over the original design. Equipped with the AD9363 RF transceiver chip, it supports full‑duplex operation with 2 transmit and 2 receive channels, covering a wide RF frequency range from 70 MHz to 6 GHz. It is well‑suited for RF learning, wireless communication experiments, as well as signal receiving, transmitting and development debugging on GitHub.
The hardware features the Zynq7010 SoC FPGA (28 k logic cells), 512 MB RAM and 32 MB Flash. It integrates a high‑precision 40 MHz 0.5 ppm VCTCXO voltage‑controlled temperature‑compensated crystal oscillator and accepts external reference clock input for stable and reliable clock performance. The RF chip can be modified to work compatibly with AD9361 or AD9364 for expanded hardware capabilities.
It comes with abundant interfaces: a newly‑added Gigabit‑Ethernet high‑speed data port alongside USB 2.0 OTG. Micro‑SD card boot is supported, enabling firmware operation independent of a host PC. Power input is via Micro‑USB at 5 V±0.5 V, 2 A. On‑board peripherals include JTAG debug interface, PTT control port and DFU firmware update button. All I/O levels are 1.8 V. Jumpers are provided to switch between firmware modes, SD‑card boot mode and external clock‑input mode. It is compatible with both official Pluto firmware and custom Pluto+ firmware.
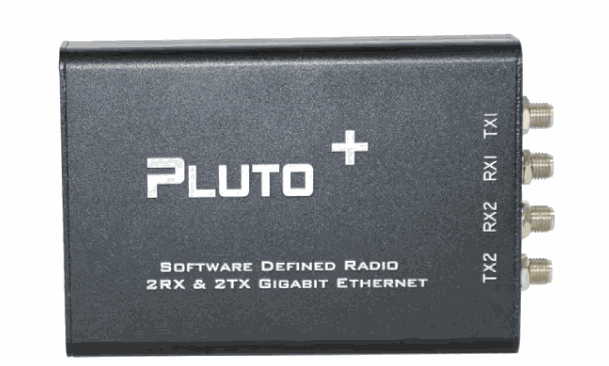
Official Product Specifications
| Item | Official product information |
| Product | PLUTO+ AD9363 2T2R 70MHz-6GHz FPGA Circuit Board |
| RF transceiver | AD9363 |
| RF range | 70 MHz - 6 GHz |
| RF channels | 2 transmit, 2 receive |
| Reference clock | VCTCXO 40 MHz, 0.5 ppm |
| SoC and FPGA | Zynq 7010, FPGA 28K |
| Memory and flash | 512M RAM, 32M flash |
| Host interfaces | USB 2.0 OTG, Gigabit Ethernet |
| Boot support | Micro SD card boot |
| DC input | 5 V +/- 0.5 V, 2 A through micro USB |
| I/O level | 1.8 V |
Windows System Usage Tutorial
This guide walks through the complete Windows deployment of Pluto+: device preparation, driver and libiio installation, IIO context verification, SDR receiver setup, GNU Radio practice, and DFU firmware update.
Hardware Checklist
| Item | Requirement |
|---|---|
| Pluto+ unit | Confirm that the enclosure, LEDs, and ports are intact. |
| DATA cable | Connects the DATA port to the PC for data and virtual-network communication. |
| 5V-IN power cable | Provides stable 5 V power through the dedicated input port. |
| RX1 antenna | Use RX1 for the initial FM reception exercise. |
Connection Procedure
Step 1 Connect the DATA port. Use a USB data cable to connect the DATA port to the computer.
Step 2 Connect the 5V-IN port. Use the second cable to supply stable power through 5V-IN.
Step 3 Wait for USB enumeration. Before the driver is installed, Windows may show an unknown USB device.
Windows Software Checklist
| Software | Purpose |
|---|---|
| PlutoSDR-M2k-USB-Drivers.exe | Official USB virtual-network and serial driver. |
| libiio-setup.exe | Installs libiio and the iio_info command-line tool. |
| SDRangel or SDR# | Used later for spectrum and WFM reception tests. |
| GNU Radio Companion | Used to build PlutoSDR receive and transmit flowgraphs. |
Driver Installation Procedure
Step 1 Install the USB driver. Run PlutoSDR-M2k-USB-Drivers.exe as Administrator and keep the default options in the setup wizard.
Step 2 Install libiio. Run libiio-setup.exe and complete the default installation.
Step 3 Reconnect Pluto+. After installation, reconnect DATA and 5V-IN if the device does not appear immediately.
Step 4 Check Device Manager. Confirm PlutoSDR Serial Console under Ports and PlutoSDR USB Ethernet/RNDIS Gadget under Network adapters.
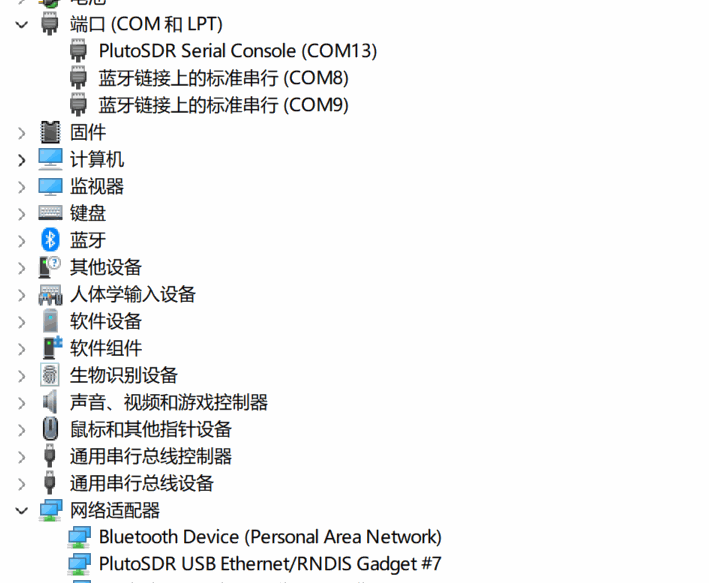
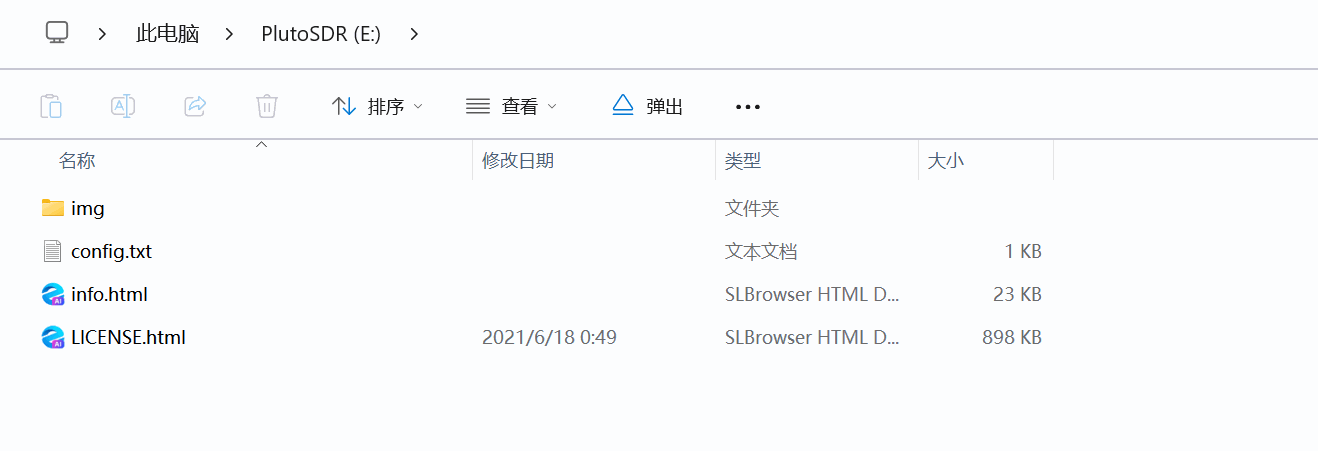
Acceptance criteria: The serial console, RNDIS network adapter, and PlutoSDR removable disk are visible in Windows.
Command-Line Verification
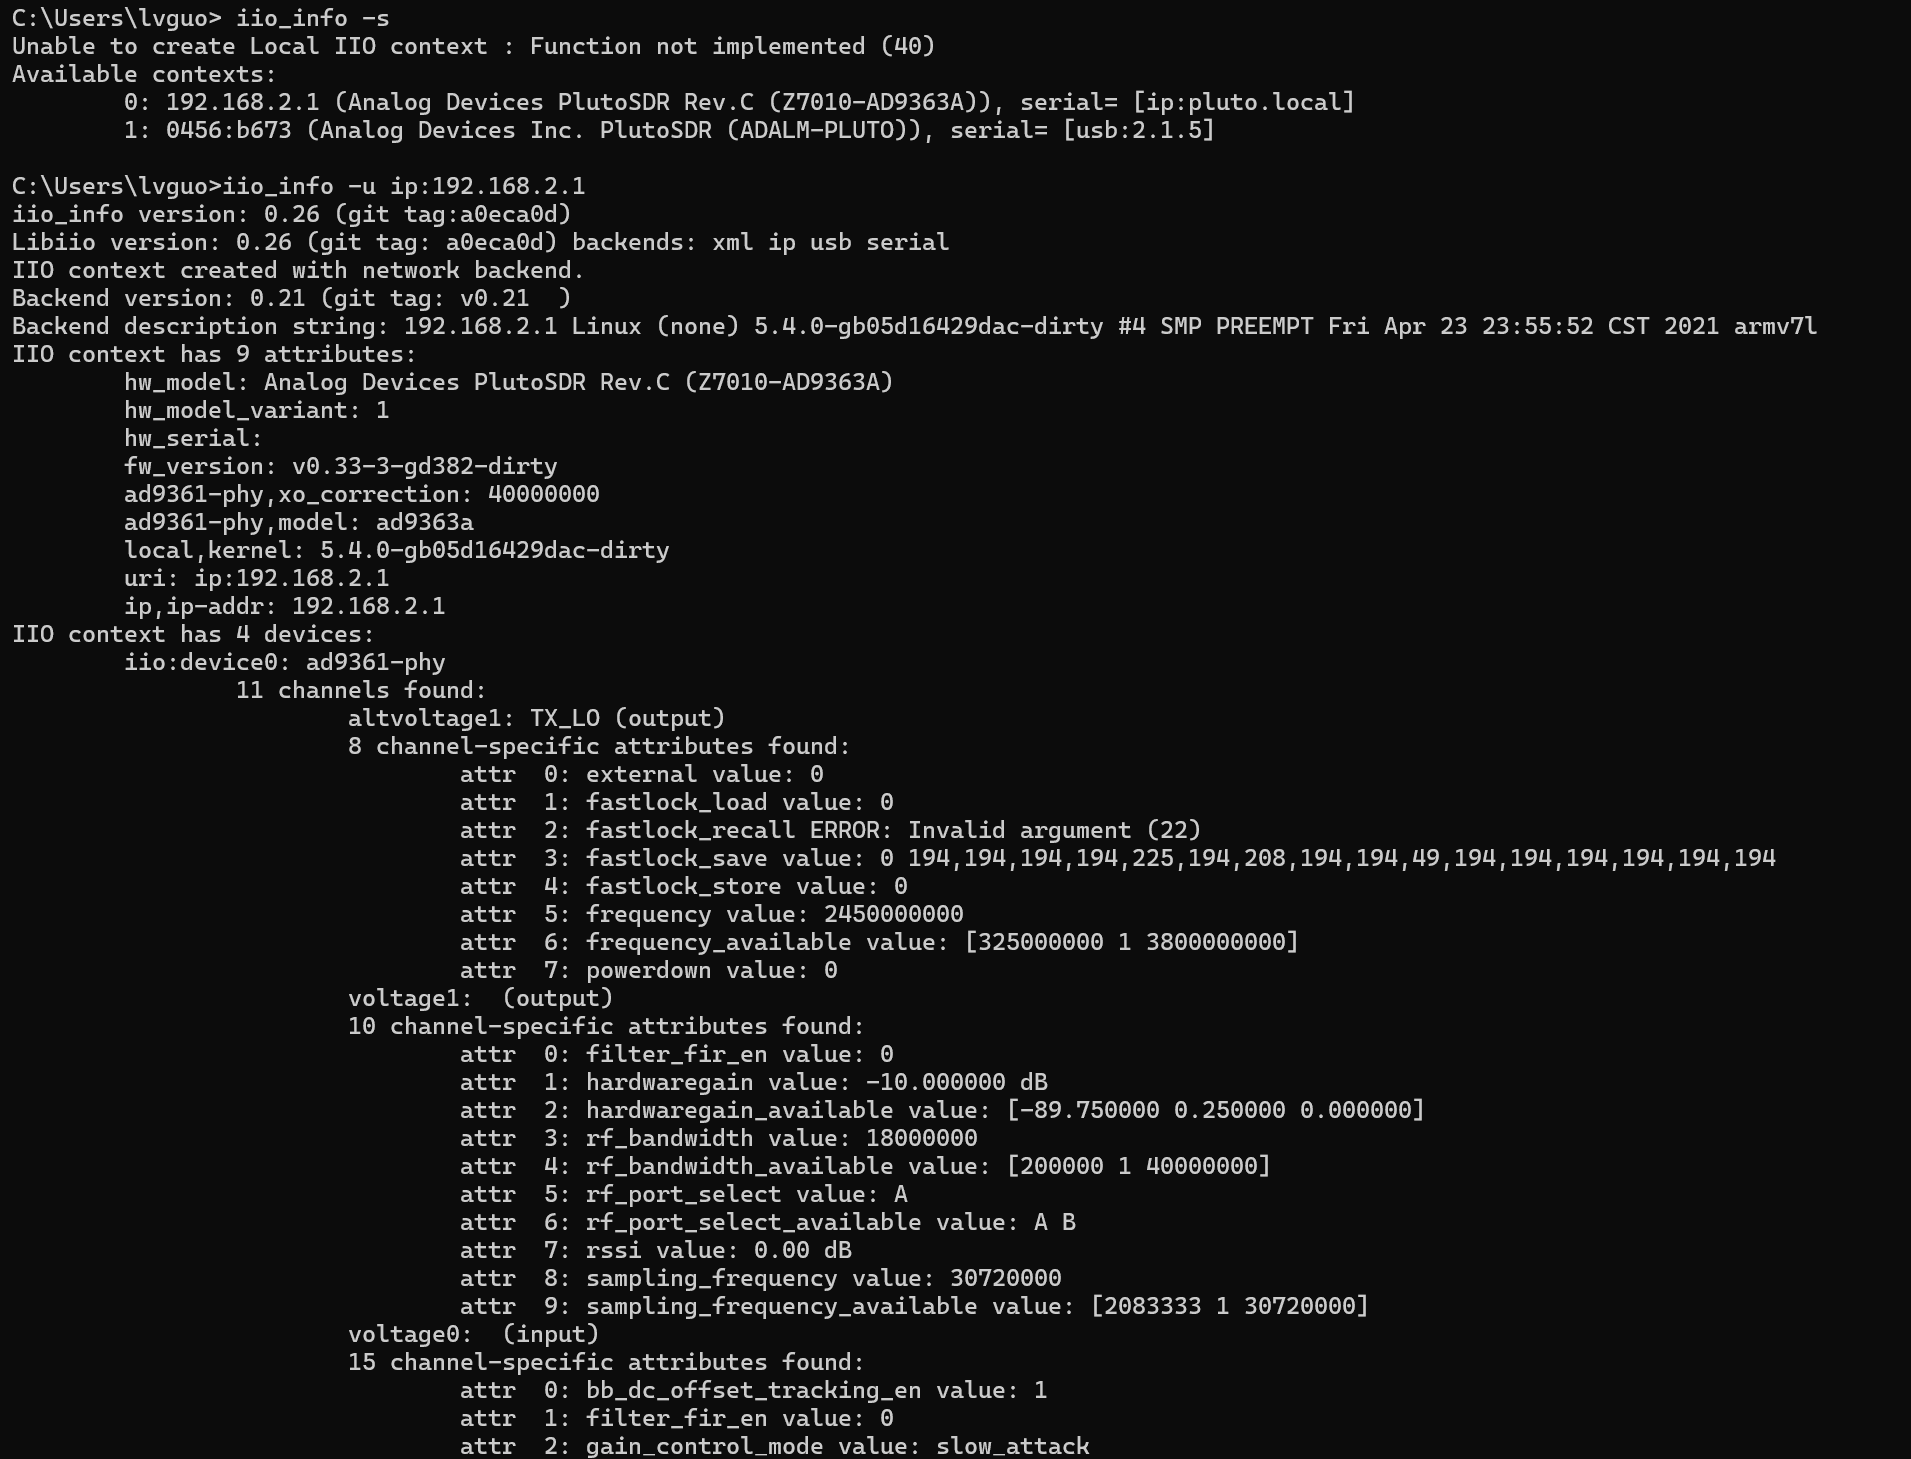
Step 1 List contexts. Run iio_info -s and record the currently detected USB descriptor.
Step 2 Verify the network context. Run iio_info -u ip:192.168.2.1 when the default IP is in use.
Step 3 Review the result. The command should print device and RF-channel information without a connection timeout.
Modify the Chip Identifier to Unlock the Full Frequency Range
The device is factory-equipped with the AD9363 RF transceiver chip, which comes with a factory-limited tuning range of 325–3800 MHz, making it unable to cover the civilian FM broadcast band. Prior to use, you must modify the firmware configuration to emulate the chip as AD9361. This unlocks the full 70–6000 MHz frequency range, enabling normal reception of FM radio broadcasts.
Download the Tezuka Firmware
1. Navigate to the project GitHub Releases page at https://github.com/F5OEO/tezuka_fw/releases. Download the archive tezuka‑plutoplus‑v0.3.19‑eb9c680.zip and extract its contents.
2. Copy all contents inside the sdimg folder to the root directory of the SD card. Insert the SD card into the Pluto+ hardware, then short‑circuit the SD‑H and 3V3 pins to enable SD‑card boot mode.
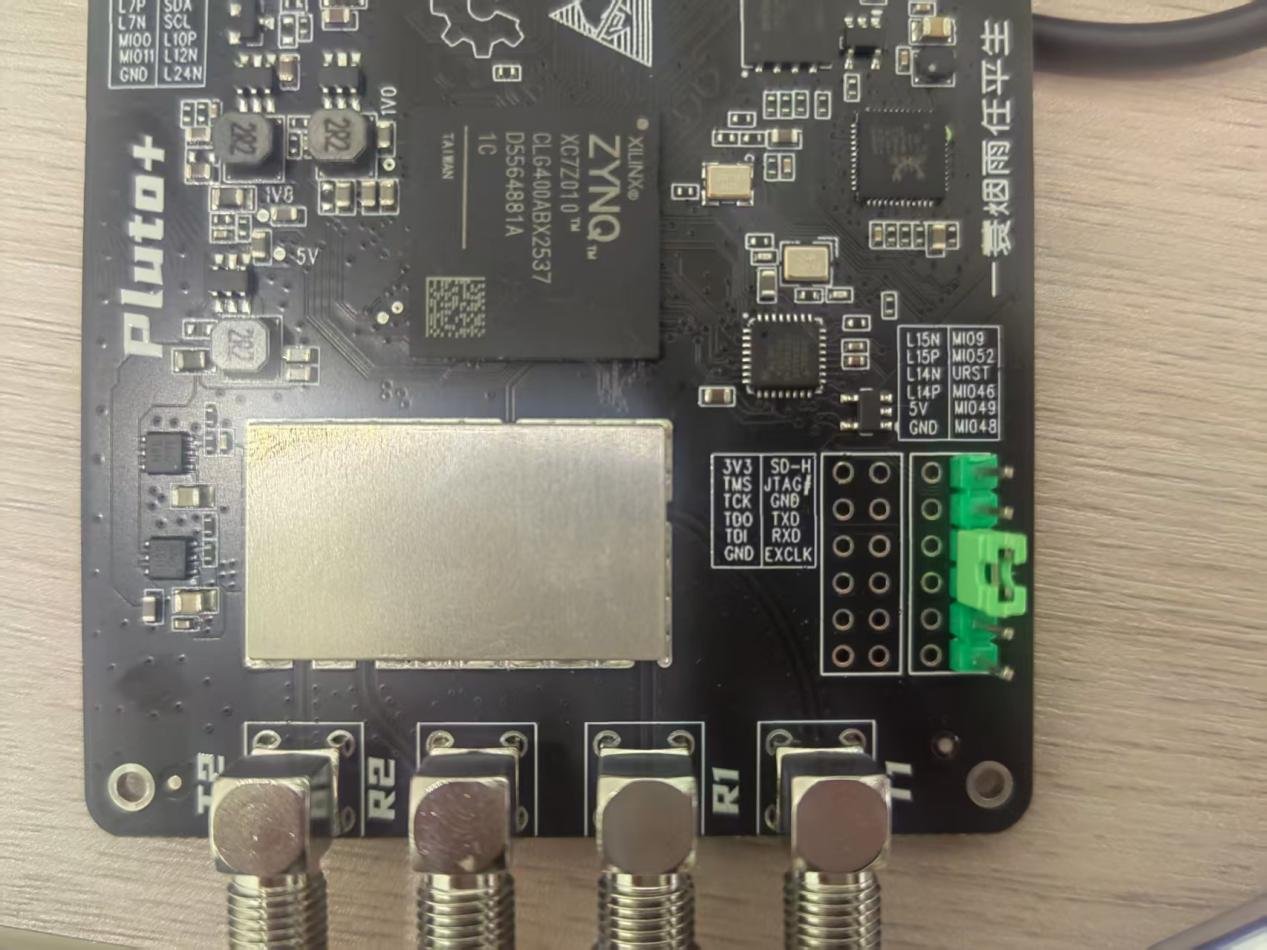
Upgrade AD9363 to AD9361 and configure 2‑transmit 2‑receive mode
Navigate to https://github.com/plutoplus/plutoplus/releases and download the Pluto+ release firmware archive plutosdr‑fw‑v0.33‑3‑gd382‑dirty.zip. Extract the archive and retrieve two files boot.frm and pluto.frm for later use.
Connect the data port and power‑supply port of Pluto+ to your PC with two separate USB cables to realize data communication and independent power supply. After USB connection, wait for a short while; a TEZUKA removable disk drive letter will appear on the computer, and a corresponding COM serial‑port device will show up in Device Manager.
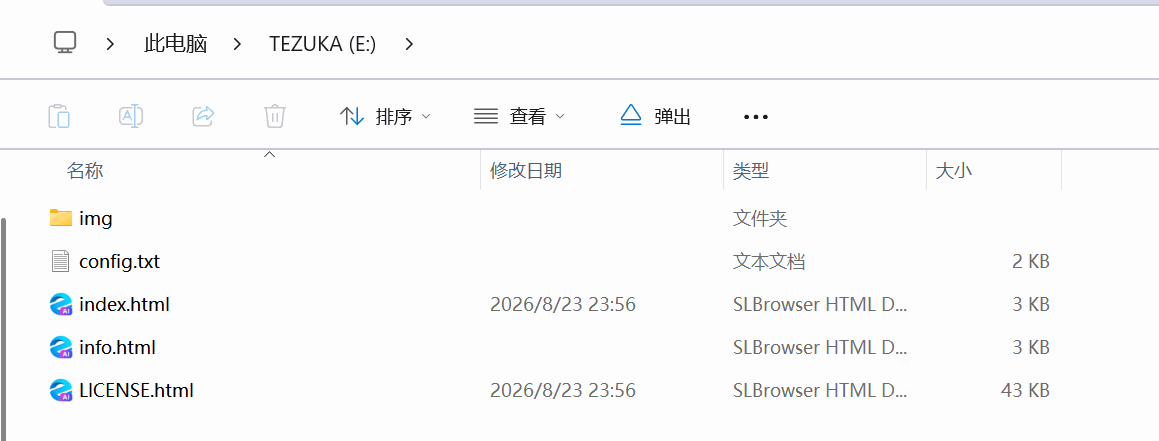
Copy the extracted boot.frm and pluto.frm files to the root directory of the TEZUKA removable disk. After file copying is finished, safely eject the USB device following the procedure shown in the figure. Do not unplug the USB cables of data port and power‑supply port. Cable disconnection will cause firmware update failure.

After safely ejecting the USB device as illustrated in the figure, the LED indicator on Pluto+ will keep flashing, indicating that the firmware update is in progress. The whole update procedure takes approximately 3‑4 minutes, and the LED will stop flashing once completed.
Upon completion of firmware update, the TEZUKA removable disk will reappear on the Windows host.
Next, modify the chip identifier from AD9363 to AD9361. Log into Pluto+ over SSH using PuTTY as described below.
After establishing the SSH connection to Pluto+, execute the following commands sequentially:
fw_setenv attr_name compatible
fw_setenv attr_val ad9361
fw_setenv compatible ad9361
reboot
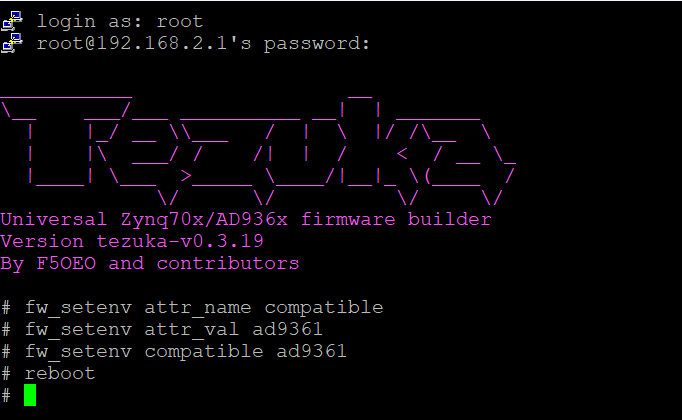
Close the current SSH terminal after issuing the reboot command. Once the device finishes rebooting, re‑establish SSH connection to Pluto+ via PuTTY.
Run the commands below to verify whether the configuration takes effect:
fw_printenv attr_name
fw_printenv attr_val
fw_printenv compatible
fw_printenv mode
fw_printenv maxcpus
cat /proc/cpuinfo
reboot
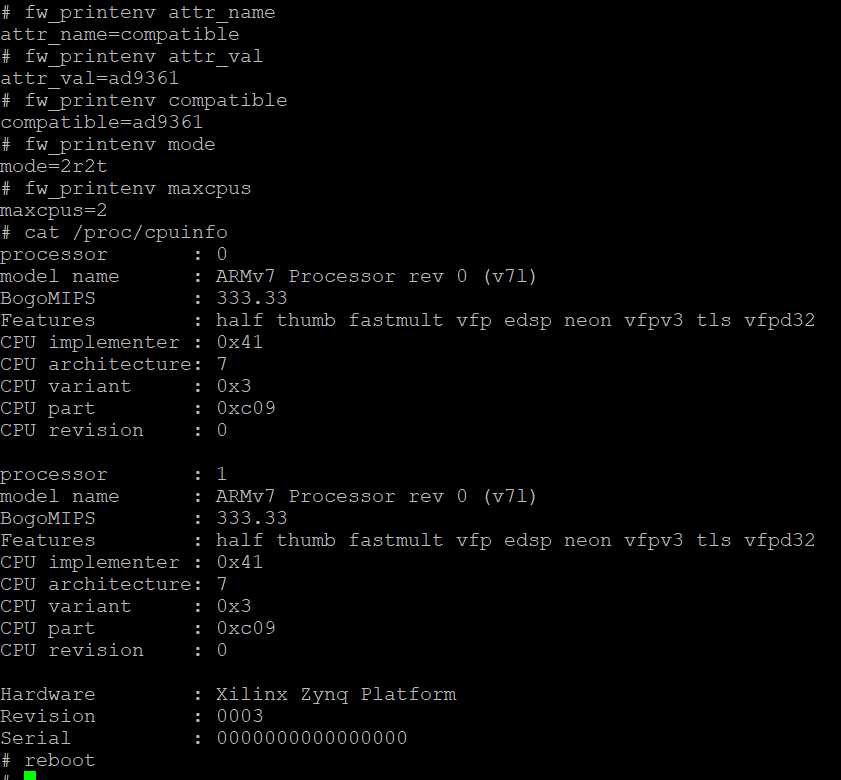
After executing the reboot command, wait approximately 3‑5 seconds for Windows to re‑recognize the TEZUKA removable disk. Re‑plug the device. If the LED indicator blinks normally, the TEZUKA removable disk appears on the PC and the corresponding COM serial‑port device can be found in Device Manager, the 2‑Tx 2‑Rx mode has been successfully configured.
SDRangel Installation and Usage
SDRangel Installation
First, the driver file is included in the resource package. The file is located in the " Software Package " folder. The file name is: sdrangel-7.23.0-win64.exe. Right-click on it. From the context menu that appears, select "Run as administrator". If Windows User Account Control prompts you with a dialog box asking "Do you want to allow this app to make changes to your device?", click "Yes" to proceed.
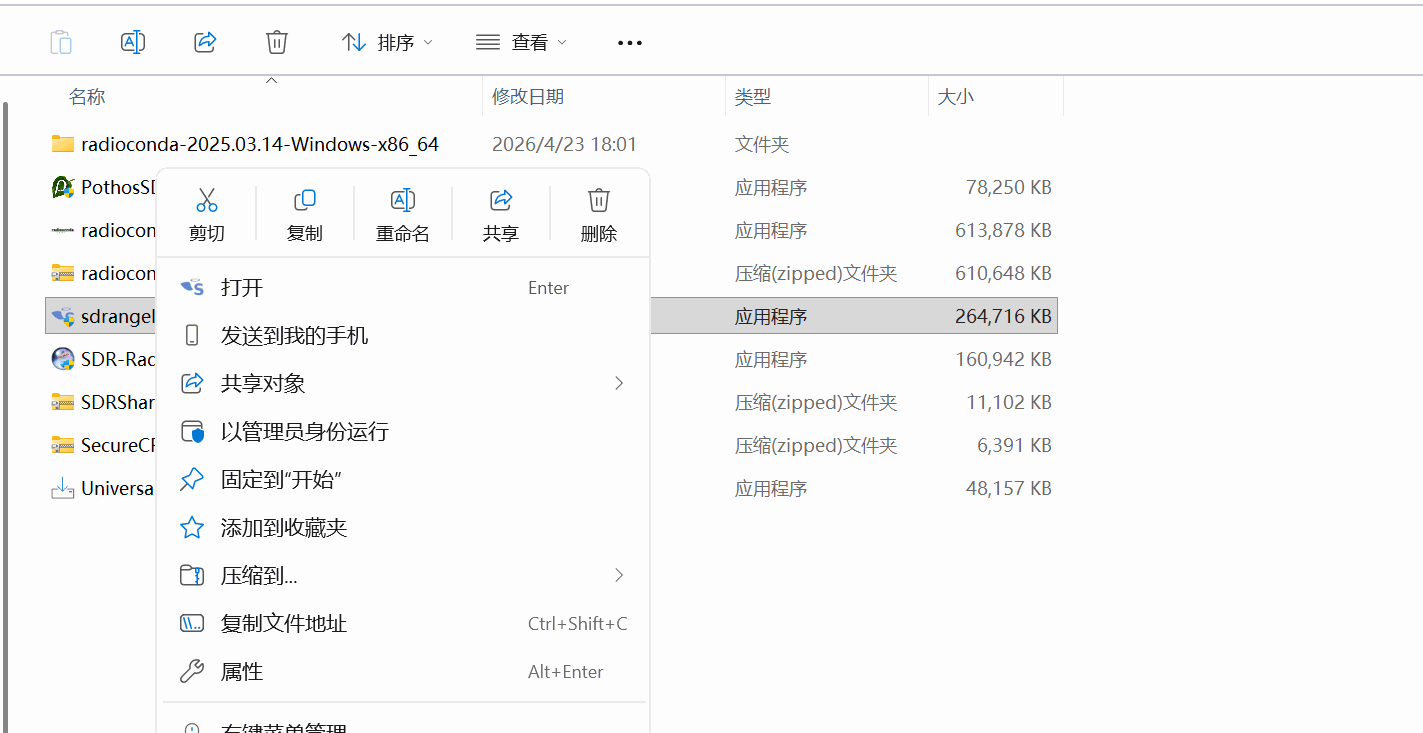
The installation wizard window will now appear. Click the "Next" button to continue. Accept the agreement, and then click "Install".
SDRangel Reception Test
Step 1 Install SDRangel. Run the SDRangel installer from the software package and start the application.
Step 2 Add a receiver. Select Add Receiver and choose PlutoSDR from the device list.
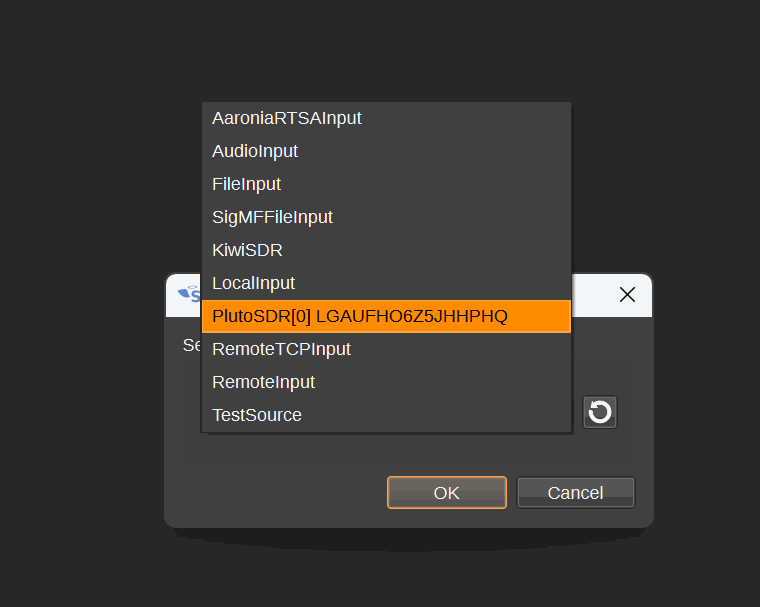
Step 3 Configure the receiver. Start with about 2.5 Msps and a local FM frequency, for example 97.4MHz.
Step 4 Demodulate WFM. Start the device, add Broadcast FM Demodulator, and adjust gain when necessary.
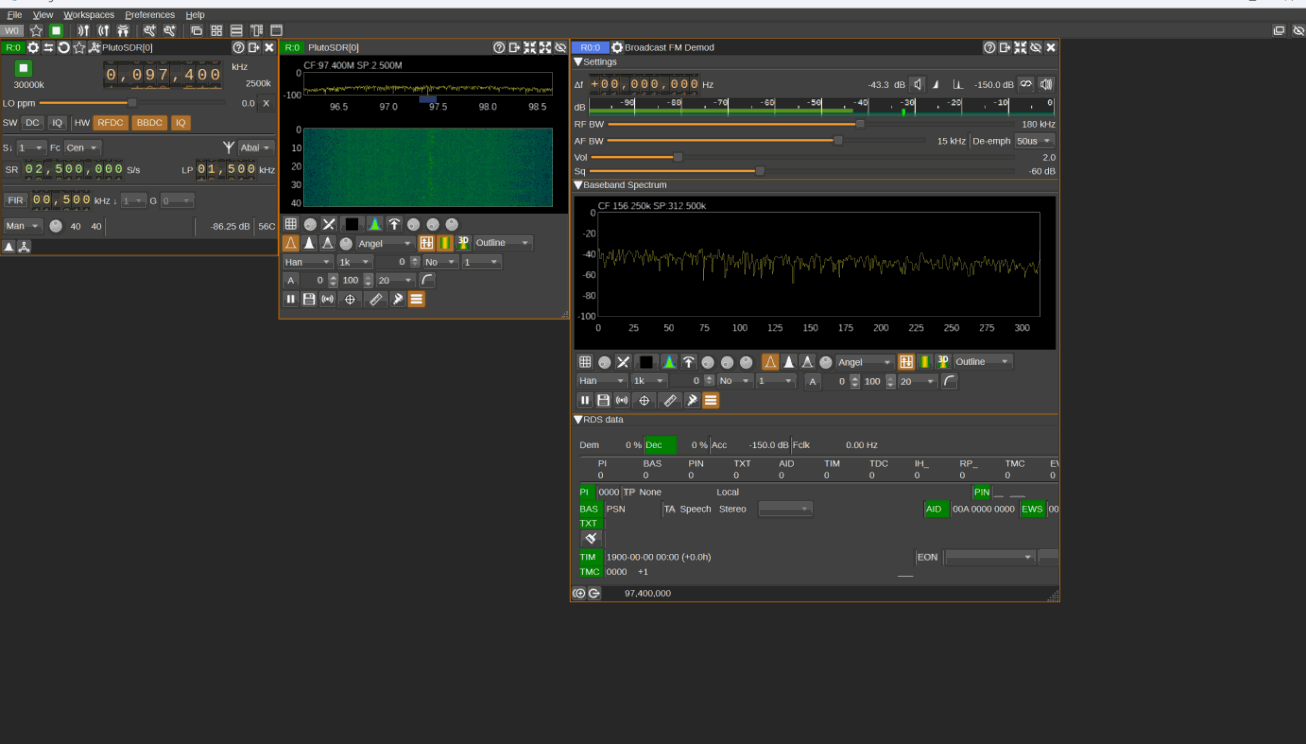
Click the play button. The spectrum and waterfall plot refresh normally, and the selected FM radio broadcast can be heard from the PC loudspeakers.
Universal Radio Hacker (URH) Installation and Usage
Install URH by running the Universal.Radio.Hacker-2.10.0-x64.exe installer. After launching the application, click the "File" menu and then the red "Record" button. In the recording dialog, select "PlutoSDR" as the device and click the green refresh arrow to detect it.
Set the center frequency to your target signal, for instance 103.9 MHz. Set the bandwidth to 2 MHz and the sampling rate to 2.1 MSPS. Adjust the gain as needed, perhaps starting with 25 dB. Click "Start" to begin recording. After 10 to 30 seconds, click "Stop".
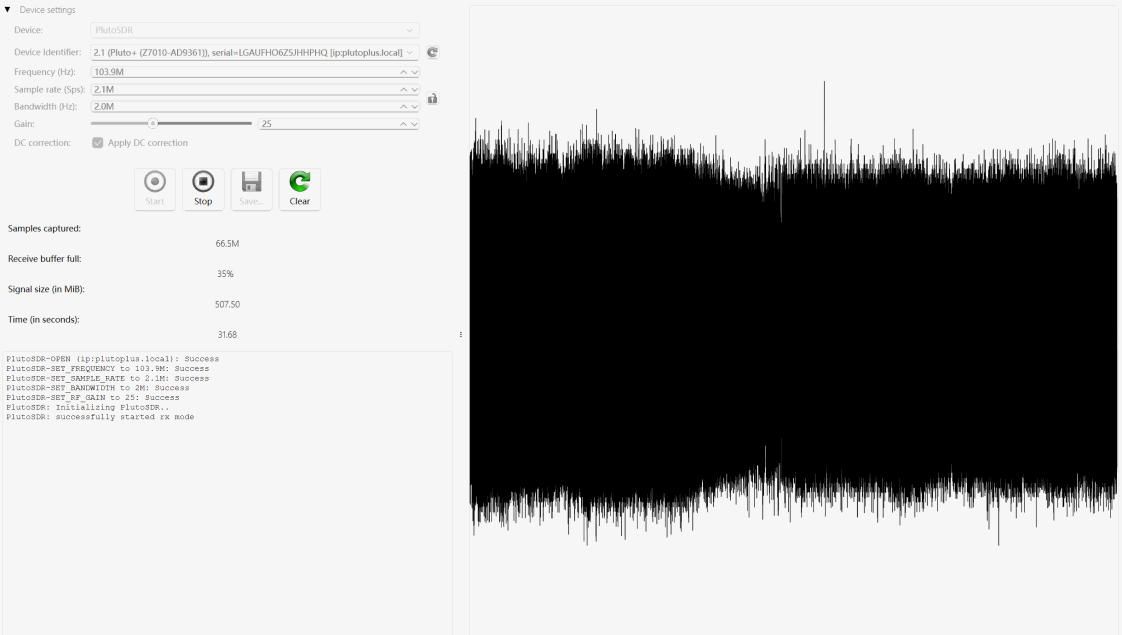
You can now save the recorded IQ data to a file for later analysis or replay.
GNU Radio Usage
GNU Radio is a powerful open-source signal processing framework widely used in SDR application development. Through its graphical interface GNU Radio Companion (GRC), users can build complex wireless communication systems without writing code.
Creating an FM Reception Flowgraph in GNU Radio
Step 1 Add PlutoSDR Source. Drag PlutoSDR Source onto the GNU Radio Companion canvas.
Step 2 Build the WFM chain. Connect PlutoSDR Source to WBFM Receive and then to Audio Sink. Match the WBFM Quadrature Rate to the upstream sample rate.
Step 3 Set parameters. Set the center frequency to 103.9 MHz, the sample rate to 2.4 MHz, and set the sample rate of the Audio Sink block to 96 kHz.
Step 4 Make connections. Connect the output of the PlutoSDR Source block to the input of the WBFM Receive block, then connect its output to the Audio Sink block.
Step 5 Run and observe. Save the flowgraph and execute it.
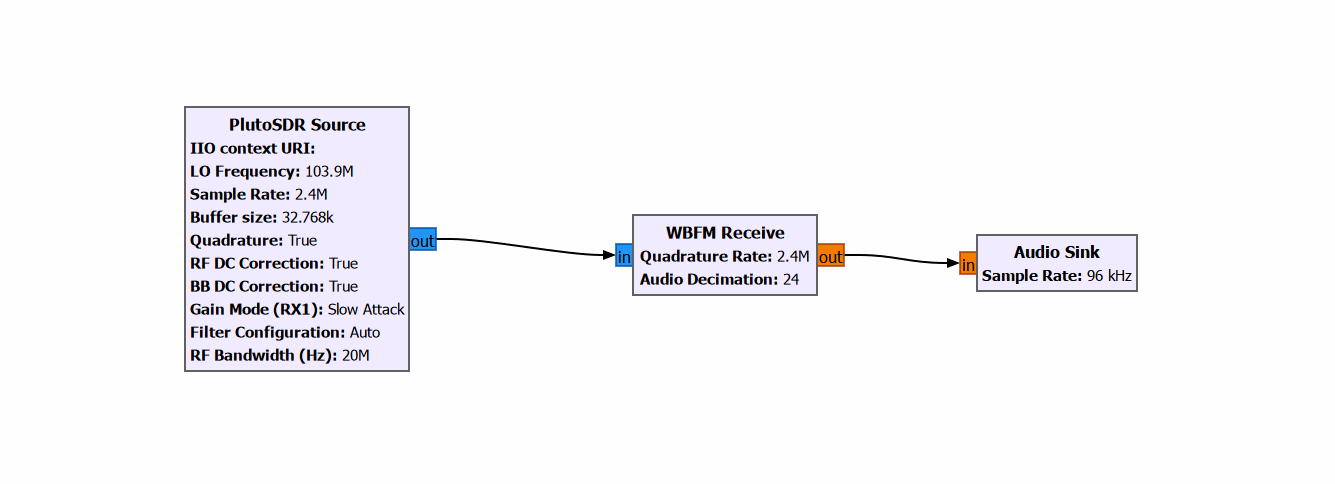
Save the flowgraph and click the "Execute" button. After a few seconds of compilation, you should hear the FM station through your computer's speaker.
Verification of Pluto+ Dual‑Receive Channels (RX1/RX2)
Use GNU Radio to simultaneously read the dual‑channel received data from RX1 and RX2 of the Pluto+, and verify that both receive functions are correctly enabled under the 2‑transmit‑2‑receive (2T2R) mode.
Connect two antennas to the RX1 and RX2 ports of the Pluto+ respectively. Add the FMComms2/3/4 Source block and two QT GUI Frequency Sink blocks.
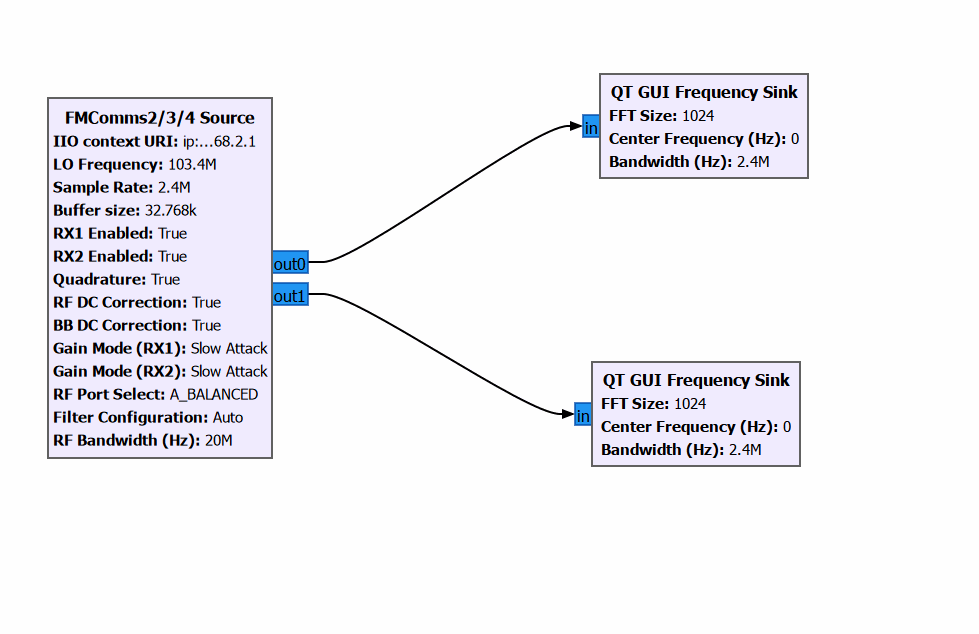
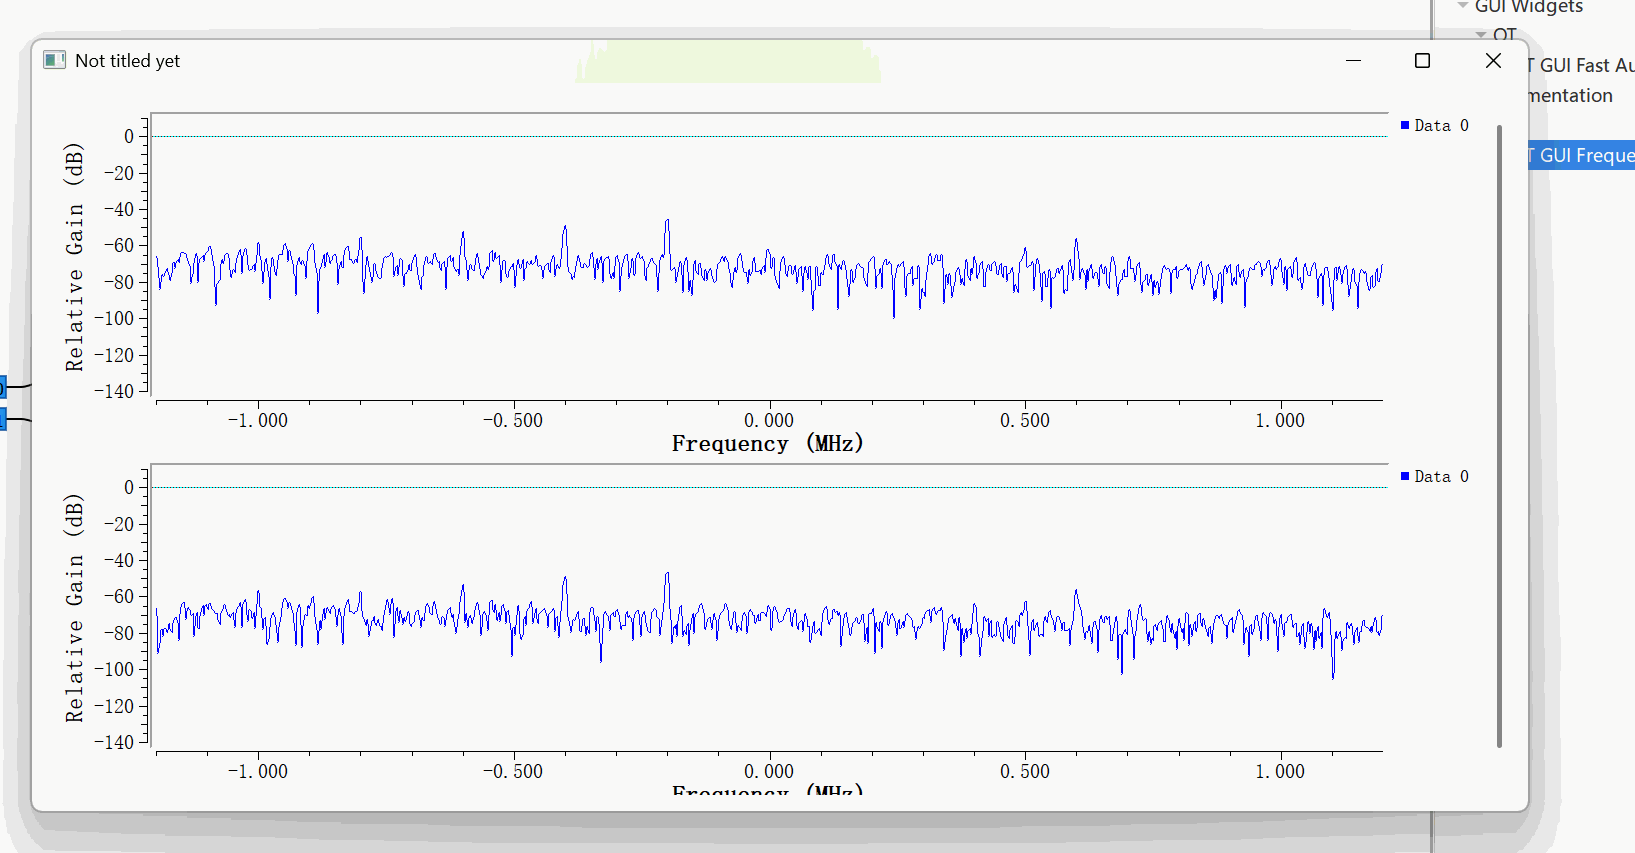
Start the GNU Radio flowgraph and observe the two spectrum windows. Both the RX1 and RX2 windows shall show an energy peak for the 103.9 MHz broadcast signal at approximately +0.5 MHz. When the RX1 antenna is removed, the target peak decreases significantly only in the RX1‑associated window. When the RX2 antenna is removed, the target peak decreases significantly only in the RX2‑associated window. The corresponding peaks shall recover once the antennas are re‑connected.
DFU Firmware Update
Fault symptom: If the LED lights up briefly and then turns off immediately after removing the SD card, the device fails to boot normally. In this case, DFU firmware update is required for repair.
Normal‑state and Bricked‑state Device Identification
Under normal circumstances, when Pluto+ is connected to a Windows PC, open Device Manager and two devices shall be observed:
1. Under Ports (COM & LPT): PlutoSDR Serial Console
2. Under Network adapters: PlutoSDR USB Ethernet/RNDIS Gadget
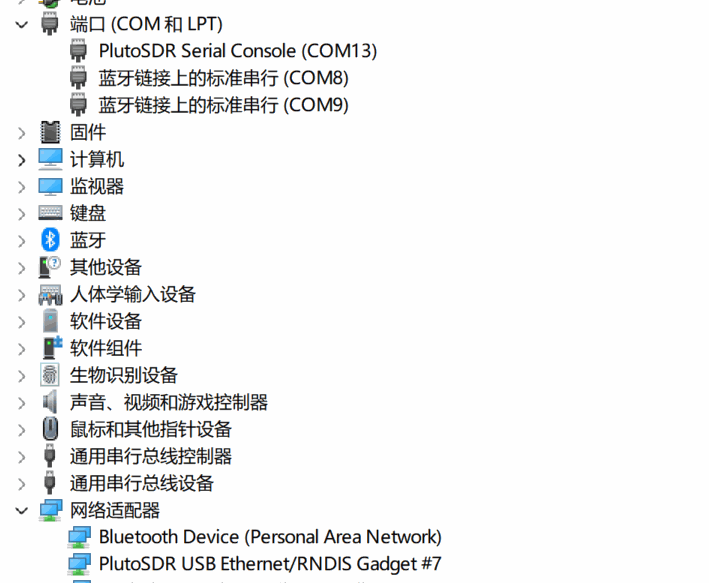
If the device becomes bricked due to failed firmware flashing or improper usage, the serial‑port and network‑adapter devices will disappear after USB re‑connection. Instead, USB download gadget appears under Universal Serial Bus controllers. This indicates the firmware cannot boot normally.
DFU‑mode Jumper Configuration and Firmware Recovery
1. Pre‑check
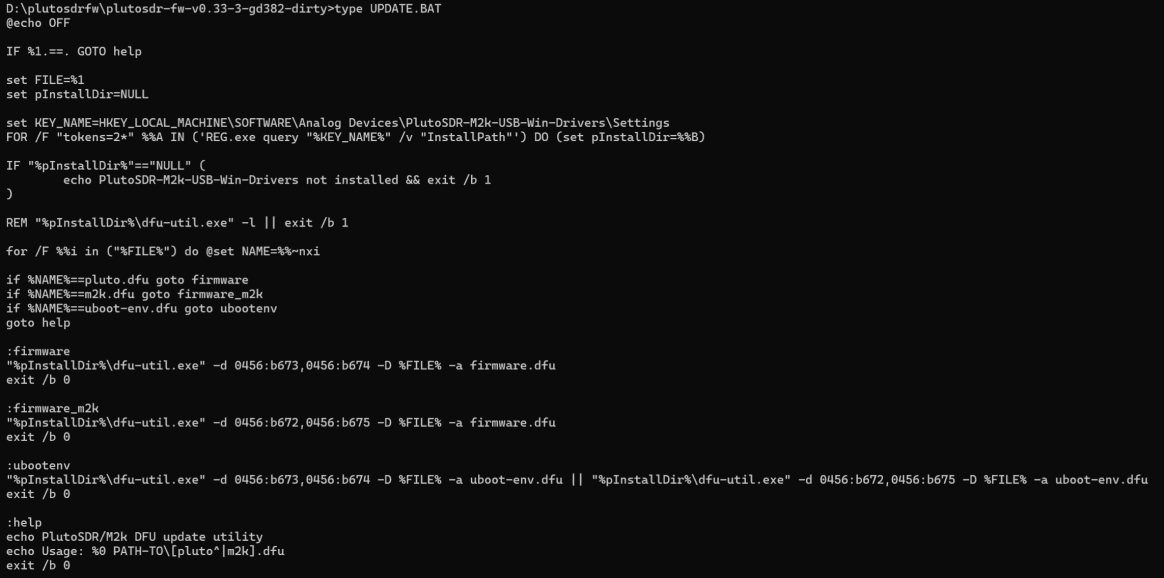
Execute type UPDATE.BAT in the firmware tool directory. The flashing script for pluto.dfu only supports DFU devices with hardware IDs 0456:B673 or 0456:B674.
2. DFU Flashing Procedure under the Default Jumper Setting
Set the jumper cap to factory‑default URST‑MIO46, then connect the device to the PC via the DATA port. Observe Windows Device Manager for the following states:
- Pluto serial port and USB network adapter are detected: firmware operates normally, no recovery is required.
- USB download gadget appears: firmware boot failed, but the download interface is available. Verify the hardware ID.
- No device change after USB re‑plug: USB data link or onboard hardware fault. Check the USB cable, DATA port and PC USB port.
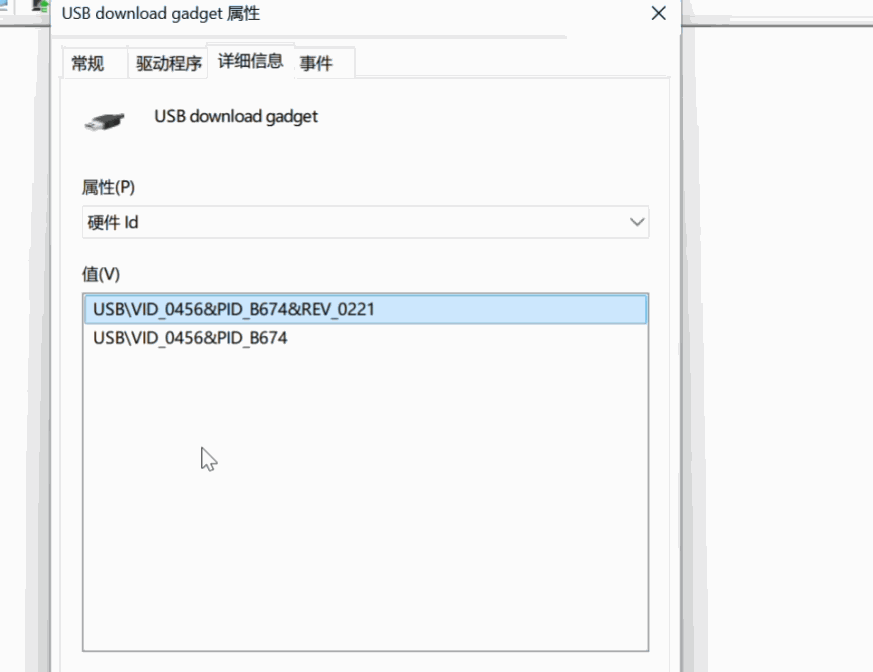
When USB download gadget is present: Right‑click the device → Properties → Details → Hardware Ids. If the hardware ID is USB\VID_0456&PID_B674 or USB\VID_0456&PID_B673, keep the jumper cap at URST‑MIO46. Then run the commands below.
Open the CMD terminal in the firmware tool directory and execute:
UPDATE.BAT uboot-env.dfu
UPDATE.BAT pluto.dfu
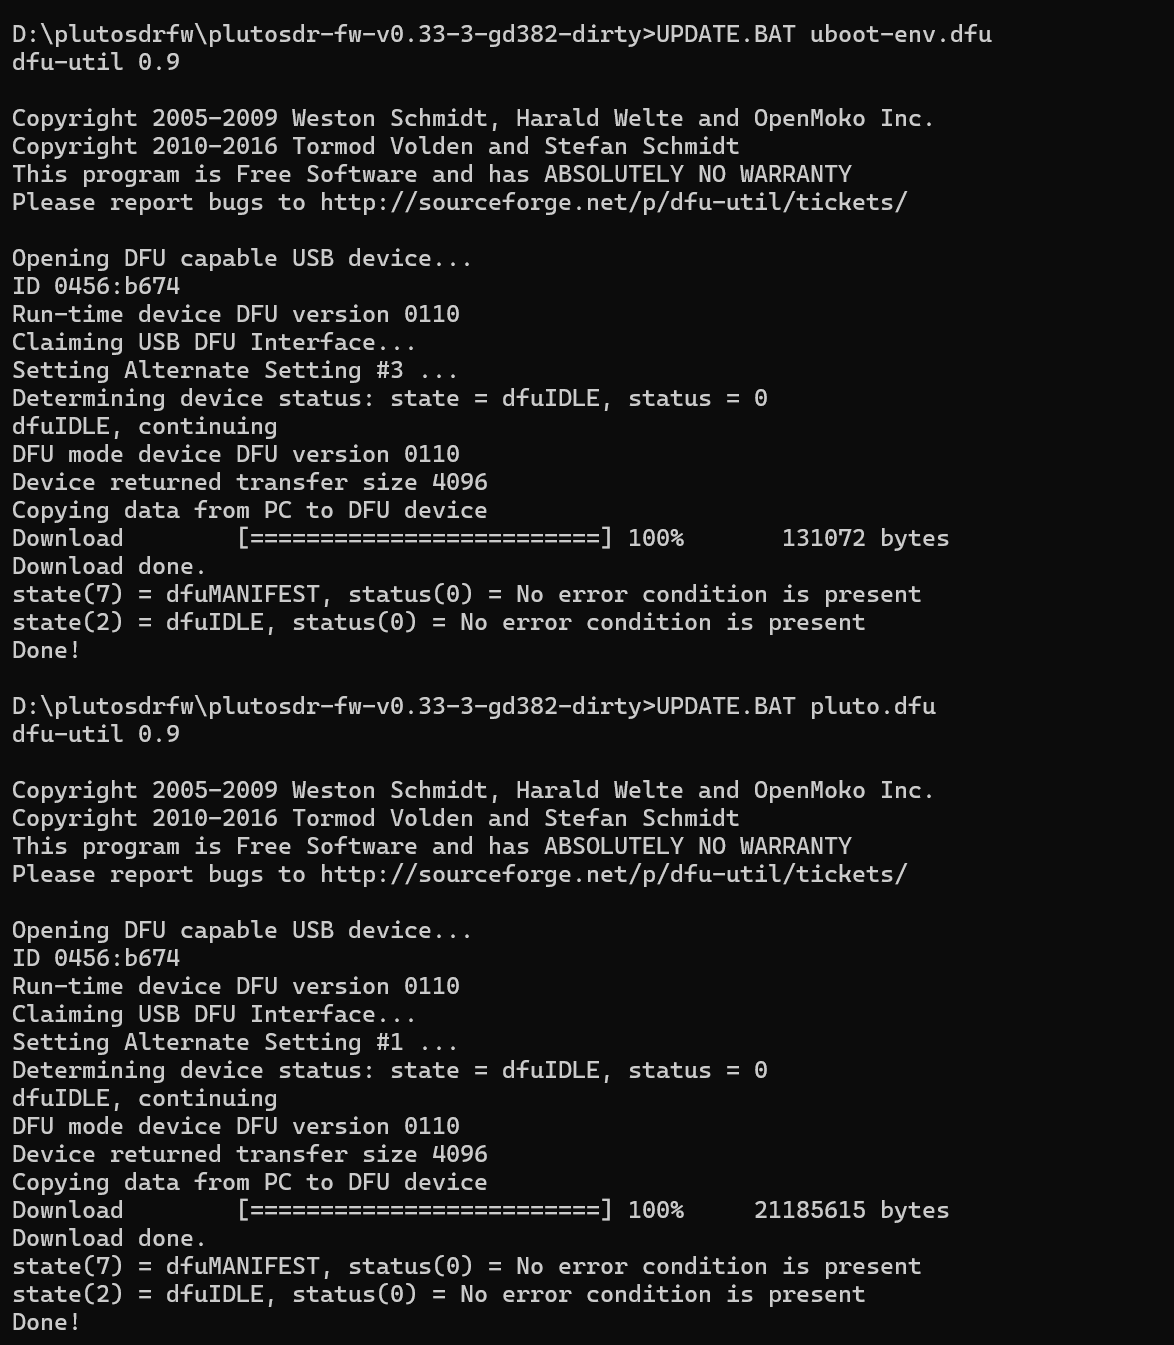
The first command programs boot partition; the second command programs main system partition.
After completion, disconnect USB. Restore jumper cap back to factory setting URST‑MIO46.
Power‑on and reconnect USB. Serial port and virtual Ethernet adapter reappear, recovery finished.
3. Manual DFU‑mode Jumper Operation
If no valid DFU interface is available under the URST‑MIO46 configuration, power off the device completely. Relocate the jumper cap to URST‑MIO52, hold down the DFU button, connect the USB cable to the DATA port, and release the DFU button after approximately 3 seconds. Confirm that the DFU device is enumerated in Windows Device Manager. Even if a device is detected under URST‑MIO52, the hardware ID must be verified. Do not run UPDATE.BAT from this firmware package if the ID is not 0456:B673 / 0456:B674.
Open the CMD terminal in the firmware tool directory and execute:
UPDATE.BAT uboot‑env.dfu
UPDATE.BAT pluto.dfu
Ubuntu System Usage Tutorial
This guide walks through the complete Ubuntu deployment of Pluto+: driver & dependency installation, SoapySDR & SoapyPlutoSDR compiling‑installation, device verification, SDR receiver setup (SDRangel, Gqrx) and FM radio reception test.
Hardware Checklist
| Item | Requirement |
|---|---|
| Pluto+ unit | Confirm that the enclosure, LEDs, and ports are intact. |
| DATA cable | Connects the DATA port to the PC for data and virtual‑network communication. |
| RX1 antenna | Use RX1 for the initial FM reception exercise. |
Connection Procedure
Step 1 Connect the DATA port. Use a USB data cable to connect the DATA port to the computer.
Step 2 Wait for USB enumeration. Before the driver is compiled and installed, Ubuntu cannot identify the Pluto+ hardware normally.
Ubuntu Software Checklist
| Software / Library | Purpose |
|---|---|
| git, cmake, g++ | Source code pull‑down, compiling environment |
| libiio‑dev, libiio‑utils | IIO device underlying library and command‑line tool |
| libboost‑all‑dev, libusb‑1.0‑0‑dev | Compile dependency libraries |
| SoapySDR | SDR hardware abstraction layer framework |
| SoapyPlutoSDR | Pluto+ SoapySDR driver plugin |
| SDRangel / Gqrx | SDR spectrum software for FM demodulation test |
Driver Installation Procedure
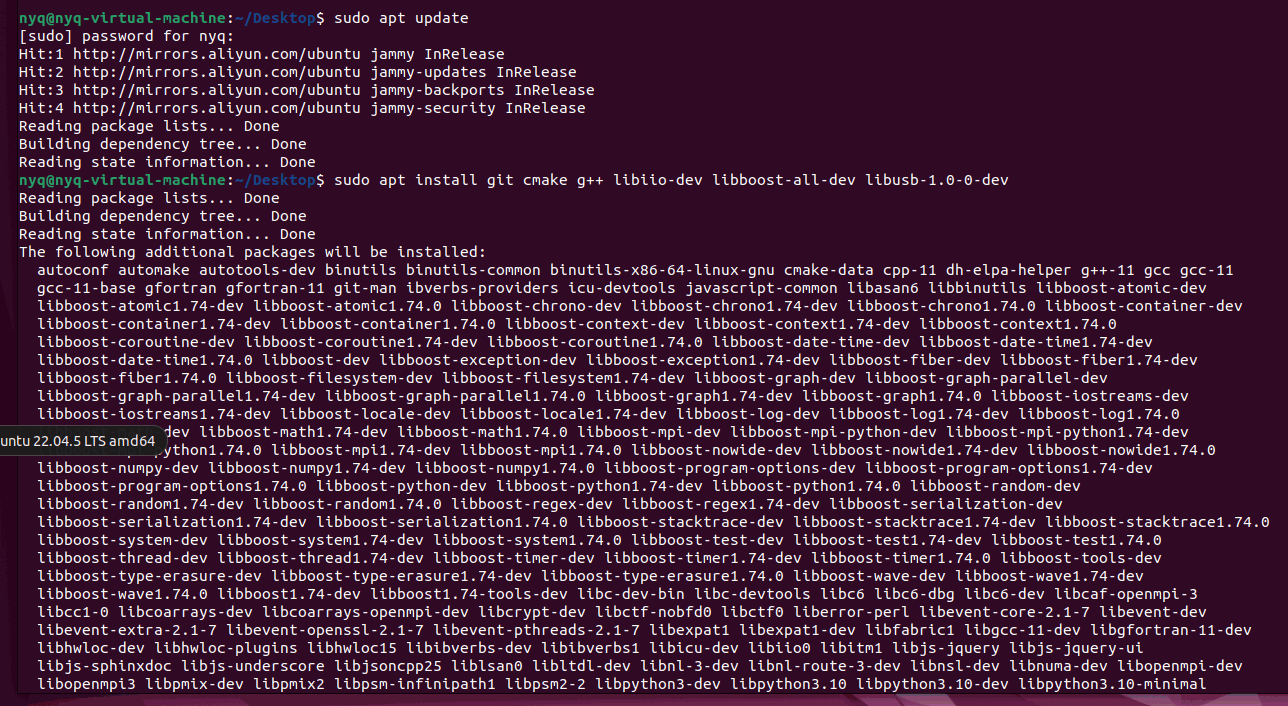
Step 1 Open terminal, update package index and install base dependencies
sudo apt update
sudo apt install git cmake g++ libiio-dev libboost-all-dev libusb-1.0-0-dev
sudo apt install libiio-utils
Wait several minutes for packages installation to finish.
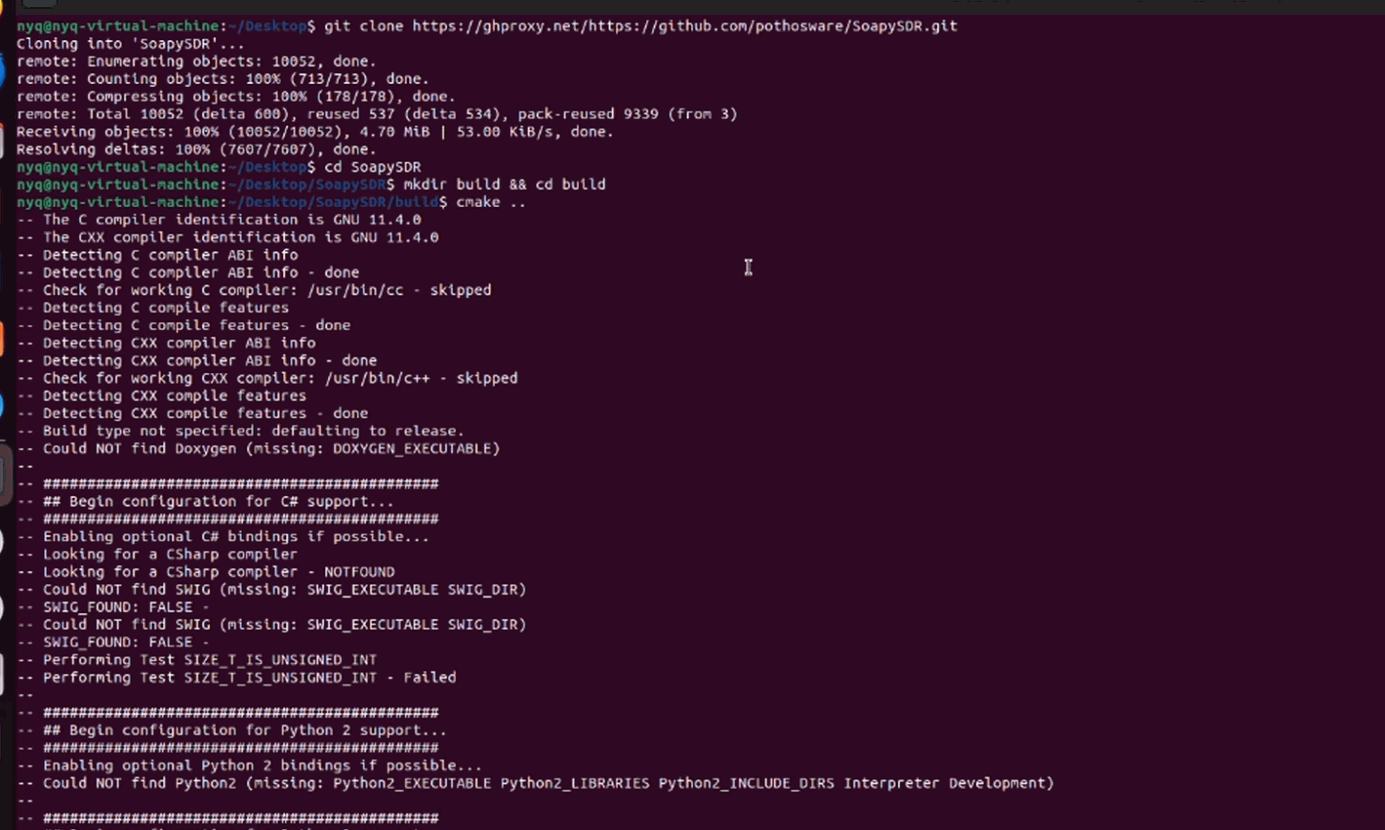
Step 2 Clone SoapySDR source code from GitHub, compile and install
git clone https://github.com/pothosware/SoapySDR.git
cd SoapySDR
mkdir build && cd build
cmake ..
make -j$(nproc)
sudo make install
Step3 Refresh dynamic library cache, verify SoapySDR installation
sudo ldconfig
SoapySDRUtil -info
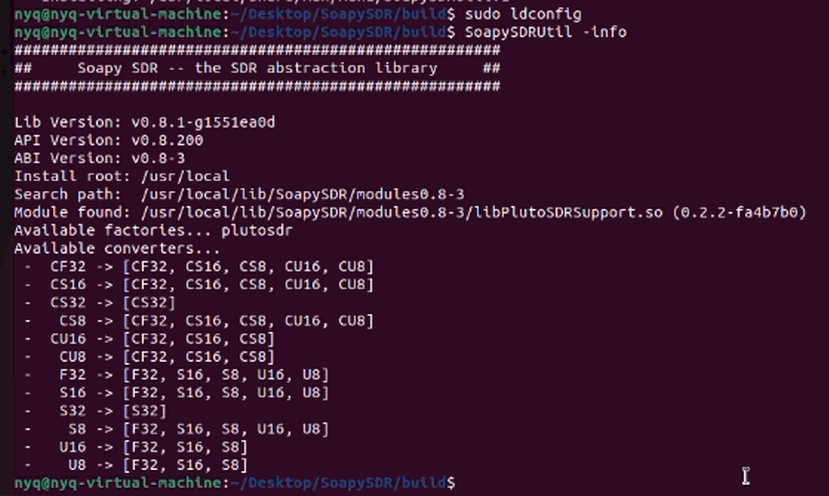
After success, the SoapySDR version and plugin search path will be printed on terminal.
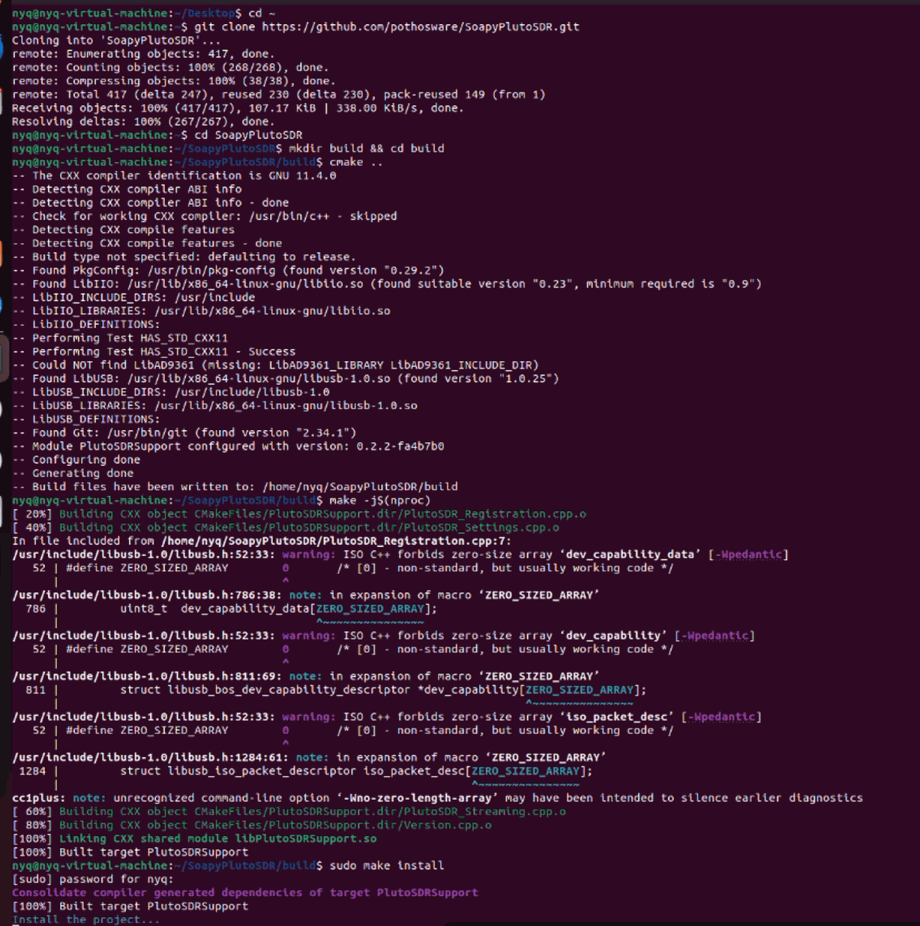
Step4 Clone, compile and install SoapyPlutoSDR plugin
cd ~
git clone https://github.com/pothosware/SoapyPlutoSDR.git
cd SoapyPlutoSDR
mkdir build && cd build
cmake ..
make -j$(nproc)
sudo make install
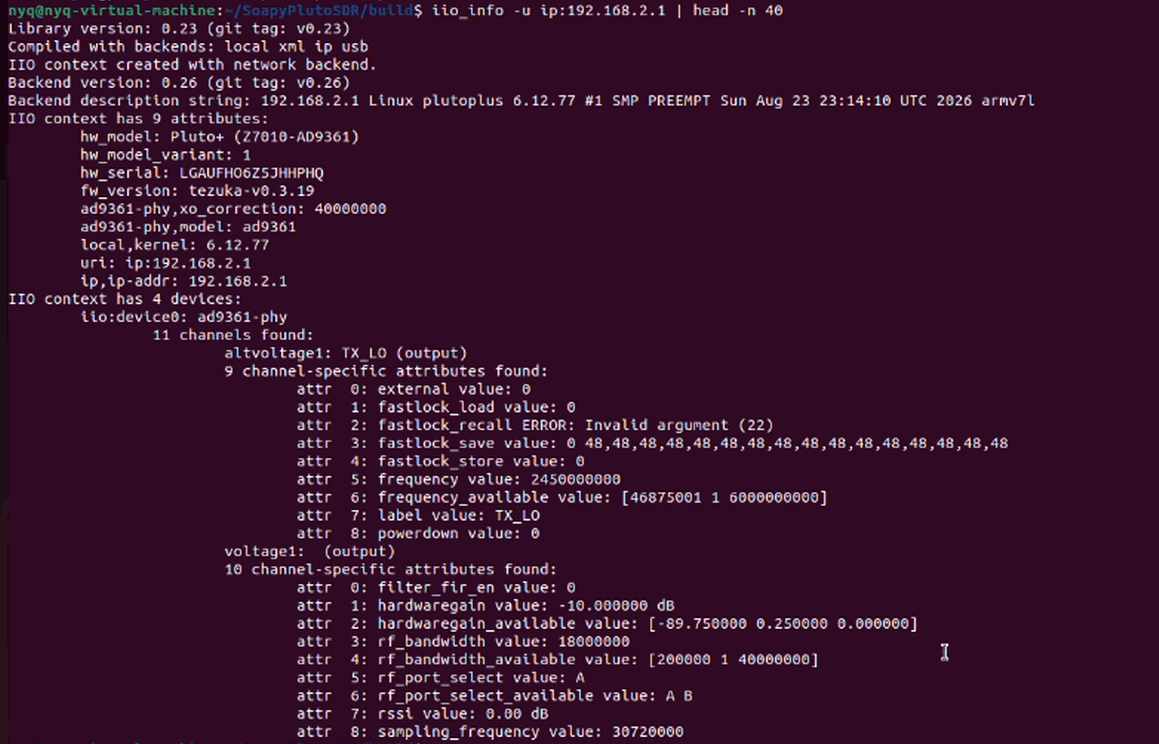
Step5 Hardware connectivity verification
Test network connectivity to Pluto+ default IP
ping -c 3 192.168.2.1

Read Pluto+ hardware IIO information
iio_info -u ip:192.168.2.1 | head -n 40
Probe Soapy PlutoSDR driver status
SoapySDRUtil --probe="driver=plutosdr,hostname=192.168.2.1"
Acceptance criteria: Terminal outputs complete PlutoSDR hardware information, RF channel description, no connection error report.
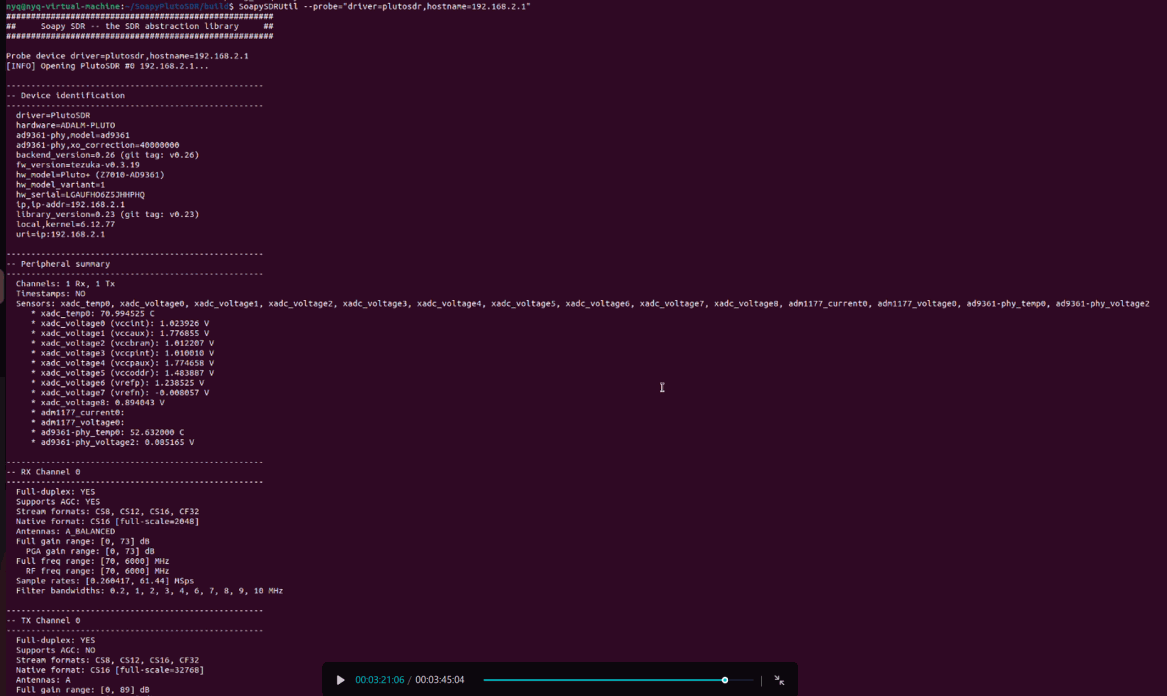
SoapySDRUtil --probe="driver=plutosdr,hostname=192.168.2.1" invokes the locally‑compiled SoapyPlutoSDR.so driver plugin. As an upper‑layer SDR abstraction wrapper, it does not directly read the low‑level hardware status. Even if 2‑receive‑2‑transmit hardware mode has been enabled in the Pluto+ device firmware, the probe result will still show 1 Rx ‑ 1 Tx without the mandatory parameter, because the vanilla SoapyPlutoSDR is not adapted to the dual‑channel implementation logic of the Tezuka firmware.
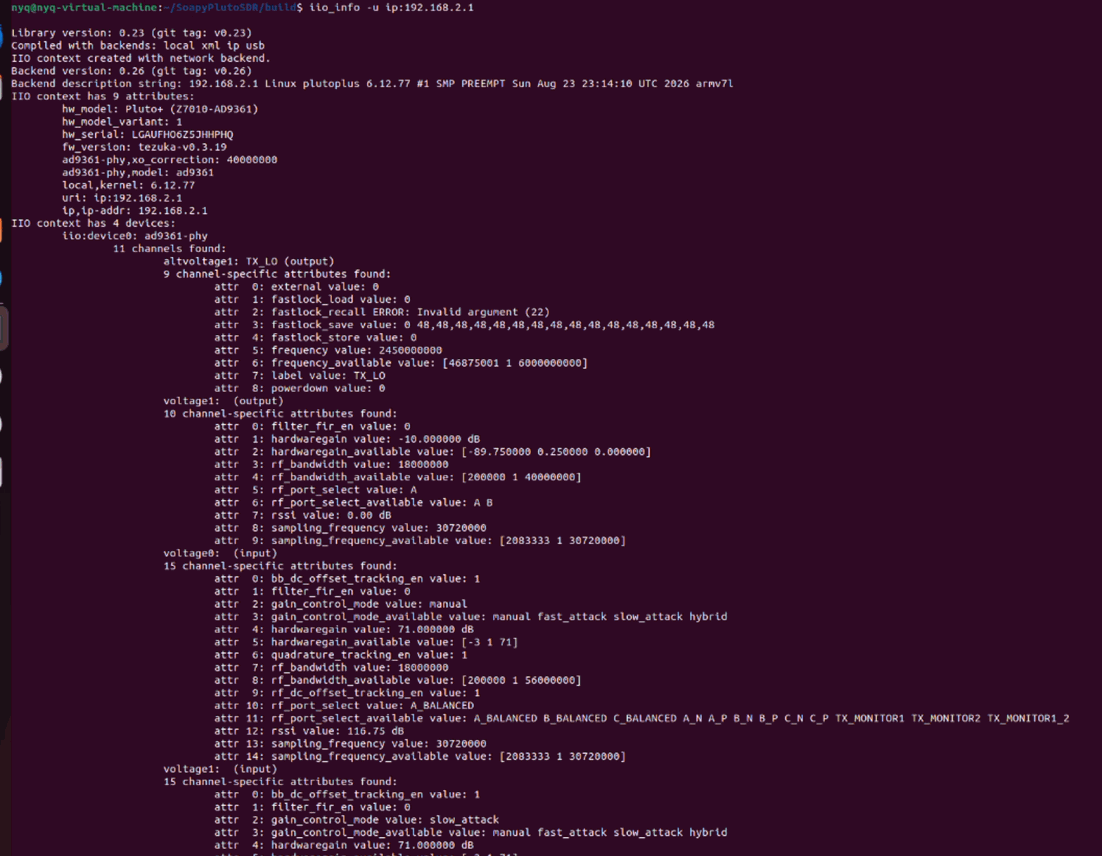
If you want to view the real hardware‑device information from the firmware side, run the command: iio_info -u ip:192.168.2.1
Note: This command communicates directly with the IIO low‑level framework of the Pluto+ device. It is not affected by the logic of the Soapy driver plugin on the host PC, and its output reflects the genuine hardware status reported by device firmware.
Install SDRangel and FM radio reception test
SDRangel Installation
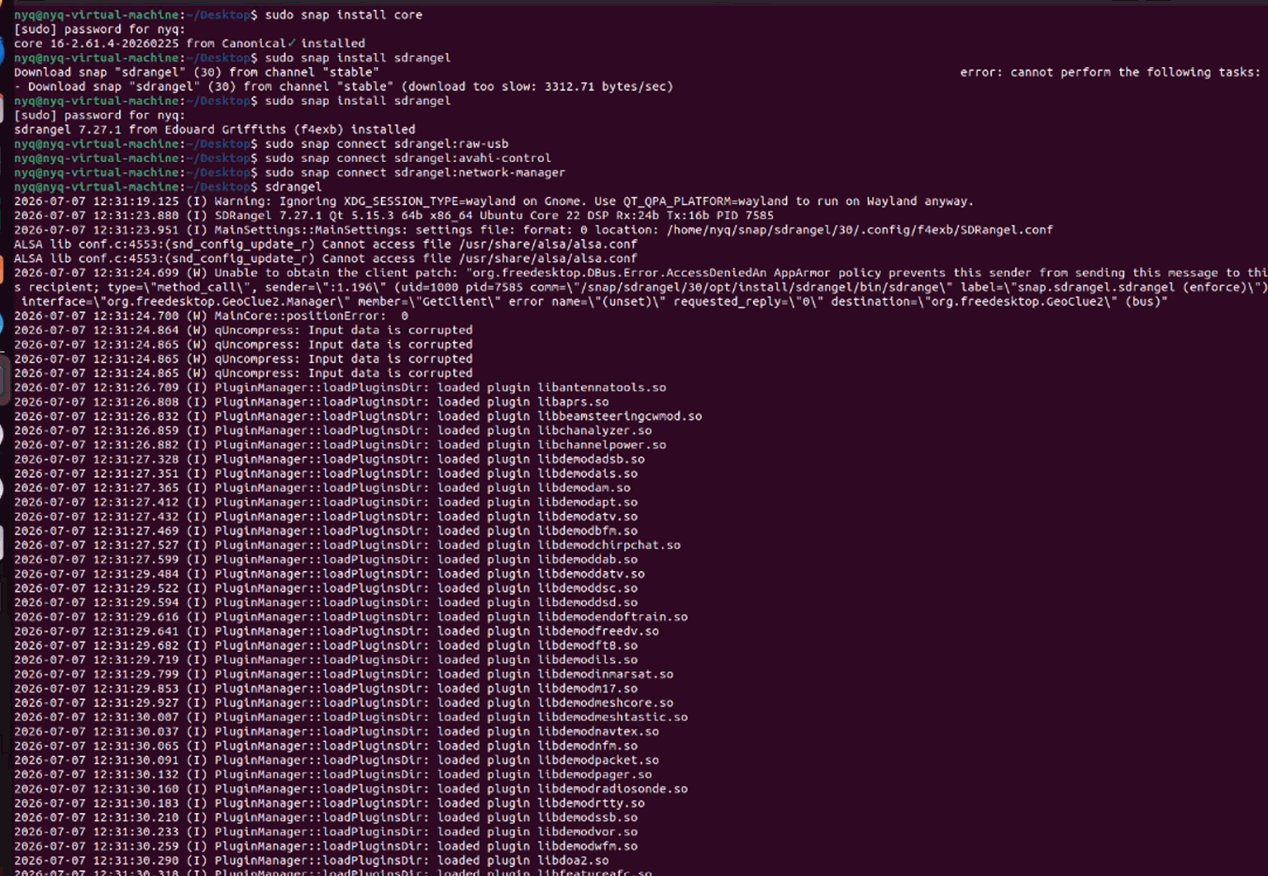
We use snap to install SDRangel under Ubuntu.
Step1 Install snap core and sdrangel package
sudo snap install core
sudo snap install sdrangel
Step2 Snap software has restricted permissions by default, execute following commands to grant hardware‑access permissions
sudo snap connect sdrangel:raw-usb
sudo snap connect sdrangel:avahi-control
sudo snap connect sdrangel:network-manager
sudo snap connect sdrangel:hardware-observe
Step3 Fix possible dependency broken
sudo apt --fix-broken install
Step4 Launch SDRangel
sdrangel
SDRangel FM Reception Test
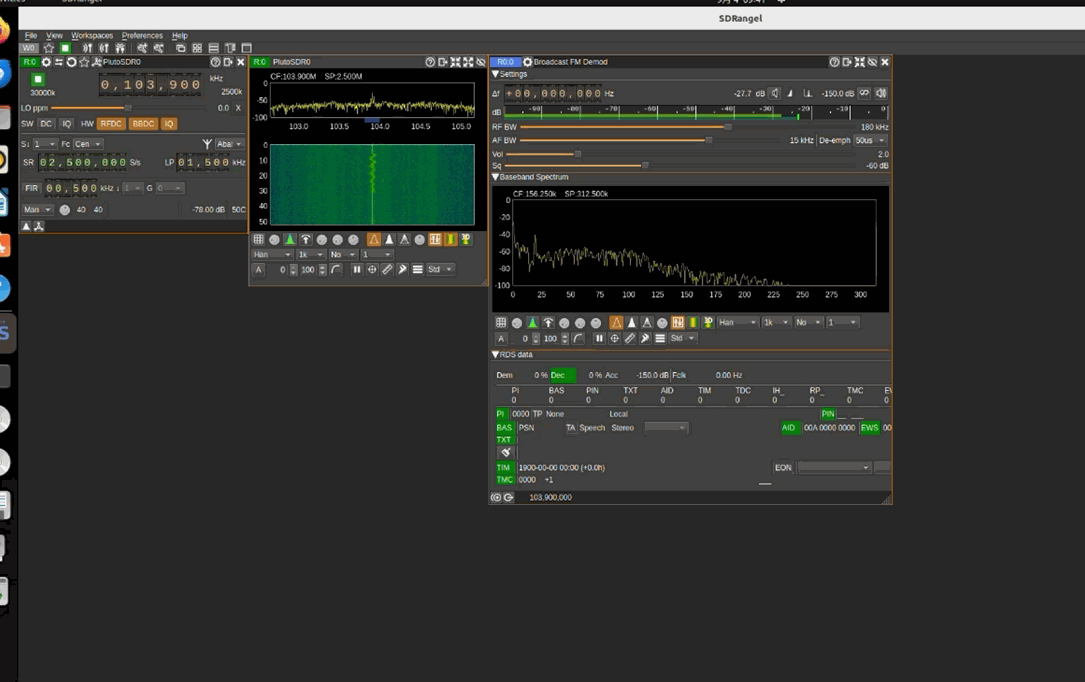
Step1 Hardware connection: USB cable connects Pluto+ DATA port to PC, antenna is connected to RX1 port.
Step2 Inside SDRangel software, click add receiver, select PlutoSDR device from list.
Step3 Receiver parameter configuration
Center frequency: set to local FM station frequency, example: 103.9 MHz
Sample rate: 2.5 MHz
Step4 Click purple triangle start button to activate receiving stream.
Step5 In Channels panel click + button, add Broadcast FM Demodulator block.
Step6 Adjust audio volume, you can hear local FM broadcast sound.
Install Gqrx and FM radio reception test
Gqrx Installation
Step1 Install system dependency libfuse2 for AppImage execution
sudo apt update
sudo apt install libfuse2
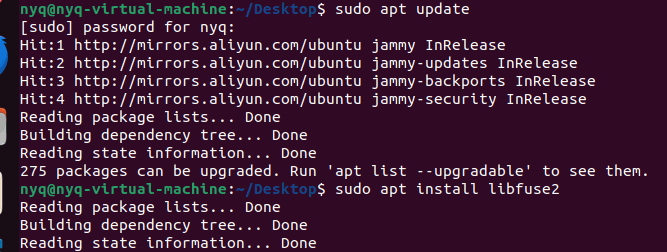
Step2 Go to official release page: https://github.com/gqrx-sdr/gqrx/releases , download Gqrx‑2.17.7‑x86_64.AppImage binary file.
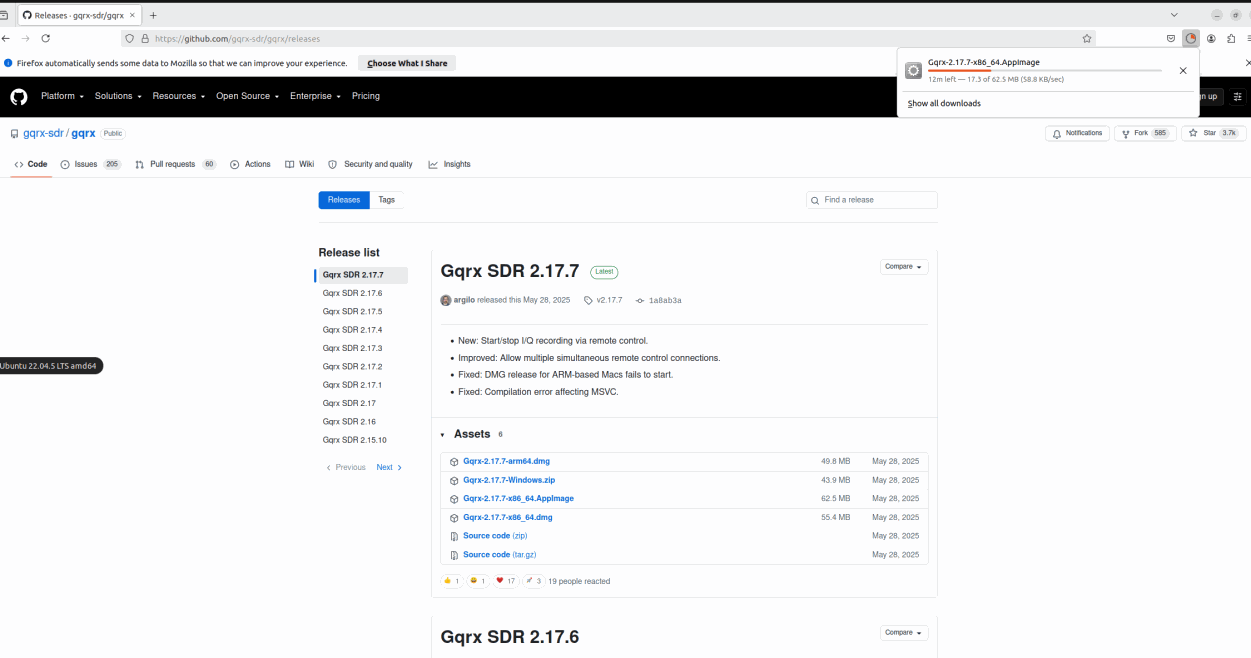
Step3 Move downloaded AppImage file into ~/Desktop/apps folder. Open terminal and enter this directory:
cd ~/Desktop/apps
Note: Modify path if your file stores in other directory.
Step4 Grant executable permission for AppImage
chmod +x Gqrx-2.17.7-x86_64.AppImage
Step5 Create global system symbolic link for quick launch
sudo ln -sf $HOME/Desktop/apps/Gqrx-2.17.7-x86_64.AppImage /usr/bin/gqrx
After configuration finished, you can launch gqrx directly input gqrx inside terminal.

Gqrx FM Reception Test
Step1 Hardware connection: USB cable connects Pluto+ DATA port to PC, antenna connect to RX1 port.
Step2 Launch Gqrx. Open I/O device configure window.
If PlutoSDR appears in device dropdown list, select PlutoSDR.
If device cannot be auto‑detected: select Other in Device dropdown, fill device string field with ip:192.168.2.1, click OK.
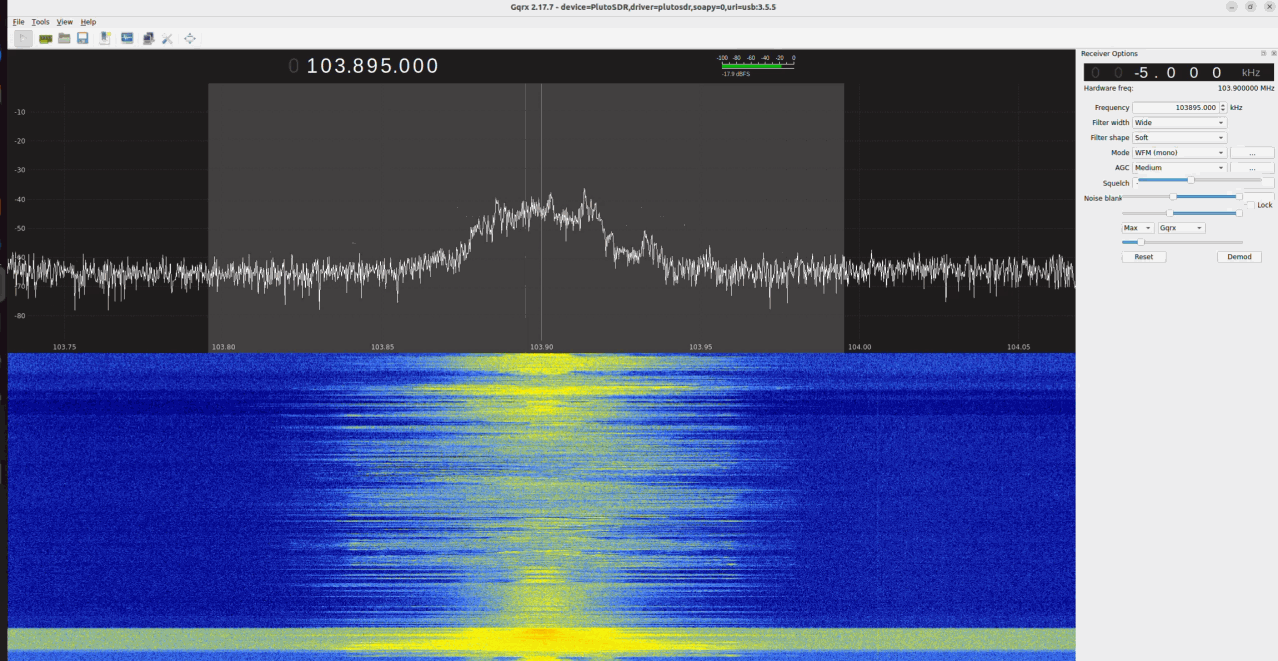
Step3 Receiver parameter configuration
Frequency: input local FM broadcast frequency, example 97400.000 kHz (equal to 97.4 MHz)
Filter width: select Wide
Demodulation Mode: choose WFM (mono) wideband mono FM demodulation.
Step4 Click play button to start receiving, adjust audio volume to listen FM radio broadcast.
Reference
https://www.rtl-sdr.com/adalm-pluto-sdr-unboxing-and-initial-testing/
https://wiki.analog.com/university/tools/pluto/drivers/windows
https://github.com/analogdevicesinc/plutosdr-m2k-drivers-win/releases
https://wiki.analog.com/university/tools/pluto/prerequisites